Pages

Showing posts with label Jen's Sweet Temptations CT. Show all posts

Sunday, January 22, 2012

Cuties


For this tutorial you will need the following:

Paint Shop Pro, I am using PSP X, you should be able to use any version.

Tube of choice, I am using the artwork of Lilith Morana,which you need a license to use. You can get it at AIL, here.

Scrap kit of choice. I am using a PTU kit, Resolutions by Jen's Sweet Temptations, which you can find here.

Font of choice, I am using Zebra.

Plugins: Xero Fritillary


Just remember that my choices of papers and elements is just a suggestion, change it up and make it yours! You don't have to follow mine exactly.


Let's get started!

Open a new canvas 650 x 650 white background.

Open paper 9. Set your preset shape tool on elipse.

On your color palette, click on the colored box and go to patterns. Find the paper in the menu and click on it. Angle should be 0 and scale 100%. Set your foreground to white, line style solid, width 10. Now draw out a largish circle in the middle of your canvas.

Objects, align, center in canvas, Convert to raster layer. Take your magic wand and click in the white border. Ajust, add/remove noise, add noise monochrome and uniform checked 100%

Deselect, add a drop shadow. Duplicate.

Adjust blur, gaussian blur, 40. Apply Xero Fritillary, change the variation to 30. Resize by 110%

Open ribbon 2, copy and paste as a new layer, arrange near the bottom of the circle, add a drop shadow. If necessary, take the eraser and erase the bits hanging over the frame.

Open fireworks 1, copy and paste as a new layer, arrange near top left of the circle.

Open flower 3, copy and paste as a new layer, resize by 30%. Arrange on right, just above the ribbon. Duplicate, rotate to the left by 12, Drag the duplicate just above the original flower & drag that layer below the original flower layer. Do it again so you have a total of 3 flower layers. Merge all 3 flower layers together, duplicate and mirror.

Open your tube, copy and paste as a new layer, resize if necessary, add a drop shadow. 

Crop & resize.

Add your text, copyright and credits as needed.

Friday, January 20, 2012

Oh So Sexy


For this tutorial you will need the following:

Paint Shop Pro, I am using PSP X, you should be able to use any version.

Tube of choice, I am using the artwork of Tatyana Haustova, which you need a license to use. You can get it at AIL, here

Scrap kit of choice. I am using Valentine Angel, a PTU kit by Jen's Sweet Temptations which you can find here.  

UchyTemp OhSoSexy2011 by Uchy at Creative Misfits. You can find it here, and it's the last set in the post.

Font of choice, I am using Renaissance

Plugins: no outside plugins


Just remember that my choices of papers and elements is just a suggestion, change it up and make it yours! You don't have to follow mine exactly.


Let's get started!

Open your template and change the canvas size to about 750 x 750 so you have some room to work. 

Open paper 3, fill black circle and lower black circle by making the layer active (click on it in your layer palette) click inside the shape with your magic wand, selections, invert, copy and paste your paper as a new layer, click delete on your keyboard, deselect. Add a drop shadow then delete your original template layer.

Do the same for the 2rectangles layer using paper 9.

On the heart frame layer, do the same using paper 8. Add/remove noise using the following settings uniform, monochrome 100%. 

Fill the heart layer with paper 4.

Make the mask layer active, selections, select all, float, defloat, invert. Copy and paste paper 4 as a new layer, click delete on your keyboard then deselect.  Duplicate the pink mask layer and merge down. Delete the original mask layer.

Fill the wa layer the same way you filled the shapes layer using paper 4. Delete the original wa layer and merge down with wa bg. Add a drop shadow.

Make your heart layer active. Selections, select all, float, defloat, invert. Open your tube, copy and paste as a new layer, duplicate. Drag one layer below the heart frame and one above. Hide the top tube. Take your eraser tool and erase the bits of tube hanging over the frame. Deselect. Add a drop shadow to the tube.

Un-hide your top tube layer. Erase the bits hanging over the frame. You don't have to be super careful because you'll have the bottom tube showing. 

Crop, resize, add your text, credits and copyright as needed & save.

Friday, December 30, 2011

Sweet Treats


For this tutorial you will need the following:

Paint Shop Pro, I am using PSP X, you should be able to use any version.

Tube of choice, I am using the artwork of Pinup Toons, which you need a license to use. You can get it at Creative Design Outlet (CDO) here.

Scrap kit of choice. I am using Land of Gingerbread by Jen's Sweet Temptations, which you can find here.

CBN Drama Temp 2 by Deb at the Creative Misfits. You can find it on the blog here, and it's the 3rd set down.

Font of choice, I am using zebra.

Plugins: no outside plugins used..


Just remember that my choices of papers and elements is just a suggestion, change it up and make it yours! You don't have to follow mine exactly.

Let's get started!

Open your template, shift D to duplicate. Delete the following layers: ©, 1, 2, Raster 2 Shadow 1, & 9.

Resize to 600 x 600, then change the canvas size to 750 x 750 to have extra work space.

Add a new raster layer, drag to the bottom and flood fill with white.

On layer 12, click inside the circle with your magic wand, selections, invert, copy and paste a paper as a new layer, click delete on your keyboard. Deselect, add a drop shadow, delete the original layer 12.

Fill layers 3, 5, 6, 8, 10, & 11 the same way, using papers of your choice. Make sure to add a drop shadow and delete the original layers as you go.

On layer 7, fill with a paper as you did above, but after you click delete on the paper, leave selected. 

Open your tube, mirror if needed, copy and paste as a new layer, arrange within the frame, click delete on your keyboard. Deselect, add a drop shadow to your tube.

Do the same for layer 4.

Add whichever elements you like adding drop shadow as necessary. I used the following:

Snowman2, resized at 45%
Canister, resized at 45%
Pie2, resized at 45%
Cup, resized at 30%
Cupcake 1, resized at 30%
Cupcake 3, resized at 30%

Crop, resize, add your text, copyright and credits as needed.

Wednesday, December 28, 2011

Winter's Kiss


For this tutorial you will need the following:

Paint Shop Pro, I am using PSP X, you should be able to use any version.

Three tubes of choice, I am using the artwork of Ismael Rac, which you need a license to use. You can get them at his store, here.

Scrap kit of choice. I am using Winter's Kiss by Jen's Sweet Temptations and you can find it here.

Font of choice, I am using Sweet Home Oklahoma

Missy Tag Template 430 by Missy at Divine Intentionz, which you can find here.

Mask: Vix Big mask 18 which you can find here.

Plugins: Xero Porcelain


Just remember that my choices of papers and elements is just a suggestion, change it up and make it yours! You don't have to follow mine exactly.


Let's get started!

Open your template, shift D to duplicate, close the original.

Delete raster 1 layer. Change the canvas size to about 850 x 600 to give yourself room to work.

Fill the various shapes by making the layer you want to work with active (click on that layer in your layer palette) click on the shape with your magic wand, layers, invert, copy and paste the paper, click delete on your keyboard. & deselect. Do this for all layers except frame back 1, 2, & 3, glitter back,  and their frames. Add drop shadows as you go and delete the original layers.

Add noise to the frame back 1, 2, and 3 layers with the following settings: Uniform, monochrome checked, 100%, then add drop shadow.

For each of the frame back layers, fill with a paper as you did above, but leave selected, then copy and paste your tube, arrange it within that area, click delete on your keyboard and deselect. Do this for each of the frame back layers.

Duplicate each of your tubes. On the top layer, adjust blur, gaussian blur 3. Set blend mode to soft light. On the original tube layer (bottom) apply xero porcelain using the default settings, except change the blue to 0.

Add a drop shadow to the tube layer you just applied the filter to. Do this with each tube.

Copy and paste a paper just above the white background layer. Apply your mask by opening your mask, got to layers, new mask layer, from image, find the mask in the drop down box, click ok, click yes on the pop up, delete the mask in the layers pallet and merge group.

Add any elements you like.

Add your text, copyright and credits as needed.


Monday, December 5, 2011

Winter WIshes

For this tutorial you will need the following:
Paint Shop Pro, I am using PSP X, you should be able to use any version.
Tube of choice, I am using the artwork of Keith Garvey, which you need a license to use. You can get it at PTE.
Scrap kit of choice. I am using a PTU kit, All Wrapped Up by Jen's Sweet Temptations.
SSCTemplate 20 by me, here.
Font of choice, I am using Sh*t Happens
Plugins: No outside plugins
Just remember that my choices of papers and elements is just a suggestion, change it up and make it yours! You don't have to follow mine exactly.
For the drop shadow in this tut I used 1, 1, 50, 5 black throughout unless otherwise noted.
Let's get started!
Open the template, change the canvas size to 650 x 650.
Delete the following layers, the top credits layer, circle 1, circle 4, circle 1 frame and circle 4 frame.
Rotate the other layers to the left by 45.
Fill each of the remaining layers with papers of your choice from the scrap kit by clicking on each layer with your magic wand, selections invert, copy and paste the paper, click delete on your keyboard and delete each of the original raster layers. Leave the top square layer for last.
I also added noise 100%, uniform and monochrome checked, on the two square frame layers. Add drop shadow to your liking as you go along.
When you fill the top square layer, leave selected, open your close up tube, copy and paste as a new layer, arrange in the square and click delete on your keyboard. Deselect, duplicate the tube, on the top layer, adjust blur, gaussian blur, 3. Change the blend mode to soft light. Change the blend mode on the original tube to Luminance(L), add a very light drop shadow. I used 1, 1, 15, 1 black.
Copy and paste your main tube as a new layer, add a drop shadow.
Add any elements you'd like. I used the following with drop shadows and if I resized them, the amount is beside it.
Bow 1, 30%
Snowman 1, 65%
Lantern, 30%
Mouse, 25%
Add a paper just above the white background layer. Open the mask, layers, new mask, from image. Find the mask in the drop down box, click ok. Delete the mask in the layer palette and merge group.
Crop, resize, add your name and copyright & credits as needed. On my name, I added noise at 50, uniform and monochrome checked and added a drop shadow.

Saturday, November 19, 2011

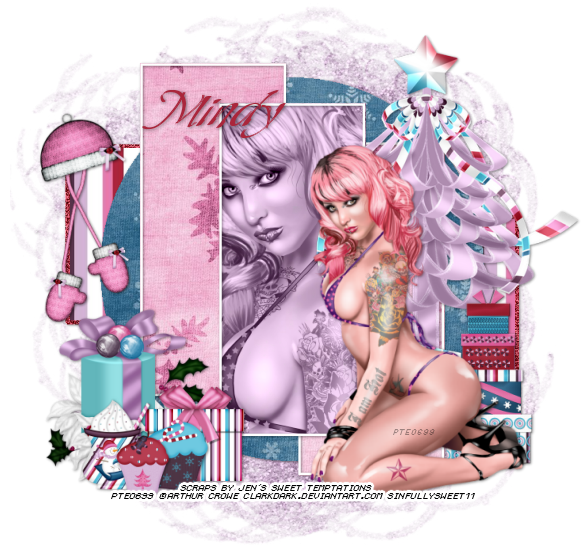
Naughty Holidays

For this tutorial you will need the following:
Paint Shop Pro, I am using PSP X, you should be able to use any version.
Tube of choice, I am using the artwork of Arthur Crowe, which you need a license to use. You can get it at PTE.
Scrap kit of choice. I am using Home for the Holidays by Jen's Sweet Temptations.
Font of choice, I am using Saliere
Template115 by Leah at Amy & Leah's Gimptastic Tuts.
Mask: gemsmask163 from Gems Taggin Scraps
Plugins: No outside plugins
Just remember that my choices of papers and elements is just a suggestion, change it up and make it yours! You don't have to follow mine exactly.
Let's get started!
Open the template, delete the credits layer, change the canvas size to 700 x 700.
Merge the two yellow rectangles together, click inside with your magic wand.
Open paper 1, copy and paste as a new layer, arrange how you want, selections, invert, click delete on your keyboard, selections, modify, invert, selections, modify, expand by 5.
Add a new raster layer. Flood fill with a color from the paper. Deselect, add/remove noise, add noise 100%, monochrome, uniform. Add a drop shadow.
Delete the original yellow rectangles layer.
Click inside the circle layer with your magic wand.
Open paper 7, copy and paste as a new layer, selections, invert, click delete on your keyboard, deselect, delete the original layer. Add drop shadow.
Do the same with rectangles 2 & 3, using paper 10. Do not add drop shadow.
Add the drop shadow to the rectangle 2 & 3 frames.
Do the same with rectangle 1 but leave it selected after you delete the paper. Copy and paste your tube into the rectangle, arrange it and then click delete on your keyboard. Change the blend mode to Luminance(L).
Copy and paste your main tube as a new layer, add drop shadow.
Add the elements you'd like. I used the following and if I resized them, the amount I resized them by is beside it. Add drop shadow as you go as needed.
Tree 1
Gift 3, resized 50%
Mittens, resized 50%
Hat, resized 50% twice
Gift 2, resized 50% twice
Cocoa, resized 24%
Cupcake 6, resized 15%
Cupcake 5, resized 18%
Open paper 16, copy and paste as a new layer, just above the white background. Open your mask and apply it.

Thursday, November 17, 2011

It's Frosty!

For this tutorial you will need the following:
Paint Shop Pro, I am using PSP X, you should be able to use any version.
Tube of choice, I am using the artwork of Ismael Rac, which you need a license to use. You can get it at his store.
Scrap kit of choice. I am using Frosty by Jen's Sweet Temptations.
Font of choice, I am using Champignon.
Plugins: No outside Plugins
Just remember that my choices of papers and elements is just a suggestion, change it up and make it yours! You don't have to follow mine exactly.
Let's get started!
Open a new canvas 700 x 700.
Open frame 2, copy and paste as a new layer, resize by 150%. Click inside with your magic wand.
Selections, modify, smooth with default settings. Settings, modify, expand by 5.
Open paper 8, copy and paste as a new layer just above the white background. Resize by 65%, selections, invert, click delete on your keyboard and leave selected.
Open your tube, copy and paste as a new layer, arrange in the frame, duplicate. Drag the original layer below the frame layer, hide the duplicate tube.
Take your eraser tool and erase the bits hanging below the frame where you don't want them showing. Selections, select none. Add a drop shadow to the tube and frame.
Un-hide the duplicate tube that is above your frame. Take the eraser tool and erase the bits below the frame. You don't have to be careful to run exactly along the frame because you have the duplicate showing below it.
Add the following elements (or any others of your choice), add drop shadow as needed
Tree lights, resize by 50%
Snowman 1, resize by 50%
Skater Light, resize by 50%
Snow, arrange on the left, duplicate, mirror
Flower 3, resize by 65%, arrange on the right, duplicate, mirror
Open paper 9, copy and paste as a new layer, just above the white background layer. Apply your mask by opening it in PSP, then go to layers, new mask layer, from image, find the mask in the drop down box, click ok. Delete the mask in your layer pallete, click yes, then merge group. Arrange the mask if needed. I had to pull mine a bit to the left to make it look right.
Crop, resize, add text, copyright and credits as needed.

Monday, October 24, 2011

Chills & Thrills

For this tutorial you will need the following:
Paint Shop Pro, I am using PSP X, you should be able to use any version.
Tube of choice, I am using the tubes that came with the scrapkit.
Scrap kit of choice. I am using a PTU kit, Chills & Thrills by Jen's Sweet Temptations.
Template: APHWNtemplate1 by Lorna J. It's the link under the 4th template on that page.
Font of choice, I am using Saliere.
Plugins: no outside filters.
Just remember that my choices of papers and elements is just a suggestion, change it up and make it yours! You don't have to follow mine exactly.
Let's get started!
Open the template, delete the info, layer 5 & cat layers. Change the canvas size to 650 x 650.
Make layer 4 active, click inside it with your magic wand, open paper 9, resize by 70%, copy and paste as a new layer, selections, invert, click delete on your keyboard. Deselect and delete the original black circle.
Do the same with layer 2, using paper 7.
Do the same for layers 1, 3, 6 and 8 using paper 4. After you fill them with the paper, then go in and adjust, add/remove noise, and add noise, 85, monochrome, uniform. Add drop shadows to each frame layer.
Make layer 7 active, click inside with your magic wand, selections, invert, open paper 10, resize by 70%, copy and paste as a new layer, click delete on your keyboard, leave selected.
Open your tube, copy and paste as a new layer, arrange in the frame, click delete on your keyboard.
Delete the original layer 7, add drop shadow to your tube.
Do the same for layer 9.
Add elements and your tube. I used the following (add drop shadow of your choosing):
Cauldron, resized 70%
Ghost, resized 50%
Flowers
Candle, resized 60%
Cat2, resized 45%
Bottle, resized 45%
Goblet, resized 40%
Cupcake, resized 35%
add a new layer , drag it to the bottom, flood fill with black. Open your mask, go to layers, new mask layer, from image, find your mask in the drop down box, click yes. delete the mask, choose yes in the pop up box, merge group. Drop the opacity to about 45.
Crop, resize, add text, credits, and copyright as needed.

Thursday, October 20, 2011

Candy Dreams

For this tutorial you will need the following:
Paint Shop Pro, I am using PSP X, you should be able to use any version.
Tube of choice, I am using the artwork of Ismael Rac, which you need a license to use. You can get it at his store, here.
Scrap kit of choice. I am using Sugar on Top by Jen's Sweet Temptations
Font of choice, I am using Saliere
Plugins: no outside plugins
Just remember that my choices of papers and elements is just a suggestion, change it up and make it yours! You don't have to follow mine exactly.
Let's get started!
Open a new canvas 700 x 700 white. This will give us extra room to work, and we can crop and resize at the end.
Open film 4, copy and paste as a new layer.
Open film 1, copy and paste as a new layer, arrange over bottom of film 4.
Take your freehand selection tool set on point to point and add (Shift). Click around the edges of the center squares on film 4.
Open paper 4, copy and paste between film 4 and the white background layer, selections, invert, click delete on your keyboard.
Leave selected.
Open your tube, copy and paste above the paper you just put in the frame. Arrange the tube, then click delete on your keyboard.
Do this with your tube 3 times, to fill all 3 squares in the film 4, mirroring the tube sometimes to have it going different directions. Deselect & erase the bits that show from one film square into another. Merge each tube together.
Duplicate your tube layer, on the top layer, adjust blue, gaussian by 3. change blend mode to soft light. On the original layer, change the hue and saturation both to 0.
Add a drop shadow to to the filmstrip layer.
Do the same thing with the paper (I'm using paper 10 for this one) and tube in the small film 1 element.
Copy and paste your main tube, drag it so it is just above the larger filmstrip. Arrange it how you want, add drop shadow, if any of it is peeking below the thin filmstrip, erase it.
Doodle 1, copy and paste arrange at top left, duplicate, image flip, duplicate, image mirror, duplicate, image flip.
Add your elements.
I used
Heart
beads
white flower
lollipop
Crop, resize, add text and credits, save.

Tuesday, October 18, 2011

Pink Fantasy

For this tutorial you will need the following:
Paint Shop Pro, I am using PSP X, you should be able to use any version.
Tube of choice, I am using the artwork of Barbara Jensen which you need a license to use. Her artwork is available at her store, but this tube is available only at Scraps and the City.
Scrap kit of choice. I am using a PTU kit, Pink Fantasy by Jen's Sweet Temptations. I'm working with the full sized kit, so the resizing percents are for that. If you get the tagger sized, you'll have to change the amounts you resize by, if you have to resize at all.
Tonya and Minxy Collab Template 03 at Creative Misfits Creations. It's the last set in the post.
Font of choice, I am using zebra
Plugins: no outside plugins required
Just remember that my choices of papers and elements is just a suggestion, change it up and make it yours! You don't have to follow mine exactly.
Let's get started!
Open your template, delete the copyright layer, stars, and all the word art layers.
Change the canvas size to 700 x 650.
For any shapes on the template that you fill with a paper, delete the original shape afterwards.
Make shape 1 layer active, click inside with magic wand, open paper 3, resize by 25%, copy and paste as a new layer. Selections, invert, click delete on your keyboard & deselect. Do the same for shape 2. Add drop shadow to both.
Do the same with rectangle frame and rectangle background, filling them with paper 1 resized by 25%
Add noise to both rectangle frame and rectangle background after you add the paper, uniform, monochrome checked 40%, then add drop shadow.
Make the rectangle layer active, click inside it with magic wand, open paper 4, resize by 15%, copy and paste as a new layer, selections, invert, click delete on your keyboard, deselect. No drop shadow on this one.
Do the same with the circle layer, using paper 9 add drop shadow.
Make rectangle layer active, click inside with magic wand, open paper 10, resize by 15%, copy and paste as a new layer, selections, invert, click delete on your keyboard, leave selected.
Open your close up tube, copy and paste as a new layer, arrange it in the rectangles, click delete on your keyboard then deselect.
Change the blend mode to luminance (L) and drop the opacity to about 60.
On thin rectangles 1 and 2, add noise with the same settings as above and add drop shadow.
Open your tube, copy and paste as a new layer, resize if necessary, arrange on the left side.
add elements that you like. These are the ones I used and how much I resized them by, add drop shadow to each.
Swans resized by 20%
Unicorn resized by 15%
Flower 1 resized by 15%
Bow 1 resized by 10% then 75%
Cupcake 1 resized by 10% then 55%
Envelope resized by 10% then 85%
Champagne resized by 10% then 65%
Jar resized by 10%
Decor 5 resized by 20%
Balloons resized by 20% then 50%
Raspberry 3 resized by 10% then 75%
The two raspberries, resize by 10% then 25%, arrange them duplicating and mirroring until you get as many as you want scattered about.
copy and paste a paper of your choice, open & apply mask, layers, new mask layer, from image, find your mask in the drop down menu, click ok, delete mask and merge group. You may have to resize it and duplicate it if you used a light paper.
Crop, resize, add credits and copyright as needed then add your name.