 i
i
For this tut you will need:
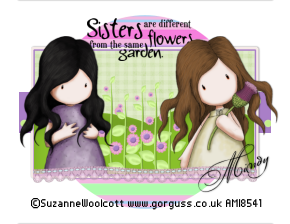
Two tubes of choice. I used the artwork of Suzanne Woolcott which you have to have a license to use. I got mine from AMI when she was there, but she is now on her own. You can get her work HERE.
Template #37 from Kristen at Wicked Scraps.
FTU scrap kit (Dragons, Fairies, and Princess's) by Tami at Addictive Pleasures.
Font of choice. I useed Bickham Script Fancy which is a pay font, so I cannot supply it.
Word art: Sisters are flowers by MHK Scrap Bytes
Ok, on with the tutorial:
Open the template and delete the following layers: her info, words, butterflies, and butterflies fill.
On the circle layer, hit select all, float, defloat, and add a new raster layer.
Paste paper 11 (or a paper of your choosing) as a new layer, hit selections invert, and press delete on the paper layer.
Go to the rectangle 1 layer, and do the same thing except paste paper 4 (or another paper of your choosing).
Then go to rectangle 2 layer and do the same using paper 6 (or another of your choosing). Hit delete and then keep it selected and invert selection again.
Selections modify, expand by 2 and add a new raster layer, flood fill with #a97fc7 or a color of your choice, and drag that below your rectangle layer. Again, selections, modify, expand by 5 add a new layer and flood fill with white. Drag this layer below your layer you filled. So it should be your paper layer, then below that your first filled layer, then below that your white layer.
Hide all layers except these 3 and merge visible and add a drop shadow of your choice. Unhide all layers.
Take the selection tool and pull out a rectangle just inside the purple line. Paste your tubes where you want them. You may have to resize. I resized mine by 66%. Add a drop shadow, then invert selection and take your eraser tool and delete the bits that hang over the bottom edge. Leave selected.
Open the hills 2 layer, resize by 43% and past below your tubes. Arrange them how you'd like then hit delete. Leave selected.
Open the branch with flower tube and resize it 20%, then place below your tubes. Duplicate several times and arrange how you'd like, merge those layers together then with the eraser tool, erase the bits hanging out of the bottom. Deselect.
Copy your word art and paste it as a new layer. Resize by 20% then again by 45%. add a drop shadow and place where you'd like.
Open lace 1, resize by 43% and arrange it above the tube layers at the bottom the rectangle. Add any other embellishments, your name, and the copyright information, save as a .gif or .jpeg file and you're done!