 If you'd like to do the tut to make an avatar to go along with your tag, check it out HERE.
Thanks Sharon for writing it out and posting it up!
If you'd like to do the tut to make an avatar to go along with your tag, check it out HERE.
Thanks Sharon for writing it out and posting it up!

Tuesday, September 29, 2009
Good Girls Go Avatar
Sharon over at Dolly's Tag World wrote a tut for an avatar to match my Good Girls Go tag. She did a great job! Lookie:
If you'd like to do the tut to make an avatar to go along with your tag, check it out HERE.
Thanks Sharon for writing it out and posting it up!
If you'd like to do the tut to make an avatar to go along with your tag, check it out HERE.
Thanks Sharon for writing it out and posting it up!
Sunday, September 20, 2009
Good Girls Go
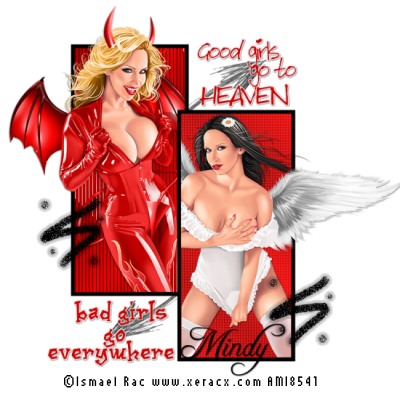 For this tutorial you will need the folowing:
2 tubes: I used the beautiful artwork of Ismael Rac which you have to have a license to use. You can purchase it at AMI.
Brushes: I used zig001 and Arrow right by Brushes by Pang on Magitek Designs. On the right, click on "brushes," click on "download by set," and the sets are there. I truthfully don't know what set each of them were in because I downloaded them all and installed them! ;-)
3 Fonts of choice: I used Bitch Cakes for the good girls part, Cajun Boogie for the bad girls part, and Freebooter Script for my name.
Filters:
Tramages ~ Tow the Line
Penta.com ~ Color Dot
Eye Candy 3.1 ~ Glow
Ok, let's get started!
Open a new canvas about 700x700, and if it's too big, you can resize later.
Grab your preset shapes tool, rectangle with the foreground set to black, background null, line width set at 8. Draw out a longish rectangle, convert to raster layer, then duplicate it. Situate them so they look like mine in my example above.
Click inside the left rectangle with your magic wand, selections>expand 2.
Change your foreground to #a70000 and your background to #ec0303 then click on your foreground and change it to gradient, Style>linear>angle 43> repeats 3
Add a new raster layer and fill with this gradient, drag below the black rectangle frame, selections>deselect.
Now click inside your right rectangle and do the same, but open your gradient and click the "invert" box. Leave selected and copy your angel tube and arrange her in there how you'd like her, selections invert> and erase the bits that you don't want hanging over, deselect and add a drop shadow to the tube, pull her down below the rectangle layer.
Click on the right gradient layer that is under your angel tube. Go to your effects and apply penta.com color dot using the following settings from top to bottom in your pop up box 90, 2, 255, 255, 255.
Add a drop shadow to your rectangle. I then merged my rectangle, tube layer and right side gradient layer.
Click on your left gradient layer. Go to your effects and choose Tramages Tow The line, apply that using the following settings top to bottom in your pop up box 80, 54, 48, 9.
Click on selections, select all, float, defloat, invert and open your devil tube and paste her as a new layer, arranging her where you'd like her. Take your eraser tool and erase the bits that hang over. Deselect and then add a drop shadow to your frame and tube. Then, merge the left rectangle, tube and left gradient together.
Now, if the rectangles are not quite where you'd want them, you can arrange them around a little bit.
I applied a new raster layer and dragged it below my rectangle layers and then applied the right arrow brush. Arrange it where you'd like it then duplicate the layer and image> mirror> image> flip, then arrange that arrow where you want, and merge those two brush layers.
Then, add a new raster layer on the very top. Add whatever squiggle or grungy brushes you'd like, I used the Zig001.
Add your text. I wrote Good girls go to HEAVEN in Bitch Cakes font. Convert to raster layer, then add Alien Eye Candy 3.1 Glow, and I changed the width to 3 and left everything the same. Then add your drop shadow.
I used Cajun Boogie to write Bad girls go everywhere. Use the same glow settings and drop shadow.
Add your name, I used Freebooter Script for mine and no glow, just a drop shadow.
Add your © info, crop and resize.
To save as transparent, go to File> Export> PNG Optimizer> click Ok and save wherever you'd like.
Hope you liked it, and please feel free to leave any comments. You can email me copies of your tags if you'd like! I'd love to see them.
For this tutorial you will need the folowing:
2 tubes: I used the beautiful artwork of Ismael Rac which you have to have a license to use. You can purchase it at AMI.
Brushes: I used zig001 and Arrow right by Brushes by Pang on Magitek Designs. On the right, click on "brushes," click on "download by set," and the sets are there. I truthfully don't know what set each of them were in because I downloaded them all and installed them! ;-)
3 Fonts of choice: I used Bitch Cakes for the good girls part, Cajun Boogie for the bad girls part, and Freebooter Script for my name.
Filters:
Tramages ~ Tow the Line
Penta.com ~ Color Dot
Eye Candy 3.1 ~ Glow
Ok, let's get started!
Open a new canvas about 700x700, and if it's too big, you can resize later.
Grab your preset shapes tool, rectangle with the foreground set to black, background null, line width set at 8. Draw out a longish rectangle, convert to raster layer, then duplicate it. Situate them so they look like mine in my example above.
Click inside the left rectangle with your magic wand, selections>expand 2.
Change your foreground to #a70000 and your background to #ec0303 then click on your foreground and change it to gradient, Style>linear>angle 43> repeats 3
Add a new raster layer and fill with this gradient, drag below the black rectangle frame, selections>deselect.
Now click inside your right rectangle and do the same, but open your gradient and click the "invert" box. Leave selected and copy your angel tube and arrange her in there how you'd like her, selections invert> and erase the bits that you don't want hanging over, deselect and add a drop shadow to the tube, pull her down below the rectangle layer.
Click on the right gradient layer that is under your angel tube. Go to your effects and apply penta.com color dot using the following settings from top to bottom in your pop up box 90, 2, 255, 255, 255.
Add a drop shadow to your rectangle. I then merged my rectangle, tube layer and right side gradient layer.
Click on your left gradient layer. Go to your effects and choose Tramages Tow The line, apply that using the following settings top to bottom in your pop up box 80, 54, 48, 9.
Click on selections, select all, float, defloat, invert and open your devil tube and paste her as a new layer, arranging her where you'd like her. Take your eraser tool and erase the bits that hang over. Deselect and then add a drop shadow to your frame and tube. Then, merge the left rectangle, tube and left gradient together.
Now, if the rectangles are not quite where you'd want them, you can arrange them around a little bit.
I applied a new raster layer and dragged it below my rectangle layers and then applied the right arrow brush. Arrange it where you'd like it then duplicate the layer and image> mirror> image> flip, then arrange that arrow where you want, and merge those two brush layers.
Then, add a new raster layer on the very top. Add whatever squiggle or grungy brushes you'd like, I used the Zig001.
Add your text. I wrote Good girls go to HEAVEN in Bitch Cakes font. Convert to raster layer, then add Alien Eye Candy 3.1 Glow, and I changed the width to 3 and left everything the same. Then add your drop shadow.
I used Cajun Boogie to write Bad girls go everywhere. Use the same glow settings and drop shadow.
Add your name, I used Freebooter Script for mine and no glow, just a drop shadow.
Add your © info, crop and resize.
To save as transparent, go to File> Export> PNG Optimizer> click Ok and save wherever you'd like.
Hope you liked it, and please feel free to leave any comments. You can email me copies of your tags if you'd like! I'd love to see them.
Rac SOTM and new tubes!
Wow, so far it's been an amazing month. Over at the Official Xeracx Stalkers forum, they made me the FIRST SOTM (Stalker of the Month). I've gotten lots of beautiful tags from everyone! Thank you so much to those who have gifted me with tags.
Let's see, the new Halloween tubes came out today and since I'm officially without an income until I find another job, I was sure I wasn't going to get them. Well, some very sweet person (who shall remain nameless unless she tells) gifted me with the pack! Whoot! I made a couple new tags today, though they weren't Halloween themed, they are most likely going to be tuts here as soon as I write them up.
Sometime, probably next month I'm told, because Rac is pretty swamped, look for the "Mindy" tube by Rac over at AMI which is the tube inspired by me!
Have a spook-tac-u-lar weekend, and happy stalking!
Wednesday, September 16, 2009
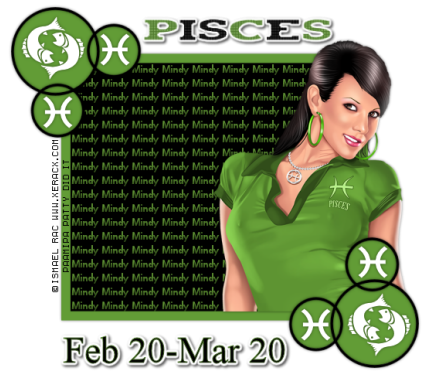
Tut using my template
Patty over at Sunspotppspplace has an awesome tut using one of my zodiac templates on her blog called Rac Zodiac. Go on over to her blog and check it out! Click HERE Thanks so much Patty for sending it to me to post here!
Tuesday, September 8, 2009
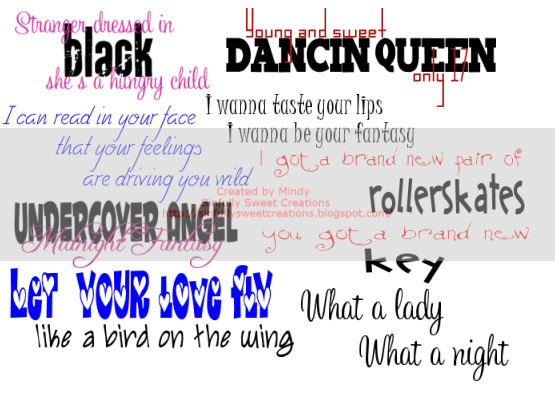
Oldies word art
I was listening to a bunch of oldies the other day and I thought what a great bunch of lyrics. So these word art are inspired by song lyrics from back in the 60's and 70's. You can get them by clicking HERE
Please feel free to leave a comment. It would be nice to see some feedback on my work!
Monday, September 7, 2009
Runaround
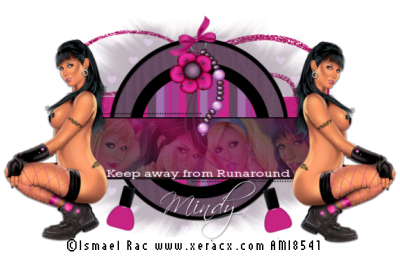 For this tut you will need the following:
5 tubes of choice. I am using the artwork of Ismael Rac which you have to purchase from AMI to use.
Template from Mirella which I got off the Creative Misfits blog.
Scrap kit from Bea's Creations called You Rock, which is FTU.
Mask: WSL Mask 241 from WeeScotsLass creations.
Plugins: Penta color dot
2 fonts of choice, I used Rockwell and Scriptina
Let's get started!
Delete the Raster 1, Glamorous, two small rectangles, and Babe layers.
Image>canvas size, change to 750 x 600 to give you room to work. You can crop it down after you're finished.
Please remember you don't have to use the same papers or even the same kit if you don't want, these are just suggestions.
Click on rectangle one layer, select all, selections float, defloat, copy and paste paper 9 (p9) as a new layer. Selections invert, and on your paper layer, delete, select none. Delete the original rectangle layer. Add drop shadow of 1, 1, 60, 3 or another of your choice.
Click on the circle layer and do the same thing as you did on the rectangle layer using paper 2 (p2).
Click on your border circle layer and selections, select all, float, modify, expand 3. Add a new raster layer and flood fill with black, deselect and add the same drop shadow you used on the rectangle layer. Delete the original border layer.
Select your small circle layer and follow the directions used on the rectangle and circle layer using paper 1 (p1) resizing the paper 65%, and delete the original small circle layer.
Click on the small circle border layer, selections, select all, selections float, modify, expand 2, add a new raster layer and flood fill with black. Select none, add your drop shadow, and delete the original border layer.
Click on the big rectangle layer, selections, select all, float, defloat and add a new raster layer. Make your foreground #c72483 and your background #63485e. Click on your foreground and choose gradient foreground background with rotation set at 36 repeats set at 3 and flood fill your new layer with that gradient. Deselect.
Select your big rectangle border, selections, select all, float, defloat, add a new raster layer and flood fill black, then add your drop shadow. Delete the original rectangle border.
Add a drop shadow to the dotted lines layer.
Click on your background layer and open paper 14 (p14) and copy and paste right above the background layer. Layers, new mask layer, from image, and find in the drop down box your mask layer, click ok. Delete the mask and merge the group, drop the opacity to about 40%. Delete your background layer.
Click on raster 6 and selections float, selections defloat, and copy and paste your first tube into the rectangle as you like it, then selections, invert, and on your tube layer, delete. Do this with each of your tubes, resizing as needed. On each tube layer, change the blend mode to soft light. Once you do this, depending on how your tubes are positioned, you may need to erase some parts of the tubes that show through each other.
If you have deselected your raster 6 layer to erase parts of your tubes, select it again, float, and defloat, add a new raster layer above the tubes and flood fill with black, deselect.
Use the Penta color dot plugin with the following settings top to bottom: 90, 2, 255, 255, 255. Click ok, then change the opacity of that layer to around 35.
Image resize 75%, then change the canvas size back to 750x 600. When you do this, you may have to erase some bits of your tube along the edges.
Add a tube of choice and add your drop shadow, image mirror and position on the other side.
Add any elements you'd like, bows, doodles, etc. I added the following
Pendant2 resized at 60% and deleted the part that covered the black border on one side so it looked like it was hooked through.
Nailpolish resized at 30% rotated 15 degrees, then duplicated and mirrored.
Doodle 1 which I left full sized and placed just below my mask layer.
Bow 2 which I also resized at 30# and placed on the top of the Pendant layer.
Use your text tool and add the words "Keep away from Runaround" in the rectangle. I used Rockwell set at 5, then I pulled it out so it was longer, and kind of smooshed it a little to make it a little shorter in height.
Add your name and copyright info. I used Scriptina for my name and added a drop shadow.
Crop your image to get rid of the excess and resize it.
Save as a .png image so that you have a transparent background by going to Image, export, png optimizer, and leave the settings as they are, click ok, and save to whatever folder you'd like.
For this tut you will need the following:
5 tubes of choice. I am using the artwork of Ismael Rac which you have to purchase from AMI to use.
Template from Mirella which I got off the Creative Misfits blog.
Scrap kit from Bea's Creations called You Rock, which is FTU.
Mask: WSL Mask 241 from WeeScotsLass creations.
Plugins: Penta color dot
2 fonts of choice, I used Rockwell and Scriptina
Let's get started!
Delete the Raster 1, Glamorous, two small rectangles, and Babe layers.
Image>canvas size, change to 750 x 600 to give you room to work. You can crop it down after you're finished.
Please remember you don't have to use the same papers or even the same kit if you don't want, these are just suggestions.
Click on rectangle one layer, select all, selections float, defloat, copy and paste paper 9 (p9) as a new layer. Selections invert, and on your paper layer, delete, select none. Delete the original rectangle layer. Add drop shadow of 1, 1, 60, 3 or another of your choice.
Click on the circle layer and do the same thing as you did on the rectangle layer using paper 2 (p2).
Click on your border circle layer and selections, select all, float, modify, expand 3. Add a new raster layer and flood fill with black, deselect and add the same drop shadow you used on the rectangle layer. Delete the original border layer.
Select your small circle layer and follow the directions used on the rectangle and circle layer using paper 1 (p1) resizing the paper 65%, and delete the original small circle layer.
Click on the small circle border layer, selections, select all, selections float, modify, expand 2, add a new raster layer and flood fill with black. Select none, add your drop shadow, and delete the original border layer.
Click on the big rectangle layer, selections, select all, float, defloat and add a new raster layer. Make your foreground #c72483 and your background #63485e. Click on your foreground and choose gradient foreground background with rotation set at 36 repeats set at 3 and flood fill your new layer with that gradient. Deselect.
Select your big rectangle border, selections, select all, float, defloat, add a new raster layer and flood fill black, then add your drop shadow. Delete the original rectangle border.
Add a drop shadow to the dotted lines layer.
Click on your background layer and open paper 14 (p14) and copy and paste right above the background layer. Layers, new mask layer, from image, and find in the drop down box your mask layer, click ok. Delete the mask and merge the group, drop the opacity to about 40%. Delete your background layer.
Click on raster 6 and selections float, selections defloat, and copy and paste your first tube into the rectangle as you like it, then selections, invert, and on your tube layer, delete. Do this with each of your tubes, resizing as needed. On each tube layer, change the blend mode to soft light. Once you do this, depending on how your tubes are positioned, you may need to erase some parts of the tubes that show through each other.
If you have deselected your raster 6 layer to erase parts of your tubes, select it again, float, and defloat, add a new raster layer above the tubes and flood fill with black, deselect.
Use the Penta color dot plugin with the following settings top to bottom: 90, 2, 255, 255, 255. Click ok, then change the opacity of that layer to around 35.
Image resize 75%, then change the canvas size back to 750x 600. When you do this, you may have to erase some bits of your tube along the edges.
Add a tube of choice and add your drop shadow, image mirror and position on the other side.
Add any elements you'd like, bows, doodles, etc. I added the following
Pendant2 resized at 60% and deleted the part that covered the black border on one side so it looked like it was hooked through.
Nailpolish resized at 30% rotated 15 degrees, then duplicated and mirrored.
Doodle 1 which I left full sized and placed just below my mask layer.
Bow 2 which I also resized at 30# and placed on the top of the Pendant layer.
Use your text tool and add the words "Keep away from Runaround" in the rectangle. I used Rockwell set at 5, then I pulled it out so it was longer, and kind of smooshed it a little to make it a little shorter in height.
Add your name and copyright info. I used Scriptina for my name and added a drop shadow.
Crop your image to get rid of the excess and resize it.
Save as a .png image so that you have a transparent background by going to Image, export, png optimizer, and leave the settings as they are, click ok, and save to whatever folder you'd like.
Wednesday, September 2, 2009
My first award
I have always tried to do my best to stay © compliant and at times I get so disgusted with those who feel it's their right to use an artists work just because it's posted on the internet and they hide behind "fair use." Truthfully, I think it's just their way of trying to get out of paying an artist for his hard work. You wouldn't take an artists painting out of a museum and place it on your wall then claim it's "fair use" would you? No, you'd call it theft. Well there are some who do that very thing in the PSP world. Ok, enough of my little rant, even though there was a reason leading up to it.
Over the years I've had to learn a few things about © and I am still learning. For instance, when my blog was being looked at by The Zone Groups to make sure I was following all the rules, I had links to fonts. I didn't realize that sites like dafont actually are sharing fonts that are PTU. hmmm!
Anyway, after they reviewed my site and I removed some font links and changed my tag previews to make the © more legible after the resizing to fit my blog, I was all set to go. I knew I was doing pretty good at being © compliant, but didn't realize I was doing that well that I only had a couple minor changes to make. whooo hooo! Anyway, here is my award and it will always be at the bottom of the first page on my blog.

Tuesday, September 1, 2009
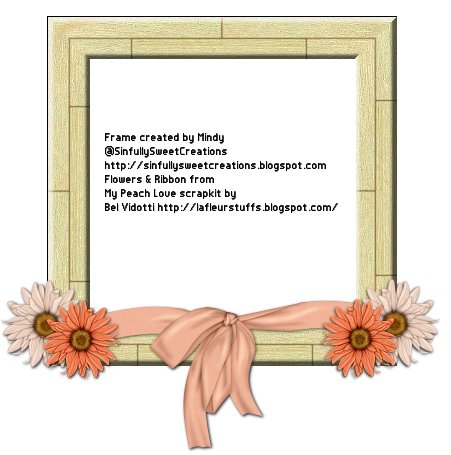
Frame
This is my first frame, so be nice, lol.. I created the frame itself and then added the ribbon and flowers from Bel Vidotti's My Peach Love scrapkit. Enjoy!
Click HERE for the download.
Subscribe to:
Posts (Atom)