Pages

Showing posts with label FTU kits. Show all posts

Tuesday, July 5, 2011

Tea 4 Two

For this tutorial you will need the following:
Paint Shop Pro, I am using PSP X, you should be able to use any version.
Tubes of choice, I am using the artwork of Pin Up Toons, which you need a license to use. You can get it at CDO. I got mine at CILM when he was selling tubes there. You will need 4 or 5 tubes.
Scrap kit of choice. I am using a FTU kit Tea4Two by Sugar Kissed Designs which you can get here and here.
Font of choice, I am using
Plugins: Xero Porcelain, Vanderlee Unplugged Tools Spice Dots
Just remember that my choices of papers and elements is just a suggestion, change it up and make it yours! You don't have to follow mine exactly.
Let's get started!
Open a new canvas 650 x 650 white background.
Open frame element 8, resize by 30%, then again by 60%. Click inside each square with your magic wand and selections, modify, expand by 1.
Open paper 9, resize it to 600 x 600, copy and paste it between the background layer and frame layer, selections, invert, click delete on your keyboard. Leave selected.
Open each of your tubes, copy and paste them, arrange them how you want them and delete the sections outside the frame by clicking delete on your keyboard. Deselect and erase the parts of your tubes that might be overhanging into another frame.
Hide all layers except your tubes and merge visible. Duplicate and on the duplicate layer, adjust blur, gaussian blur by 3, change the blend mode to soft light. On the bottom layer apply Xero Porcelain and change the bottom slider to 0.
Add a drop shadow to your frame and then hide the background layer and merge visible. Duplicate your frame.
On the bottom layer, adjust blur, gaussian blur by 20.
Apply Vanderlee Unplugged Spice Dots leave the settings at the original settings.
If you are going to add a full tube, open that, copy and paste, arrange where you want it and add a drop shadow, resize if necessary.
Add any other elements if you'd like.
Add your credits and text.

Monday, February 21, 2011

No Tears in Heaven

For this tutorial you will need the following:
Paint Shop Pro, I am using PSP X, you should be able to use any version.
Tube of choice, I am using the artwork of Ismael Rac which you need a license to use. You can get at his site HERE.
Scrap kit of choice. I am using Angels Above by Wicked Princess Scraps. It's free for the first week out, then after that it will become PTU. You can find it on her blog HERE. If it is no longer a freebie when you go to her blog post, her stores she sells at are listed at the top left side.
Font of choice, I am using Playbill
Plugins: No outside plugins needed
Just remember that my choices of papers and elements is just a suggestion, change it up and make it yours! You don't have to follow mine exactly.
Let's get started!
Open a new 700x700 canvas with a white background. You can crop it at the end, resize and get rid of the white if you want. This just gives us lots of room to work.
Open WP_AA_Frame, copy and paste as a new layer, resize by 75%. Click inside it with your magic wand, hold down your shift key and get the areas inside the frames that are rotated. Selections>modify>expand by 5.
Open paper 5, copy and paste as a new layer, resize by 75%, selections>invert, click delete on your keyboard. Leave selected.
Open your tube, copy and paste as a new layer, arrange it how you want inside your frame, then take your eraser tool and erase whatever parts you don't want showing over the frame. Deselect and add a drop shadow to your tube and frame.
Open the scalloped frame, copy and paste as a new layer. Drag it down so it is just above your white background layer. Add your drop shadow.
Open the rainbow element, copy and paste as a new layer. Drag it down below the green frame, and above the background paper. Arrange it how you like it. I just pretty much left mine where it pasted because you can see it just behind her.
Open the pansy element, copy and paste as a new layer, resize by 55%, mirror, rotate to the right by 10, add a drop shadow.
Open HRHeartscatter, copy and paste as a new layer, drag this layer so that it is just above the white background layer. Resize by 85%.
Open the harp element, copy and paste as a new layer, resize by 25%, rotate to the left by 15. Add your drop shadow and arrange it on the left side of your tag.
Add any text to it you'd like and your name, copyright info and credits as needed. Crop, resize and save.

Monday, June 7, 2010

Little Mermaid

For this tutorial you will need the following: Paint Shop Pro, I am using PSP X, you should be able to use any version. Tube of choice, I am using the artwork of Lisa Victoria which you need a license to use. You can get it at AMI. Scrap kit of choice. I am using a FTU kit by Artmama, called Beach Morning, which you can find at her blog, Artmama's Studio. Font of choice, I am using Sweetheart Script Mask: gemsmask21 from Gems Taggin Scraps Plugins: No outside plugins used. Just remember that my choices of papers and elements is just a suggestion, change it up and make it yours! You don't have to follow mine exactly. Let's get started! Open a new canvas, 700 x 700 white background. You can crop and resize at the end, this just gives us room to work. Set your background to black, foreground to null and with your preset shapes tool, draw out a largish circle in the middle of your canvas, objects, align, center in canvas. Convert to raster layer, selections, select all, float, defloat, invert. Open your tube, copy and paste as a new layer and arrange it in the circle, erase the bits that hang off where you don't want them. Selections, invert, make sure you are back on your black circle layer, make your foreground a color from your tube, selections, modify, expand by 5, add a new raster layer and fill with that color from your tube. Deselect and drag that layer below your black circle. Adjust, add/remove noise with the following settings: Random, monochrome checked, noise at 100%, add a drop shadow of your choice. Back on your tube layer, duplicate the tube. On the original layer, gaussian blur of 3. On the duplicate layer change the blend mode to overlay and add a drop shadow to the top duplicate layer. Pick another color from your tube and set it as your background color, draw out a largish circle and pull it over to the left of your tag so its sort of peeking out from under your black circle. Convert to raster layer, and follow the instructions above for making a frame around it. This time, choose a color that is a few shades darker than what you used to draw the circle. When you are finished, merge the circle and the frame together, duplicate, image mirror, image flip, add a drop shadow to both. Pick another darkish color from your tube and set it as your foreground, background is null. Take your preset rectangle shape, with width set at about 5 and draw out a rectangle to the left of your circle (see my tag as a reference), and then convert to raster layer. Drag it below your circles. Add the noise with the same settings as above. Click inside it with your magic wand, selections, modify, expand 2, open a paper of your choice, copy and paste as a new layer, selections, invert, click delete on your keyboard. Click inside one of your circles with your magic wand, invert. Open the seashell embellishment, copy and paste as a new layer, arrange it how you want it click delete on your keyboard. Do the same for the other circle. Add embellishment 31, resize and rotate as needed to have it lay correctly on the tops of both of the bottom circle layers. The amounts you will have to resize and rotate will depend on how big you drew out your circles, so just play with the settins til you get something you like. My resize was at 45%, and I rotated mine about 57, so that might give you something to go from. Also, add a drop shadow to each one. Add any seashell embellishments along the bottom that you like, resizing as necessary. Open Beach Mornings 4 paper, copy and paste as a new layer, drag it just above your white background layer, open your mask, Layers, new mask layer, from image, search for your mask in the drop down bar and apply it. Delete the mask, then merge the group together.

Wednesday, December 23, 2009

Skulls & Bows

For this tutorial you will need the following: Tube of choice. I am using the awesome artwork of Angela Newman, which you have to have a license to use, and you can purchase at AMI. Scrap kit of choice. I am using a freebie called Frosty Days by Sylvie at Fantasy Moments. You can use this one or any other of your choice that matches the tube you are using. My template HERE. Font of choice. I am using Nightmare Hero Plugins: Alien Skin Eye Candy 3.1 Glow (or another version of Alien Skin's gradient glow, etc will work just as well) Let's start! Open your template, delete the Raster 6 layer. Change the canvas size to about 700 x 700 so you have room to work. You can crop it down and resize it at the end if you want. Open paper 9. On your raster 3 layer, click inside it with your magic wand, copy your paper 9 layer and paste as a new layer. Selections, invert, make sure you are on your paper layer, and hit the delete key on your keyboard. Deselect and using your Eye Candy Glow filter using #ede6d4 as the color, set to width of 5 and fat. Add a drop shadow of your choosing. I use 1, 1, 60, 5. Delete the original raster 3 layer. Click on your raster 1 layer, click inside it with your magic wand, add a new raster layer, and flood flood fill with #d4b3b3, deselect and delete the original raster 1 layer. Apply the Eye Candy glow filter using the same settings, except change the color to #b87a7b, and add your drop shadow. Click on your raster 5 layer, click inside it with your magic wand, add a new raster layer and flood fill with #344162. Deselect, add a drop shadow and delete the original layer. Do the same thing for the Copy of Raster 5 layer. Open paper 17. On your raster 2 layer, click inside it with your magic wand, copy paper 17 and paste as a new layer, selections, invert, make sure you are on the paper layer, and hit delete on your keyboard, add a drop shadow and delete the original raster layer. Click on raster 4 layer with your magic wand, open paper 18, copy and paste it as a new layer, selections, invert, on your paper layer, hit delete on your keyboard, delete the original raster 4 layer and leave selected. Open your tube, copy and paste as a new layer, move it to the right side of your circle layer and take your eraser tool and erase the bits that hang over the bottom edge, keep selected. On the original tube, image, mirror, then copy and paste as a new layer. Resize your tube, I resized about 145%, but the amount you resize will depend on the tube you are using. Make sure you are on the resized tube layer, and hit delete on your keyboard. Drag that layer below your first tube layer, deselect, change the blend mode to Soft Light. Open a ribbon, I used Element 13 and resized it by 40%, add a drop shadow, arrange it near the bottom of the tag, and erase the bits that hang over the top rectangle. Take your lighten/darken tool, and with the size set to about 25, hardness at 50, step 5, density 100, thickness 100, rotation 0, opacity 50, right click and hold the button down and drag it across the ends of your ribbon, from the inside edge to the outside edge, making it darken a bit on the edges. On the smaller circle layer, selections, select all, float, defloat, open Element 17, copy and paste as a new layer, resize by 60%, selections, invert, on your element layer, hit delete on your keyboard and then deselect and add a drop shadow. With your text tool, background set to #3d5873 write out your name. Using your Glow plugin, add a glow with the width of about 5 fat using color #ede6d4, and then add a drop shadow. Add your license and ©info. Delete the white background layer, crop your image, resize as necessary, and save as a transparent .png file and you're done!

Sunday, October 18, 2009

Fall/Halloween Kits

These are actually my first two kits ever made. I made these prior to the BCA kit that I posted about a week ago. They were made for the Xeracx Stalkers site, and I was waiting for our challenge to be over before posting them here. Halloween mini kit HERE Autumn mini kit HERE

Friday, October 9, 2009

BCA Mini Tag Sized Scrap Kit

I've made my first kit for sharing here on my blog. This is actually my 3rd kit, my first two being for a challenge on the Xeracx Stalkers site, which I will be posting here in a little over a week. This kit has 6 papers, 2 ribbons and 7 word arts for you to use. I made the colors to match an Exclusive Commission BCA tube by Ismael Rac. You can get the kit HERE.

Monday, September 7, 2009

Runaround

For this tut you will need the following: 5 tubes of choice. I am using the artwork of Ismael Rac which you have to purchase from AMI to use. Template from Mirella which I got off the Creative Misfits blog. Scrap kit from Bea's Creations called You Rock, which is FTU. Mask: WSL Mask 241 from WeeScotsLass creations. Plugins: Penta color dot 2 fonts of choice, I used Rockwell and Scriptina Let's get started! Delete the Raster 1, Glamorous, two small rectangles, and Babe layers. Image>canvas size, change to 750 x 600 to give you room to work. You can crop it down after you're finished. Please remember you don't have to use the same papers or even the same kit if you don't want, these are just suggestions. Click on rectangle one layer, select all, selections float, defloat, copy and paste paper 9 (p9) as a new layer. Selections invert, and on your paper layer, delete, select none. Delete the original rectangle layer. Add drop shadow of 1, 1, 60, 3 or another of your choice. Click on the circle layer and do the same thing as you did on the rectangle layer using paper 2 (p2). Click on your border circle layer and selections, select all, float, modify, expand 3. Add a new raster layer and flood fill with black, deselect and add the same drop shadow you used on the rectangle layer. Delete the original border layer. Select your small circle layer and follow the directions used on the rectangle and circle layer using paper 1 (p1) resizing the paper 65%, and delete the original small circle layer. Click on the small circle border layer, selections, select all, selections float, modify, expand 2, add a new raster layer and flood fill with black. Select none, add your drop shadow, and delete the original border layer. Click on the big rectangle layer, selections, select all, float, defloat and add a new raster layer. Make your foreground #c72483 and your background #63485e. Click on your foreground and choose gradient foreground background with rotation set at 36 repeats set at 3 and flood fill your new layer with that gradient. Deselect. Select your big rectangle border, selections, select all, float, defloat, add a new raster layer and flood fill black, then add your drop shadow. Delete the original rectangle border. Add a drop shadow to the dotted lines layer. Click on your background layer and open paper 14 (p14) and copy and paste right above the background layer. Layers, new mask layer, from image, and find in the drop down box your mask layer, click ok. Delete the mask and merge the group, drop the opacity to about 40%. Delete your background layer. Click on raster 6 and selections float, selections defloat, and copy and paste your first tube into the rectangle as you like it, then selections, invert, and on your tube layer, delete. Do this with each of your tubes, resizing as needed. On each tube layer, change the blend mode to soft light. Once you do this, depending on how your tubes are positioned, you may need to erase some parts of the tubes that show through each other. If you have deselected your raster 6 layer to erase parts of your tubes, select it again, float, and defloat, add a new raster layer above the tubes and flood fill with black, deselect. Use the Penta color dot plugin with the following settings top to bottom: 90, 2, 255, 255, 255. Click ok, then change the opacity of that layer to around 35. Image resize 75%, then change the canvas size back to 750x 600. When you do this, you may have to erase some bits of your tube along the edges. Add a tube of choice and add your drop shadow, image mirror and position on the other side. Add any elements you'd like, bows, doodles, etc. I added the following Pendant2 resized at 60% and deleted the part that covered the black border on one side so it looked like it was hooked through. Nailpolish resized at 30% rotated 15 degrees, then duplicated and mirrored. Doodle 1 which I left full sized and placed just below my mask layer. Bow 2 which I also resized at 30# and placed on the top of the Pendant layer. 
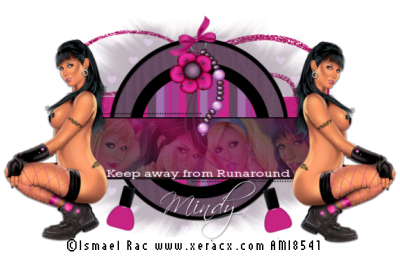
Use your text tool and add the words "Keep away from Runaround" in the rectangle. I used Rockwell set at 5, then I pulled it out so it was longer, and kind of smooshed it a little to make it a little shorter in height. Add your name and copyright info. I used Scriptina for my name and added a drop shadow. Crop your image to get rid of the excess and resize it. Save as a .png image so that you have a transparent background by going to Image, export, png optimizer, and leave the settings as they are, click ok, and save to whatever folder you'd like.

Tuesday, September 1, 2009

Frame

This is my first frame, so be nice, lol.. I created the frame itself and then added the ribbon and flowers from Bel Vidotti's My Peach Love scrapkit. Enjoy! Click HERE for the download.