Pages

Showing posts with label PTU tut. Show all posts

Sunday, December 23, 2018

Reindeer - Alicia Mujica

Reindeer

For this tutorial you will need the following:
Paint Shop Pro, I am using PSP X7, you should be able to use any version.
Tube of choice, I am using the artwork of Alicia Mujica, Rudolph 2018
which you need a license to use.
Scrap kit of choice. I am using Nutcracker by Alicia Mujica
Font of choice, I am using Digs My Hart


Plugins: Xero Porcelain
Just remember that my choices of papers and elements is just a suggestion, change it up and make it yours! You don't have to follow mine exactly.
Add a drop shadow of your choosing to tubes & elements throughout. I usually use 1, 1, 50, 5 unless otherwise noted.
Let's get started!
Open your template, shift D to duplicate and close the original
resize canvas 900 x 800
Delete the following layers
CR

Fill the layers with papers, to do this make sure the layer you want to fill has been clicked on in your layer palette.
Click inside the shape with your magic wand, selections, modify, invert, open your paper, copy and paste as a new layer,
click delete on your keyboard.
Delete the original template layer
Some layers, like the frames, you may just want to flood fill with a color from your kit. To do this, click on the layer in your layer palette, add another raster layer above it,
click inside the shape with your magic wand, and flood fill it with your color
Delete the original template layer

layer 3 use paper 2 resized to 800 pixels
layer 1 & 2 flood fill with #f3da98
layer 4 & 11  use paper
 
Make layer 7 active, click inside with your magic wand, copy and paste your tube 
as a new layer, resize 70%, arrange in circle, invert, click delete on your keyboard
Apply zero porcelain with default settings, duplicate,
on top copy, adjust blur, gaussian 10, change blend mode to screen

Do the same thing for layer 10

Copy and paste your tube as a new layer, resize by 25%
arrange in the center of the tag
Add the following elements:
cluster 2 resize 23% arrange below the tube layer, on left
cannister resize 23% mirror & arrange on right between layers 4 & 5
nutcracker 3 resize 23% then 50% arrange to the left of the tube

crop and resize
add your text and save

Sunday, November 25, 2018

Alicia Mujica Merry Christmas tube 3


For this tutorial you will need the following:

Paint Shop Pro, I am using PSP X7, you should be able to use any version.

Tube of choice, I am using the artwork of Alicia Mujica,
Merry Christmas Special Edition, which you need a license to use.  

Scrap kit of choice. I am using the matching kit by Alicia Mujica, Merry Christmas

Template 872 by Millie's PSP Madness 

Font of choice, I am using

Plugins: Alien Skin Eye Candy 3.1 glow


Just remember that my choices of papers and elements is just a suggestion, change it up and make it yours! You don't have to follow mine exactly.

Add a drop shadow of your choosing to tubes & elements throughout. I usually use 1, 1, 50, 5 unless otherwise noted.
 

Let's get started!


Open your template, shift D to duplicate and close the original
Make sure you're on the white background layer, make it visible
adjust, canvas size 800x800, flood fill with white
Delete the following layers
Made by millie
word art
Fill the layers with papers, to do this make sure the layer you want to fill has been clicked on in your layer palette. 
Click inside the shape with your magic wand, selections, modify, invert, open your paper, copy and paste as a new layer, 
click delete on your keyboard.
Delete the original template layer

Some layers, like the frames, you may just want to flood fill with a color from your kit. To do this, click on the layer in your layer palette, add another raster layer above it,
click inside the shape with your magic wand, and flood fill it with your color
Delete the original template layer

Fill layers 7 & 6 with paper 2b
fill layers 4 9 with #aa2331
fill layers 2 & 3 wtih #c5a154
fill layer 5 with #cdc4ae
fill layers 1 & 8 with paper 1f 


Copy and paste your tube as a new layer, resize by 35%
arrange in your tag
erase the bits that hang out where you don't want them


now add your elements:

cluster 2 resize 35% arrange across top
reindeer resize 30% then 55% arrange on bottom right
word art resize 25% arrange on bottom left
apply eye candy fat, 7, white then thin 5, #a03f47


crop and resize
add your copyright and credits as needed
add your text and save

Friday, November 16, 2018

Merry Christmas 2 - Alicia Mujica


For this tutorial you will need the following:

Paint Shop Pro, I am using PSP X7, you should be able to use any version.

Tube of choice, I am using the artwork of Alicia Mujica -Merry Christmas Special edition tube 2
which you need a license to use.  

Scrap kit of choice. I am using Alicia's matching kit - Merry Christmas

Template 869 by Millie's PSP Madness

Font of choice, I am using Declara

Plugins: Xero Porcelain


Just remember that my choices of papers and elements is just a suggestion, change it up and make it yours! You don't have to follow mine exactly.

Add a drop shadow of your choosing to tubes & elements throughout. I usually use 1, 1, 50, 5 unless otherwise noted.
 

Let's get started!


Open your template, shift D to duplicate and close the original
Change canvas size to 950 x 975 
Delete the following layers
Made by Millie


Fill the layers with papers, to do this make sure the layer you want to fill has been clicked on in your layer palette. 
I resized all papers to about 800 x 800 pixels before I used them
Click inside the shape with your magic wand, selections, modify, invert, open your paper, copy and paste as a new layer, 
click delete on your keyboard.
Delete the original template layer

Some layers, like the frames, you may just want to flood fill with a color from your kit. To do this, click on the layer in your layer palette, add another raster layer above it,
click inside the shape with your magic wand, and flood fill it with your color
Delete the original template layer


Copy and paste your tube as a new layer, resize by 40%
arrange in your tag below the circle layers
erase the bits that hang out below where you don't want them

Fill the following layers with these papers or colors:
layer 5 use paper 1c
layer 2 & 3 use color changer tool and change to a color from your tube
layer 1 use paper 1i
layer 13, 10, 7 color changer tool change #fc7260 to #ede2c5
layer 5, 8 , 11 flood fill with #e0b5bf

Copy and paste your resized tube, and go on layers 7, 10, & 13
make them active, using the same technique as you do to fill with a paper,
then copy and paster your tube in each
then, apply Xero Porcelain with the factory settings for each one

Flood fill layer 14 with #e0b5bf, adjust, add remove noise, 85%
selections, select all, float, defloat, expand 3, add new raster layer, 
flood fill with white, add drop shadow to white layer

add the following elements:
branch 2a resize 35% rotate right 90 arrange on right,duplicate & mirror
label 1 a resize to 645 on longest side arrange above white background

crop and resize
add your copyright and credits as needed
add your text and save

Tuesday, November 13, 2018

Winter Love - Alicia Mujica


For this tutorial you will need the following:

Paint Shop Pro, I am using PSP X7, you should be able to use any version.

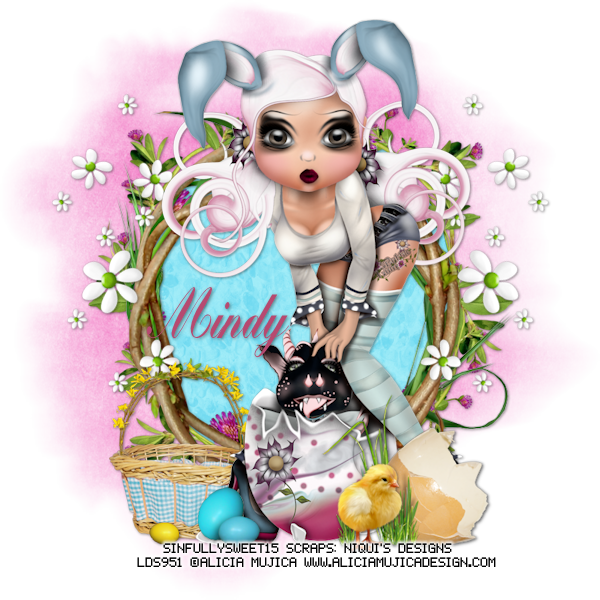
Tube of choice, I am using the artwork of Alicia Mujica (Black Friday 2015 pack, tube 3)
which you need a license to use.  

Scrap kit of choice. I am using Merry Christmas by Alicia Mujica 

Template 868 by Millie's PSP Madness

Font of choice, I am using Set Fire To the Rain

Plugins: Alien Skin Eye Candy 3 - Glow


Just remember that my choices of papers and elements is just a suggestion, change it up and make it yours! You don't have to follow mine exactly.

Add a drop shadow of your choosing to tubes & elements throughout. I usually use 1, 1, 50, 5 unless otherwise noted.
 

Let's get started!


Open your template, shift D to duplicate and close the original
Delete the following layers:
By Millie, 4, 5
Fill the layers with papers, to do this make sure the layer you want to fill has been clicked on in your layer palette. 
Click inside the shape with your magic wand, selections, modify, invert, open your paper, resize as needed,
copy and paste as a new layer, 
click delete on your keyboard.
Delete the original template layer
Some layers, like the frames, you may just want to flood fill with a color from your kit. To do this, click on the layer in your layer palette, add another raster layer above it,
click inside the shape with your magic wand, and flood fill it with your color
Delete the original template layer

I used the following:
layer 3: paper 1d (resize around 800 pixels)
layer 1: paper 2c (resize around 800 pixels)
layer 2 flood fill with #d3ad6e

layers 6 & 7 fill with #739932
then apply Alien Skin Eye Candy 3, glass with the original presets


Copy and paste your tube as a new layer, resize by 35%
arrange in your frame

Add the following elements:
cluster 6 resize 35% then 55% arrange below tube layer on left
branch 3 resize 25% arrange along bottom
cluster 2 resize 25% arrange on top left, duplicate, & mirror


crop and resize
add your copyright and credits as needed
add your text (I added glow of 5 white, fat) and save
_________________________________________________________
En Espanol
Para este tutorial necesitarás lo siguiente: Paint Shop Pro, estoy usando PSP X7, deberías poder usar cualquier versión. Tubo de elección, estoy usando la ilustración de Alicia Mujica (paquete Black Friday 2015, tubo 3) que necesita una licencia para usar. Kit de chatarra de elección. Estoy usando Merry Christmas de Alicia Mujica Plantilla 868 por la locura de PSP de Millie Fuente de elección, estoy usando Set Fire To the Rain Complementos: Alien Skin Eye Candy 3 - Glow Solo recuerda que mi elección de papeles y elementos es solo una sugerencia, cámbiala y hazla tuya. No tienes que seguir la mía exactamente. Agregue una sombra de su elección a los tubos y elementos a lo largo. Usualmente uso 1, 1, 50, 5 a menos que se indique lo contrario.   ¡Empecemos! Abra su plantilla, desplace D para duplicar y cierre el original Eliminar las siguientes capas: Por Millie, 4, 5 Rellene las capas con papeles; para ello, asegúrese de que se haya hecho clic en la capa que desea rellenar en su paleta de capas. Haga clic dentro de la forma con su varita mágica, seleccione, modifique, invierta, abra su papel, cambie el tamaño según sea necesario, Copiar y pegar como nueva capa, Haga clic en eliminar en su teclado. Eliminar la capa de plantilla original Algunas capas, como los marcos, es posible que solo desees rellenar con un color de tu kit. Para hacer esto, haga clic en la capa en su paleta de capas, agregue otra capa ráster sobre ella, haga clic dentro de la forma con su varita mágica y llénela con su color Eliminar la capa de plantilla original Utilicé lo siguiente: capa 3: papel 1d (redimensionar alrededor de 800 píxeles) capa 1: papel 2c (redimensiona alrededor de 800 píxeles) Capa 2 de relleno por inundación con # d3ad6e las capas 6 y 7 se llenan con # 739932 luego aplique Alien Skin Eye Candy 3, vidrio con los ajustes preestablecidos originales Copia y pega tu tubo como una nueva capa, cambia el tamaño en un 35% arregla en tu marco Agregue los siguientes elementos: el grupo 6 cambia de tamaño al 35% y luego al 55% organiza debajo de la capa del tubo a la izquierda rama 3 cambiar el tamaño 25% organizar a lo largo de la parte inferior el cluster 2 cambia el tamaño al 25% en la parte superior izquierda, duplicado y espejo recortar y redimensionar agregue sus derechos de autor y créditos según sea necesario agrega tu texto (agregué brillo de 5 blanco, gordo) y guarda

Wednesday, November 7, 2018

Alicia Mujica - Merry Christmas 2018


For this tutorial you will need the following:
Paint Shop Pro, I am using PSP X7, you should be able to use any version.
Tube of choice, I am using the artwork of Alicia Mujica, Merry Christmas 2018
Special Edition tube 1, which you need a license to use.  
Scrap kit of choice. I am using Alicia's matching kit, Merry Christmas
Font of choice, I am using Laughing and Smiling
Plugins: eye candy 3, glow
Just remember that my choices of papers and elements is just a suggestion, change it up and make it yours! You don't have to follow mine exactly.
Add a drop shadow of your choosing to tubes & elements throughout. I usually use 1, 1, 50, 5 unless otherwise noted.
Let's get started!
Open a new canvas 900 x 900 pixels with a white background
Open cluster 5, copy and paste as a new layer, resize 35%


Copy and paste your tube as a new layer, resize by 35%
arrange in in front of the cluster
Add the following elements:

tree 5 resize 35% arrange between cluster and tube on left
reindeer resize 25% arrange below the tube layer on left
I then took my eraser tool and erased parts of cluster and tree layers that looked
messy hanging out on the left side

word art 1 resize 20% arrange on bottom left, add Eye candy glow
size 12, fat, white
add it again size 5, color #b1585e, fat
rotate left 20


crop and resize
add your copyright and credits as needed
add your text and save


En Espanol

Para este tutorial necesitarás lo siguiente:


Paint Shop Pro, estoy usando PSP X7, deberías poder usar cualquier versión.


Tubo de elección, estoy usando la obra de Alicia Mujica, Feliz Navidad 2018

Edición especial tubo 1, que necesita una licencia para usar.


Kit de chatarra de elección. Estoy usando el kit a juego de Alicia, Feliz Navidad


Fuente de elección, estoy usando riendo y sonriendo.

Plugins: caramelos de ojos 3, resplandor


Solo recuerda que mi elección de papeles y elementos es solo una sugerencia, cámbiala y hazla tuya. No tienes que seguir la mía exactamente.

Agregue una sombra de su elección a los tubos y elementos a lo largo. Usualmente uso 1, 1, 50, 5 a menos que se indique lo contrario.


¡Empecemos!


Abre un nuevo lienzo de 900 x 900 píxeles con un fondo blanco.
Abra el cluster 5, copie y pegue como una nueva capa, redimensione 35%


Copia y pega tu tubo como una nueva capa, cambia el tamaño en un 35%


acomodar en frente del grupo


Agregue los siguientes elementos:

el árbol 5 cambia el tamaño al 35% organiza entre el grupo y el tubo a la izquierda

el tamaño del reno al 25% se coloca debajo de la capa del tubo a la izquierda

Luego tomé mi herramienta de borrador y borré partes de las capas de clúster y árbol que parecían

desordenado colgando en el lado izquierdo


word art 1 redimensiona 20% organiza en la parte inferior izquierda, agrega un brillo de caramelo de ojos

talla 12, gorda, blanca

añádelo nuevamente tamaño 5, color # b1585e, gordo

girar a la izquierda 20


recortar y redimensionar


agregue sus derechos de autor y créditos según sea necesario


agrega tu texto y guarda

Sunday, May 17, 2015

Pure Ivory


Snaggable versions of this tag in my Fotki album

For this tutorial you will need the following:

Paint Shop Pro, I am using PSP X7, you should be able to use any version.

Tube of choice, I am using the artwork of Misticheskaya (Elza tube) which you need a license to use. 

Scrap kit of choice. I am using Pure Ivory, a PTU kit by Scrappin With Lil Ole Me 

Font of choice, I am using Sweet Pea

Plugins: no outside plugins


Just remember that my choices of papers and elements is just a suggestion, change it up and make it yours! You don't have to follow mine exactly.

Add a drop shadow of your choosing to tubes & elements throughout. I usually use 1, 1, 50, 5 unless otherwise noted.


Let's get started!

Open a new canvas 850 x 850 pixels with a white background

Open element 39 copy and paste as a new layer 
click inside with your magic wand, selections, modify, expand 2, selections, invert
open paper 6 copy and paste as a new layer 
click delete on your keyboard,

Copy and paste your tube as a new layer, resize by 50%
arrange in your frame
erase the bits that hang out of your frame where you don't want them
deselect

Now add your elements:
element 112 resize 50% mirror & arrange on bottom right corner
element 111 resize 45% arrange to the left of element 112
element 5 resize 75% arrange below element 111

element 25 mirror & arrange over element 5, erase what hangs below the bottle on the right
element 84 resize 45% mirror & arrange below boxes on right
element 115 resize 65% rotate left 120 & arrange under flowers & beads along the bottom

crop and resize
add your copyright and credits as needed
add your text and save

Sunday, May 10, 2015

Pink Lemonade


Snaggable versions of this tag in my Fotki album

For this tutorial you will need the following:

Paint Shop Pro, I am using PSP X7, you should be able to use any version.

Tube of choice, I am using the artwork of Misticheskaya (Jenny tube) 
which you need a license to use.  

Scrap kit of choice. I am using Pink Lemonade by Scrappin With Lil Ole Me 

Font of choice, I am using DJB Carly Sue Got Married

Plugins: no outside plugins used


Just remember that my choices of papers and elements is just a suggestion, change it up and make it yours! You don't have to follow mine exactly.

Add a drop shadow of your choosing to tubes & elements throughout. I usually use 1, 1, 50, 5 unless otherwise noted.


Let's get started!

Open a new canvas 850 x 850 pixels with a white background

Open element 123 copy and paste as a new layer, resize 80% 
click inside with your magic wand, selections, modify, expand 2, selections, invert
open paper 5 copy and paste as a new layer 
click delete on your keyboard,

Copy and paste your tube as a new layer, 
arrange in your frame, click delete on your keyboard
change blend mode to Luminance(L) and drop the opacity to 66

Copy and paste your tube as a new layer, resize by 40%, arrange on left side of frame

add the following elements:
element 12 resize 60% arrange below your tube on left
element 29, mirror & resize 45% arrange over your tube on the left
element 2 resize 45% arrange to the right of the grass on the bottom

element 3 resize 45% arrange to the right of the pitcher
element 1 resize 25% arrange in front of pitcher and glass
element 7 resize 25% rotate right 12 arrange behind glass

element 13 resize 19% mirror & arrange to the right of the glass, duplicate & mirror


crop and resize
add your copyright and credits as needed
add your text and save

Sunday, May 3, 2015

Lovin Summer


Snaggable versions of this tag in my Fotki album

For this tutorial you will need the following:

Paint Shop Pro, I am using PSP X7, you should be able to use any version.

Tube of choice, I am using the artwork of Ellie Milk (Sunflower tube) 
which you need a license to use.  

Scrap kit of choice. I am using a PTU kit, Summer Lovin by Scrappin With Lil Ole Me 

Font of choice, I am using Al Kisah

Plugins: no outside plugins


Just remember that my choices of papers and elements is just a suggestion, change it up and make it yours! You don't have to follow mine exactly.

Add a drop shadow of your choosing to tubes & elements throughout. I usually use 1, 1, 50, 5 unless otherwise noted.


Let's get started!

Open a new canvas 850 x 850 pixels with a white background

Copy and paste your tube as a new layer, resize by 35%

add your elements:
element 3 arrange below tube, duplicate about 2 times, arrange around below or in front of tube so it looks like she's laying in the grass

element 26 resize 65% arrange behind tube and grass layers
element 59 resize 45% arrange in front of tube on right side
element 36 resize 35% arrange on right

element 28 resize 75% arrange between grass and fence on left
element 61 resize 25% arrange on fence on the right side
element 60 resize 35% arrange on bottom left
element 62 resize 15% arrange on grass on left side

crop and resize
add your copyright and credits as needed
add your text and save

Sunday, April 26, 2015

Sea Scape


Snaggable versions of this tag in my Fotki album

For this tutorial you will need the following:

Paint Shop Pro, I am using PSP X7, you should be able to use any version.

Tube of choice, I am using the artwork of Elias Chatzoudis (Sirena tube)
which you need a license to use.  

Scrap kit of choice. I am using a PTU kit, Sea Scape the Kit by Scrappin With Lil Ole Me 

Font of choice, I am using Bradley Hand ITC

Mask of your choice

Plugins: no outside plugins


Just remember that my choices of papers and elements is just a suggestion, change it up and make it yours! You don't have to follow mine exactly.

Add a drop shadow of your choosing to tubes & elements throughout. I usually use 1, 1, 50, 5 unless otherwise noted.


Let's get started!

Open a new canvas 950 x 950 pixels with a white background

Open element 79 copy and paste as a new layer
take your freehand selection tool set on point to point and 
make a square around the center edge of the frame, clicking once in each corner
and twice when you get back where you started

add a new raster layer below the frame,
make sure you are on that layer, copy paper 5 and paste into selection
then deselect

Copy and paste your tube as a new layer, arrange on the bottom left

Now add your elements:
element 36 resize 70% arrange on left between tube & frame
element 77 arrange between tube & boat 
element 61 resize 45% arrange on right side of boat

element 38 resize 25% arrange on element 61
element 92 resize 45% arrange on top right
element 82 resize 25% arrange at top of sign

element 47 resize 45% arrange on bottom right, duplicate, mirror, resize 75%
element 109 resize 35% arrange between cat tail reeds on bottom right
element 44 resize 25% arrange at bottom right

element 55 resize 45% arrange on bottom right side of tube
element 127 resize 25% arrange on bottom right
element 24 resize 25% arrange on bottom right

copy and paste paper 7 above the white background
apply your mask and merge group

crop and resize
add your copyright and credits as needed
add your text and save

Friday, April 24, 2015

Bridges


For this tutorial you will need the following:

Paint Shop Pro, I am using PSP X7, you should be able to use any version.

Tube of choice, I am using the artwork of Alicia Mujica which you need a license to use.  

Scrap kit of choice. I am using the inspired by kit, by Monti 

Font of choice, I am using DJB Carly Sue Got Married

Plugins: no outside plugins


Just remember that my choices of papers and elements is just a suggestion, change it up and make it yours! You don't have to follow mine exactly.

Add a drop shadow of your choosing to tubes & elements throughout. I usually use 1, 1, 50, 5 unless otherwise noted.


Let's get started!

Open a new canvas 850 x 850 pixels with a white background

Copy and paste your tube as a new layer

Now add your elements:
element 17 arrange behind tube
element 15 arrange on bottom left below element 17, 
duplicate twice, mirror one, arrange across bottom so it fills space below element 17

element 13 resize 70% arrange on bottom right, duplicate & mirror
element 11 resize 40% mirror & arrange on bottom left
element 7 arrange behind bridge on right

frame arrange behind bridge and tree
click inside with your magic wand, selections, modify, expand 2, selections, invert
open paper 1 copy and paste as a new layer 
click delete on your keyboard, deselect

element 19 arrange on left behind frame, duplicate, mirror, resize 75%
element 21 arrange at bottom between grass layers
element 10 resize 20% arrange in heart frame


crop and resize
add your copyright and credits as needed
add your text and save

Spring Sweets


Snaggable versions of this tag in my Fotki album

For this tutorial you will need the following:

Paint Shop Pro, I am using PSP X7, you should be able to use any version.

Tube of choice, I am using the artwork of Alicia Mujica which you need a license to use.  

Scrap kit of choice. I am using the inspired by kit for this tube by Ladyhawwk Designs, LHD_IB-AliciaMujica-Exclusive-13A  

Font of choice, I am using Freestyle Script


Plugins: no outside plugins


Just remember that my choices of papers and elements is just a suggestion, change it up and make it yours! You don't have to follow mine exactly.

Add a drop shadow of your choosing to tubes & elements throughout. I usually use 1, 1, 50, 5 unless otherwise noted.


Let's get started!

Open a new canvas 950 x 950 pixels with a white background

Open frame 2 copy and paste as a new layer 
click inside with your magic wand, selections, modify, expand 2, selections, invert
open paper 1 copy and paste as a new layer 
click delete on your keyboard,

Copy and paste your tube as a new layer, 
arrange in your frame
erase the bits that hang out of your frame where you don't want them, deselect

Now add your elements:
element 4 resize 60% arrange on bottom left, duplicate & mirror
element 20 resize 85% arrange in center of two flower bunches
element 10 resize 45% arrange on left, behind other flowers, duplicate & mirror

element 6 resize 55% arrange on right side of teapot
element 17 resize 40% arrange on right side of cupcakes, duplicate, mirror, arrange to left & below teapot

element 16 esize 25% arrange on bottom left

add paper 2 above the white background,
apply your mask, merge group
I resized mine 100%

crop and resize
add your copyright and credits as needed
add your text and save

Sunday, April 19, 2015

Fly Away


Snaggable versions of this tag in my Fotki album

For this tutorial you will need the following:

Paint Shop Pro, I am using PSP X7, you should be able to use any version.

Tube of choice, I am using the artwork of Ismael Rac (2015 Pretty 4 You tube)
which you need a license to use.  

Scrap kit of choice. I am using a PTU kit by Scrapping With Lil Ole Me called Fly Away Home  

Font of choice, I am using Multicolored Butterflies

Plugins: no outside plugins


Just remember that my choices of papers and elements is just a suggestion, change it up and make it yours! You don't have to follow mine exactly.

Add a drop shadow of your choosing to tubes & elements throughout. I usually use 1, 1, 50, 5 unless otherwise noted.


Let's get started!

Open a new canvas 850 x 850 pixels with a white background

Open element 141 copy and paste as a new layer, resize 85%
 click inside with your magic wand, selections, modify, expand 2, selections, invert
open paper 20 copy and paste as a new layer 
click delete on your keyboard,

Copy and paste your tube as a new layer, resize by 55%
arrange in your frame
erase the bits that hang out of your frame where you don't want them, deselect

Now add your elements:
element 22 resize 55% then 90% arrange on bottom left, duplicate & mirror
element 121 resize 50% arrange on bottom left in front of other flowers, duplicate, mirror, resize 85%
element 29 rotate right 90 arrange on left, under the other elements, duplicate, mirror, duplicate & rotate left 90 drag below the other two layers

element 24 resize 35% arrange on left above leaves, duplicate drag right, duplicate, drag up
element 65 resize 35% rotate left 40 arrange above leaves on left, duplicate, mirror
element 43 resize 35% arrange on left below the flowers layers at the bottom

element 64 resize 35% arrange below element 43
element 11 resize 25% arrange on left


crop and resize
add your copyright and credits as needed
add your text and save

Friday, April 17, 2015

Naughty


Snaggable versions of this tag in my Fotki album

For this tutorial you will need the following:

Paint Shop Pro, I am using PSP X7, you should be able to use any version.

Tube of choice, I am using the artwork of Amy Matthews tube 33-3 which you need a license to use.  

Scrap kit of choice. I am using ScrapMonti_IB-AmyMathews-26-3 by Monti

Font of choice, I am using Rage Italic

Mask: WSLMask84  - Mask links on right sidebar

Plugins: No outside plugins


Just remember that my choices of papers and elements is just a suggestion, change it up and make it yours! You don't have to follow mine exactly.

Add a drop shadow of your choosing to tubes & elements throughout. I usually use 1, 1, 50, 5 unless otherwise noted.


Let's get started!

Open a new canvas 850 x 850 pixels with a white background

Open frame 2 copy and paste as a new layer 
click inside with your magic wand, selections, modify, expand 2, selections, invert
open paper 6 copy and paste as a new layer 
click delete on your keyboard, deselect

Copy and paste your tube as a new layer, arrange on the left

Now add your elements:
element 19 resize 45% arrange in top section of frame on left, duplicate, drag right
drop opacity of the one on the left to about 30

element 5 resize 35% arrange on top left, duplicate, drag to top right
element 15 resize 45% arrange in front of tube on left
word art 1 resize 45% arrange on bottom right

Copy and paste paper 1 above the white background
apply your mask, merge group, resize 110%

crop and resize
add your copyright and credits as needed
add your text and save

Sunday, April 12, 2015

Spring Break


Snaggable versions of this tag in my Fotki album

For this tutorial you will need the following:

Paint Shop Pro, I am using PSP X7, you should be able to use any version.

Tube of choice, I am using the artwork of Fedor (Melissa tube) which you need a license to use.  

Scrap kit of choice. I am using a PTU kit, Easter Break by Scrappin With Lil Ole Me

Font of choice, I am using Qaskin

Plugins: no outside plugins used


Just remember that my choices of papers and elements is just a suggestion, change it up and make it yours! You don't have to follow mine exactly.

Add a drop shadow of your choosing to tubes & elements throughout. I usually use 1, 1, 50, 5 unless otherwise noted.


Let's get started!

Open a new canvas 950 x 950 pixels with a white background

Open element 89 copy and paste as a new layer, resize 70%
click inside with your magic wand, selections, modify, expand 2,
make a new raster layer below the frame, make sure you're on that layer
copy and paste paper into selection, deselect

Copy and paste your tube as a new layer, resize by 30%
mirror, arrange on left side

now add your elements:
element 88 resize 55% arrange on top right, duplicate & mirror
element 14 resize 20% rotate left 20 arrange in center of two branches at top

element 104 resize 60% arrange behind and above the tube
element 63 mirror & resize 50% rotate right 30 arrange on top, duplicate, resize 50, arrange on top, duplicate & mirror

element 31 resize 55% arrange on left side of tube
element 28 resize 40% arrange on bottom right corner
element 26 resize 60% arrange on right
element 41 resize 30% arrange on top right


crop and resize
add your copyright and credits as needed
add your text and save

Sweetness


Snaggable versions of this tag in my Fotki album

For this tutorial you will need the following:

Paint Shop Pro, I am using PSP X7, you should be able to use any version.

Tube & kit of choice, I am using the PinUp Toons tube 216-1 from the bundle
along with the kit by Ladyhawwk designs, available at CDO.

Font of choice, I am using Sweet Pea

Mask: beckymask23, no longer available for download
if you don't have it, just use something else you like

Plugins: no outside plugins


Just remember that my choices of papers and elements is just a suggestion, change it up and make it yours! You don't have to follow mine exactly.

Add a drop shadow of your choosing to tubes & elements throughout. I usually use 1, 1, 50, 5 unless otherwise noted.


Let's get started!

Open a new canvas 850 x 850 pixels with a white background

Open frame 2 copy and paste as a new layer, resize 85%
click inside with your magic wand, selections, modify, expand 2, selections, invert
open paper 4 copy and paste as a new layer 
click delete on your keyboard,

Copy and paste your tube as a new layer
arrange in your frame

Now add your elements:

element 15 resize 75% arrange on bottom right
element 19 resize 65% arrange behind chair on right

element 17  resize 65% arrange below the chair layer to the left of it
element 7 resize 65% roate right 40 arrange in front of seat, duplicate, mirror, drag back over by original layer so they overlap

element 18 resize 55% rotate left 90 arrange on right side of chair
element 24 resize 55% arrange behind other flowers on the left
duplicate element 19 (the pink flowers that are just behind the chair on the left)
rotate left 90, drag below the other flowers and so they show below element 24 at the bottom

element 46 arrange behind chair, duplicate 3 times and just arrange between the different flower layers wherever you like them

frame 3 arrange behind first frame and background paper

add paper 7 above the white background,
apply mask, merge group
 I duplicated mine about 4 times and merge together to make it darker

crop and resize
add your copyright and credits as needed
add your text and save

Thursday, April 9, 2015

Ebony


Snaggable versions of this tag in my Fotki album

For this tutorial you will need the following:

Paint Shop Pro, I am using PSP X7, you should be able to use any version.

Tube of choice, I am using the artwork of Souldesigner (Ebony tube) which you need a license to use.  

Scrap kit of choice. I am using the matching PTU kit by Niqui's Designs, also called Ebony. 

Font of choice, I am using Sweet Pea

Plugins: No outside plugins


Just remember that my choices of papers and elements is just a suggestion, change it up and make it yours! You don't have to follow mine exactly.

Add a drop shadow of your choosing to tubes & elements throughout. I usually use 1, 1, 50, 5 unless otherwise noted.


Let's get started!

Open a new canvas 850 x 850 pixels with a white background

Open element 26 copy and paste as a new layer, resize 75%, rotate left 90
click inside with your magic wand, selections, modify, expand 2, selections, invert
open paper 15 copy and paste as a new layer 
click delete on your keyboard, deselect

Copy and paste your tube as a new layer, resize by 55%
arrange in center of the frame area

Now add your elements:
element 31 resize 35% arrange on the right side of frame, duplicate, arrange on top left side
element 52 arrange behind frame and background paper
element 42 resize 175% arrange behind wire
element 53 rotate left 90 arrange on bottom over tube layer
element 68 resize 65% rotate left 90, arrange on bottom left below tube layer
element 10 resize 85% arrange just between the frame layer & the wire layer


crop and resize
add your copyright and credits as needed
add your text and save

Saturday, April 4, 2015

Sunflower Wishes


For this tutorial you will need the following:

Paint Shop Pro, I am using PSP X7, you should be able to use any version.

Tube of choice, I am using the artwork of PinUp Toons (PinUpToons-216-3)
which you need a license to use.  

Scrap kit of choice. I am using a PTU kit ScrapMonti_IB-MelissaDawn-14-1 by Monti 

Font of choice, I am using Gigi

Plugins: No outside plugins used


Just remember that my choices of papers and elements is just a suggestion, change it up and make it yours! You don't have to follow mine exactly.

Add a drop shadow of your choosing to tubes & elements throughout. I usually use 1, 1, 50, 5 unless otherwise noted.


Let's get started!

Open a new canvas 850 x 850 pixels with a white background

Open  copy and paste as a new layer, resize 90%
click inside with your magic wand, selections, modify, expand 2
make a new raster layer below the frame, make sure you are on this layer
open paper 7 copy and paste into selection, deselect

add the following to your tag:
element 22 resize 80% arrange across bottom of the frame
element 5 resize 80% arrange on the right side of the frame under the grass layer
add your tube on the left side of the wishing well

element 26 resize 55% arrange on bottom left side of frame
element 6 arrange on the right side of the frame element, below the well, erase what shows under the grass at the bottom, duplicate & mirror

element 4 resize 40% arrange behind the tube, between tube and the well layers
element 21 resize 38% arrange on the right side of the well
element 30, flip & arrange between the frame & background paper

element 10 resize 20% arrange in frame
element 8 resize 20% arrange in the frame by the beehive 
element 23 resize 20% rotate left 35 arrange on bottom left


crop and resize
add your copyright and credits as needed
add your text and save

Thursday, April 2, 2015

Peep Show


Snaggable versions of this tag in my Fotki album

For this tutorial you will need the following:

Paint Shop Pro, I am using PSP X7, you should be able to use any version.

Tube of choice, I am using the artwork of PinUp Toons which you need a license to use.  
This tube is the April 2015 Bonus tube only available in the month of April 2015 with a $10 purchase of PinUp Toons tubes from CDO

Scrap kit of choice. I am using Peep Show, a PTU kit by Scrappin With Lil Ole Me 

Font of choice, I am using DJB Carly Sue Got Married

Plugins:  No outside plugins


Just remember that my choices of papers and elements is just a suggestion, change it up and make it yours! You don't have to follow mine exactly.

Add a drop shadow of your choosing to tubes & elements throughout. I usually use 1, 1, 50, 5 unless otherwise noted.


Let's get started!

Open a new canvas 850 x 850 pixels with a white background

Copy and paste your tube as a new layer

Open element 90 copy and paste as a new layer
click inside with your magic wand, selections, modify, expand 2, selections, invert
open paper 14 copy and paste as a new layer 
click delete on your keyboard,

Copy and paste your close up tube as a new layer
arrange in your frame
click delete on your keyboard
change the blend mode to Luminance(L)

Now add the following elements:
element 13 resize 75% arrange on bottom right side of frame
element 125 resize 65% mirror & arrange behind grass layer
element 7 arrange on left, below element 125
element 34 resize 35% arrange on the right side of the grass
element 40 resize 35% arrange on left side of tube
element 103 resize 95% arrange on right, below frame, duplicate, flip, mirror, merge together


crop and resize
add your copyright and credits as needed
add your text and save

Saturday, March 28, 2015

Karrot Patch


Snaggable versions of this tag in my Fotki album

For this tutorial you will need the following:

Paint Shop Pro, I am using PSP X7, you should be able to use any version.

Tube of choice, I am using the artwork of Alicia Mujica, which you need a license to use. 
This tube is not available in her store, it is an ACDiva Exclusive tube

Scrap kit of choice. I am using a PUT kit, Karrot Patch by Scrappin With Lil Ole Me

Font of choice, I am using Scriptina

Plugins: No outside plugins


Just remember that my choices of papers and elements is just a suggestion, change it up and make it yours! You don't have to follow mine exactly.

Add a drop shadow of your choosing to tubes & elements throughout. I usually use 1, 1, 50, 5 unless otherwise noted.


Let's get started!

Open a new canvas 950 x 950 pixels with a white background

Copy and paste your tube as a new layer, resize by 60%

Copy and paste element 87 arrange behind tube at the top,
click inside with your magic wand, selections, modify, expand 2, selections, invert
copy and paste paper 11, arrange in frame, click delete on your keyboard

Add the following elements
element 80 resize 45% arrange on bottom right side
element 21 resize 65% arrange in front of element 80
element 96 resize 45% mirror & arrange on bottom left 
element 40 resize 45% arrange behind eggs on the left side of them
element 31 resize 25% arrange between eggs and bunny on bottom center
element 69 arrange behind frame & background paper on left, duplicate & mirror


crop and resize
add your copyright and credits as needed
add your text and save

Easter


Snaggable versions of this tag in my Fotki album

For this tutorial you will need the following:

Paint Shop Pro, I am using PSP X7, you should be able to use any version.

Tube of choice, I am using the artwork of Alicia Mujica (Easter Surprise tube)
which you need a license to use.  

Scrap kit of choice. I am using a PTU kit Blessed Easter by Niqui's Designs  

Font of choice, I am using Bolina

Mask of your choice

Plugins: No outside plugins


Just remember that my choices of papers and elements is just a suggestion, change it up and make it yours! You don't have to follow mine exactly.

Add a drop shadow of your choosing to tubes & elements throughout. I usually use 1, 1, 50, 5 unless otherwise noted.


Let's get started!

Open a new canvas 850 x 850 pixels with a white background

Open element 10 copy and paste as a new layer, resize 55% 
Open element 55 copy and paste as a new layer, resize 90% 

click inside element 10 with your magic wand, selections, modify, expand 2, selections, invert
open paper 3 copy and paste as a new layer 
click delete on your keyboard, deselect

Copy and paste your tube as a new layer above both frames, resize by 50%
Arrange over the frame 

Now add your elements:
element 11 resize 45% arrange on bottom right side of tube
element 9 resize 45% arrange on bottom left behind the tube layer
element 35 resize 25% arrange in front of basket
element 1 resize 25% arrange on bottom right
element 41 resize 45% arrange on right above the frames, duplicate & mirror

Copy and paste paper 4 above the white background
apply your mask and merge group


crop and resize
add your copyright and credits as needed
add your text and save