

Thursday, April 22, 2010
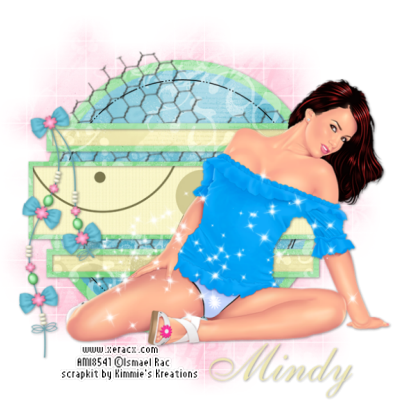
Rock Chicks Do it
 For this tutorial you will need the following:
Paint Shop Pro, I am using PSP X, but any version should work.
3 tubes of your choice. I am using the awesome artwork of Ismael Rac, which you can purchase at AMI.
Template #3 by JackieBeth which was made for the Xeracx Stalkers Forum's Creation Challenge. You can find it on the Xeracx Stalker Creations blog or at her blog Cupquakez Craze
WSL Mask 84 from Weescotslass Creations.
My wordart, which you can find HERE.
Font of choice. I used Puskin.
Plugin: Xero Porcelain, Penta.com Dot and Cross
Let's get started!
Open your template, delete the top copyright layer, resize the canvas to 650x650.
Make the frame fill layer active, click inside them with your magic wand while holding down the shift key. Choose two colors from one of your tubes. Click on the foreground color and click on gradient set as follows, style: line, angle 34, repeats 3. Add a new raster layer and flood fill with the gradient.
Open one of your tubes, arrange it on the left side, resize if necessary. Once you get it where you want, click delete on your keyboard. Do the same for the right side. Leave selected.
Duplicate the left tube, on the duplicate tube, adjust blur, gaussian blur, 20, change the blend mode to soft light. On the original tube layer apply Xero Porcelain with the default settings.
Do the same on the right side tubes. Deselect and then delete the original fill layer.
On the frame layer, adjust, add/remove noise with these settings: Random, monochrome checked, percent at 60. Add a drop shadow.
Make the circle 2 layer active, click inside it with the magic wand, add a new raster layer and flood fill with another color from your tube, deselect and apply the Penta.com Dot and Cross plugin with default settings, delete the original circle 2 layer.
Make the circle 1 layer active, apply the same noise settings as you did for the frame layer, and add a drop shadow.
Do the same for the strip layer.
Make the white background layer active, add a new raster layer. Click on your foreground color and open it up, go to the gradient tab, and check invert. Flood fill with this gradient. Open your mask and apply it by going to Layers, New mask layer, from Image, and search for your mask in the drop down box. Then, delete your mask layer and merge the group.
Add your main tube and add a drop shadow.
Open the word art and apply as a new layer, resize if necessary.
Add your name and copyright info/credits as needed.
Crop, resize and save!
For this tutorial you will need the following:
Paint Shop Pro, I am using PSP X, but any version should work.
3 tubes of your choice. I am using the awesome artwork of Ismael Rac, which you can purchase at AMI.
Template #3 by JackieBeth which was made for the Xeracx Stalkers Forum's Creation Challenge. You can find it on the Xeracx Stalker Creations blog or at her blog Cupquakez Craze
WSL Mask 84 from Weescotslass Creations.
My wordart, which you can find HERE.
Font of choice. I used Puskin.
Plugin: Xero Porcelain, Penta.com Dot and Cross
Let's get started!
Open your template, delete the top copyright layer, resize the canvas to 650x650.
Make the frame fill layer active, click inside them with your magic wand while holding down the shift key. Choose two colors from one of your tubes. Click on the foreground color and click on gradient set as follows, style: line, angle 34, repeats 3. Add a new raster layer and flood fill with the gradient.
Open one of your tubes, arrange it on the left side, resize if necessary. Once you get it where you want, click delete on your keyboard. Do the same for the right side. Leave selected.
Duplicate the left tube, on the duplicate tube, adjust blur, gaussian blur, 20, change the blend mode to soft light. On the original tube layer apply Xero Porcelain with the default settings.
Do the same on the right side tubes. Deselect and then delete the original fill layer.
On the frame layer, adjust, add/remove noise with these settings: Random, monochrome checked, percent at 60. Add a drop shadow.
Make the circle 2 layer active, click inside it with the magic wand, add a new raster layer and flood fill with another color from your tube, deselect and apply the Penta.com Dot and Cross plugin with default settings, delete the original circle 2 layer.
Make the circle 1 layer active, apply the same noise settings as you did for the frame layer, and add a drop shadow.
Do the same for the strip layer.
Make the white background layer active, add a new raster layer. Click on your foreground color and open it up, go to the gradient tab, and check invert. Flood fill with this gradient. Open your mask and apply it by going to Layers, New mask layer, from Image, and search for your mask in the drop down box. Then, delete your mask layer and merge the group.
Add your main tube and add a drop shadow.
Open the word art and apply as a new layer, resize if necessary.
Add your name and copyright info/credits as needed.
Crop, resize and save!
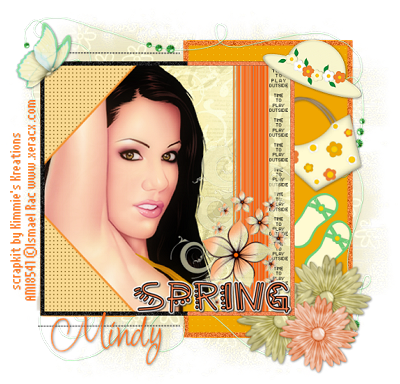
Blinged Spring
 For this tutorial you will need the following:
Paint Shop Pro, any version should work fine, I am using PSP X.
Tube of your choice. I am using the work of Ismael Rac which you must purchase. You can find his tubes at AMI.
Scrap kit of your choice. I am using a PTU kit called Summertime Fun by Kimmie's Kreations which you can also find at AMI.
Template #6 by JackieBeth, which she made for the Xeracx Stalkers Forum creation challenge. You can find it on the Xeracx Stalker Creations blog HERE and you can also find it on her own site HERE.
Font of choice. I am using ALS Script
WSL Mask84 from Weescotslass Creations
Let's get started!
Open your template and delete the top copyright layer, then resize the canvas by going to image, canvas size and resize by 650x650.
I will tell you what papers, etc I am using in my tag, but please feel free to change it up on your tag. You want it to be yours, not mine, right?
Make the circle fill layer active, click on it with your magic wand. Open paper 11, copy and paste as a new layer, selections, invert and on the paper layer, click delete on your keyboard, then deselect. Delete the original layer.
Make the black circle layer active and click on it with your magic wand, selections, modify, expand by 2, invert. Open paper 13, copy and paste as a new layer, click delete on your keyboard, deselect and add a drop shadow. I used 1, 1, 60, 5. Drag it below the inner circle layer. Delete the original circle layer.
Make the frame fill layer active, click on it with your magic wand, selections, invert, open paper 9, copy and paste as a new layer, and click delete on your keyboard. Delete the original layer.
Make the strip fill layer active, and do the same as above with it. I used paper 14 for the strip fills.
Fill the frames the same way you did the fill layers, when finished add a drop shadow to them. I used paper 13 on each of the rectangle frames.
Open your tube, copy and paste as a new layer, arrange it where you want and add the drop shadow.
Add whatever elements you'd like to your tag. I just used one of the string elements from the kit and some other wire and glitter elements I had from other kits.
Copy and paste a paper onto your canvas, drag it to the bottom, open up your mask, go to layers, new mask layer, from image, find the mask in the drop down box, and apply it to your paper. Delete the mask layer and merge the group. If you want it a little lighter, lower the opacity. I lowered mine to about 65%.
Add your name, copyright info and credits as needed.
Crop, resize, delete the white background if you want it transparent, and save.
For this tutorial you will need the following:
Paint Shop Pro, any version should work fine, I am using PSP X.
Tube of your choice. I am using the work of Ismael Rac which you must purchase. You can find his tubes at AMI.
Scrap kit of your choice. I am using a PTU kit called Summertime Fun by Kimmie's Kreations which you can also find at AMI.
Template #6 by JackieBeth, which she made for the Xeracx Stalkers Forum creation challenge. You can find it on the Xeracx Stalker Creations blog HERE and you can also find it on her own site HERE.
Font of choice. I am using ALS Script
WSL Mask84 from Weescotslass Creations
Let's get started!
Open your template and delete the top copyright layer, then resize the canvas by going to image, canvas size and resize by 650x650.
I will tell you what papers, etc I am using in my tag, but please feel free to change it up on your tag. You want it to be yours, not mine, right?
Make the circle fill layer active, click on it with your magic wand. Open paper 11, copy and paste as a new layer, selections, invert and on the paper layer, click delete on your keyboard, then deselect. Delete the original layer.
Make the black circle layer active and click on it with your magic wand, selections, modify, expand by 2, invert. Open paper 13, copy and paste as a new layer, click delete on your keyboard, deselect and add a drop shadow. I used 1, 1, 60, 5. Drag it below the inner circle layer. Delete the original circle layer.
Make the frame fill layer active, click on it with your magic wand, selections, invert, open paper 9, copy and paste as a new layer, and click delete on your keyboard. Delete the original layer.
Make the strip fill layer active, and do the same as above with it. I used paper 14 for the strip fills.
Fill the frames the same way you did the fill layers, when finished add a drop shadow to them. I used paper 13 on each of the rectangle frames.
Open your tube, copy and paste as a new layer, arrange it where you want and add the drop shadow.
Add whatever elements you'd like to your tag. I just used one of the string elements from the kit and some other wire and glitter elements I had from other kits.
Copy and paste a paper onto your canvas, drag it to the bottom, open up your mask, go to layers, new mask layer, from image, find the mask in the drop down box, and apply it to your paper. Delete the mask layer and merge the group. If you want it a little lighter, lower the opacity. I lowered mine to about 65%.
Add your name, copyright info and credits as needed.
Crop, resize, delete the white background if you want it transparent, and save.
Tuesday, April 20, 2010
Dreaming of Spring
 For this tutorial you will need the following:
Paint Shop Pro, any version should work, I am using PSP X
Template 20 by Artmama which you can find at the Xeracx Stalker Creations blog. We have creation challenges at the Offical Xeracx Stalker forum each month for templates and scrap kits, and these are from one of those challenges.
EBD Mask 4 by Rachel at Enchanted by Darkness
Scrap kit of your choice. I am using a PTU kit by Kimmie's Kreations from AMI called Summertime Fun.
Tube of your choice. I am using the wonderful artwork of Ismael Rac which you must have a license to use. You can find his work also at AMI.
Font of choice. I used licorice.
Plugins: Penta.com Color Dot, Xero Porcelain
Let's get started!
Remember, you don't have to use the papers or elements I use, they're just a suggestion. Make it yours.
I originally started out wanting to make a tag with this template and was going to recolor the orange in the template the colors of the kit, but it wasn't working quite right for me, and I wanted to use this kit... so I recolored some bits of the kit.
Open your template, resize all layers by 80%. Adjust canvas size to 700x700 so you have some room to work. If you like to have a white background layer to be able to see a little better, add a new raster layer, drag it to the bottom and flood fill with white. Delete her credits layer (named delete)
Make the square layer active, selections, select all, float, defloat, invert. Open paper 14, copy and paste as a new layer, click delete on your keyboard and deselect and delete the original layer.
Make the rectangle layer active, add a new raster layer, flood fill with #efa601 and deselect, delete the original rectangle layer. Make sure you are still on that layer that you just filled. Take your selection tool set on rectangle and draw out a small rectangle across the top of it (see my tag for reference). Leave selected and apply Penta color dot with the following settings
Value = 90
Distance = 10
Color R = 255
Color G = 255
Color B = 255
and then deselect. Do the same to the bottom of the rectangle layer.
Make the rectangle frame layer active, selections, float, defloat and add a new raster layer. Flood fill with #ee7c35. Adjust, add/remove noise, add noise, check gaussian and monochrome, amount at about 40. Delete the original frame layer.
Make the dotted triangle layer active, selections, select all, float, defloat, add a new raster layer and flood fill with #efa601. Drag it below the original layer, and then on the original layer drop the opacity to around 55 or 60, depending on how much you want the color to show through.
Take your tube close up, and if needed, resize it larger. Arrange it under the frame how you'd like it and then erase the bits that show around the frame. Duplicate and on the top layer apply gaussian blur set at 20 (you may have to erase some of it that goes beyond the frame) and change the blend mode to soft light. On the original tube, apply Xero Porcelain with the default settings. Drop the opacity of the bottom tube to around 90.
Add whatever elements you'd like and resize as needed. I also recolored some things.
Open paper 24, copy and paste as a new layer, drag it to the bottom. Open your mask and apply as a new mask layer from image, once applied, delete the mask and merge the group. If it's not dark enough, you can duplicate it and merge the two together. If it's too light, just drop the opacity down.
Add your name and copyright info/credits.
Delete your white background layer, crop and resize if necessary.
Save as a .png file to have it transparent or whatever other file type you want .jpg or .gif, etc. and you're done!
For this tutorial you will need the following:
Paint Shop Pro, any version should work, I am using PSP X
Template 20 by Artmama which you can find at the Xeracx Stalker Creations blog. We have creation challenges at the Offical Xeracx Stalker forum each month for templates and scrap kits, and these are from one of those challenges.
EBD Mask 4 by Rachel at Enchanted by Darkness
Scrap kit of your choice. I am using a PTU kit by Kimmie's Kreations from AMI called Summertime Fun.
Tube of your choice. I am using the wonderful artwork of Ismael Rac which you must have a license to use. You can find his work also at AMI.
Font of choice. I used licorice.
Plugins: Penta.com Color Dot, Xero Porcelain
Let's get started!
Remember, you don't have to use the papers or elements I use, they're just a suggestion. Make it yours.
I originally started out wanting to make a tag with this template and was going to recolor the orange in the template the colors of the kit, but it wasn't working quite right for me, and I wanted to use this kit... so I recolored some bits of the kit.
Open your template, resize all layers by 80%. Adjust canvas size to 700x700 so you have some room to work. If you like to have a white background layer to be able to see a little better, add a new raster layer, drag it to the bottom and flood fill with white. Delete her credits layer (named delete)
Make the square layer active, selections, select all, float, defloat, invert. Open paper 14, copy and paste as a new layer, click delete on your keyboard and deselect and delete the original layer.
Make the rectangle layer active, add a new raster layer, flood fill with #efa601 and deselect, delete the original rectangle layer. Make sure you are still on that layer that you just filled. Take your selection tool set on rectangle and draw out a small rectangle across the top of it (see my tag for reference). Leave selected and apply Penta color dot with the following settings
Value = 90
Distance = 10
Color R = 255
Color G = 255
Color B = 255
and then deselect. Do the same to the bottom of the rectangle layer.
Make the rectangle frame layer active, selections, float, defloat and add a new raster layer. Flood fill with #ee7c35. Adjust, add/remove noise, add noise, check gaussian and monochrome, amount at about 40. Delete the original frame layer.
Make the dotted triangle layer active, selections, select all, float, defloat, add a new raster layer and flood fill with #efa601. Drag it below the original layer, and then on the original layer drop the opacity to around 55 or 60, depending on how much you want the color to show through.
Take your tube close up, and if needed, resize it larger. Arrange it under the frame how you'd like it and then erase the bits that show around the frame. Duplicate and on the top layer apply gaussian blur set at 20 (you may have to erase some of it that goes beyond the frame) and change the blend mode to soft light. On the original tube, apply Xero Porcelain with the default settings. Drop the opacity of the bottom tube to around 90.
Add whatever elements you'd like and resize as needed. I also recolored some things.
Open paper 24, copy and paste as a new layer, drag it to the bottom. Open your mask and apply as a new mask layer from image, once applied, delete the mask and merge the group. If it's not dark enough, you can duplicate it and merge the two together. If it's too light, just drop the opacity down.
Add your name and copyright info/credits.
Delete your white background layer, crop and resize if necessary.
Save as a .png file to have it transparent or whatever other file type you want .jpg or .gif, etc. and you're done!
Thursday, April 15, 2010
I received a wonderful award from Artmama over at Artmama's Studio and I'm supposed to pass it on to three other blogs. Thank you sweetie!
I'm going to pass it on to 3 fellow Ismael Rac stalkers.
The first is Dite whose site is called Dite's Haven.
The next one is Leah whose blog is The Life and Times of Leah
And the next one goes to Tweety at Tweety's tag tutorials
Please stop by their sites and check them out, each and every one is full of great stuff!

Subscribe to:
Posts (Atom)