
Wednesday, August 31, 2011
Show off your tags!
Hey everyone, I just wanted to remind you that if you do tags from my tutorials, I'd love to see your results and possibly post them on my blog! Please feel free to send your tags to me at my email, which is sinswtcreations@aol.com You can also find it on the sidebar if you need to find it at a later time and don't want to dig this old post out! :) If you just want to show it off to me and don't want it posted, I won't post it. If you don't mind if I post it on my blog, please let me know and if you also have a blog, give me your link and I'll link back to you.
Monday, August 29, 2011
Love Kills
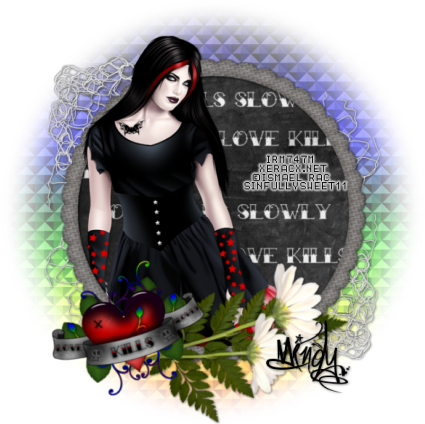
For this tutorial you will need the following:
Paint Shop Pro, I am using PSP X, you should be able to use any version.
Tube of choice, I am using the artwork of Ismael Rac which you need a license to use. You can get it at his store HERE.
Scrap kit of choice. I am using Love Kills by Farrah's Designer Scraps.
Font of choice, I am using sick capital vice.
Plugins: Filter Factory Gallery B Cut Glass
Just remember that my choices of papers and elements is just a suggestion, change it up and make it yours! You don't have to follow mine exactly.
Let's get started!
Open a new canvas 650 x 650 white background.
Open frame 1 copy and paste as a new layer, image resize by 25%.
Click inside the frame with your magic wand, selections, modify, expand by 4.
Open paper 2, resize by 25%, copy and paste as a new layer, selections, invert, click delete on your keyboard. Leave selected and drag the paper below your frame.
Open the close up of your tube, copy and paste as a new layer.
Duplicate your tube, hide the top one, drag the original below your frame. Use your eraser to erase the parts that hang over the bottom part of the frame. Deselect and add a drop shadow.
Unhide the top tube, erase the parts that hang over the bottom of the frame. You don't have to be real careful because the bottom tube will show. This way it's easier to delete the bottom part without having to go pixel by pixel.
Open the heart element, resize by 20%, rotate to the left by 16.
Open paper 2, copy and paste as a new layer, drag it so it is just above your white background layer resize by 16%.
Make the frame layer active. Selections, select all, float, defloat, invert. Take your eraser tool, make the paper your just added and erase everything outside of the outer edges of your frame, deselect.
Adjust blur, gaussian blur by 20.
Apply filter factory gallery B cut glass with the settings at 49 on top 50 on the bottom. Resize by 110% and drop the opacity to around 60.
Open the mesh, resize by 20% copy and paste as a new layer, arrange it to the top left, drag the layer down so it is just above the background we just made. Duplicate, mirror, flip. Merge both of the mesh layers together and add a drop shadow.
Open flower 3, resize by 20%, copy and paste as a new layer, free rotate to the right by 70. Arrange along the bottom of the frame, drag this layer below the heart layer. Duplicate.
On the duplicate flower, resize by 80%, free rotate to the right by 15. Add drop shadow to both flowers.
Open the leaves, resize by 16% and rotate to the right by 83 and add a drop shadow.
Add your name, copyright and credits as needed.
Crop, resize and save.
Friday, August 26, 2011
Bite Me
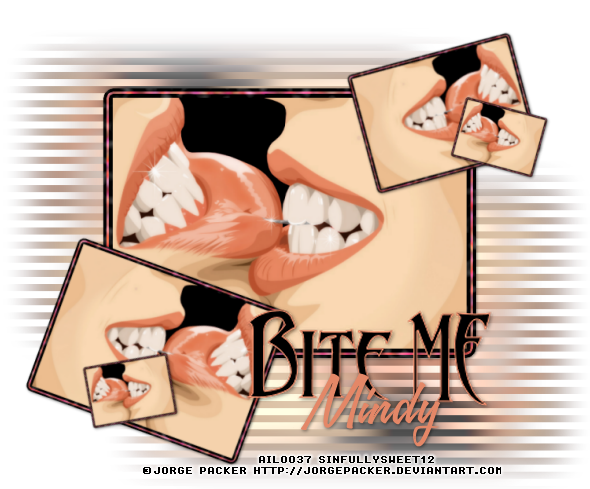
For this tutorial you will need the following:
Paint Shop Pro, I am using PSP X, you should be able to use any version.
Tube of choice, I am using the artwork of Tony Tzanoukakis, which you need a license to use. You can get it at PSP Tubes Emporium.
Scrap kit of choice. I am using Justice Vampire by Wicked Princess Scraps. You can find it on her blog HERE and the stores she sells at are shown on the top left side of her blog.
Font of choice, I am using Sanitarium BB & Nightmare 5
Mask: gemsmask158 from Gem's Taggin Scraps
Plugins: no outside plugins
Just remember that my choices of papers and elements is just a suggestion, change it up and make it yours! You don't have to follow mine exactly.
Let's get started!
Open a new canvas 650 x 650 white background.
Open element VJ_Frame, copy and paste as a new layer, resize by 70%
Click inside the frame with your magic wand, selections, modify, expand by 5.
Make the background layer active, open paper 12, copy and paste as a new layer, selections, invert, click delete on your keyboard, leave activated.
Open your closeup, mirror, copy and paste as a new layer, arrange how you want it, click delete on your keyboard. Deselect.
Duplicate your tube, and on the duplicate layer, adjust, blur, gaussian blur 3. Change the blend mode to soft light.
On the original tube layer, adjust hue and saturation, change both to 0. Now change the blend mode of this layer to hard light, drop the opacity to 65, add a drop shadow.
Add a drop shadow to your frame layer.
Open the bloody bling element.
Make the background paper layer active, selections, select all, float, defloat. Copy and paste your bling layer and resize by 70%. Selections, invert, click delete on your keyboard. Deselect.
Drop the opacity to about 70-75%. Make sure it is below both tube layers and above the background layer.
Add whichever elements you like. I used the following & added drop shadows if needed:
Moon 3 resized @ 45% - place below frame background to top right
Cemetary resized @ 60% place just above frame layer across bottom
Demon skull resized @ 60% place above cemetary layer on left side
Spiderweb resized @ 30% place above frame on top left side
Cross banner resized @ 45% place above frame on top right side
Broken heart resized @ 25% place above cemetary on bottom right side
Open a paper of your choice, copy and paste as a new layer. Drag this layer down so it is just above your white background layer.
Open your mask, go to layers, new mask layer, from image, find the mask in the drop down box, click ok. Delete the mask and merge group. Resize by 88% and drop the opacity to around 80.
Add your name, copyright and credits, resize/crop as needed and save!
Friday, August 12, 2011
Strawberry Sweetie

For this tutorial you will need the following:
Paint Shop Pro, I am using PSP X, you should be able to use any version.
Tube of choice, I am using the artwork of Ismael Rac, which you need a license to use. You can get it at his store.
Scrap kit of choice. I am using My Colorful World by Farrah's Designer Scraps. You can find it in her store here. It's a cool kit, you get 7 mini kits in one.
Font of choice, I am using zebra.
Mask: Vix mask 311 which you can find on here site here.
Plugins: Xero Radiance,
Just remember that my choices of papers and elements is just a suggestion, change it up and make it yours! You don't have to follow mine exactly.
Let's get started!
Open a new canvas 650 x 650 white.
Open Red Ribbon 1, copy and paste as a new layer, resize by 30%. Click inside it with your magic wand. Selections, modify, expand by 3.
Open Red Paper 5 (it's actually cream colored, but it's in with the reds) Copy and paste as a new layer above your white background layer, resize by 30%, selections, invert, click delete on your keyboard.
Leave selected and open a close up of your tube, copy and paste as a new layer, arrange how you want inside the ribbon frame, selections, invert, click delete on your keyboard. Deselect.
If you are using the same one as me, copy merged, then paste as a new image, then mirror it, then copy it again and paste it inside the frame. I had to do the extra step because there were several layers to the tube and I couldn't just mirror it and copy.
Duplicate the tube and on the top copy, adjust blur, gaussian blur 3, then change the opacity to soft light. On the bottom tube, apply Xero Radiance with the default settings, change the blend mode to luminance (L) and add a drop shadow.
Add a drop shadow to the ribbon frame.
Copy and paste your full sized tube, arrange it on the right side of the tag. Resize if needed, add a drop shadow.
Open red paper 3, copy and paste as a new layer, drag it down so that it is just above your white background layer. Layers, new mask layer, from image, find your mask in your drop down menu and click ok. Delete the mask in your layers palette and merge group.
Now add whichever elements you like to your tag, resizing and adding drop shadow as needed.
Add your text and credits, crop, resize and save.
Sunday, August 7, 2011
Designer Scraps Blog Train
As you may know, I joined the CT at Designer Scraps. Several of the designers and CT there have created some great kits for a blog train called A Little Birdie Told Me. It's a great color palette and each part is absolutely stunning. So stop on by each of their blogs to download. Remember to leave some love! Click on the previews to go to their blogs.


Tuesday, August 2, 2011
It's Winter Down Under

I thought since in some of the forums I'm in, many of the members are in the winter months now, while here in the States it's summer, I'd do a winter tut for them. It must stink seeing all these nice flowery pretty summer tags and tuts in the middle of winter! lol So for all my friends in cold winter places, this is for you! :)
For this tutorial you will need the following:
Paint Shop Pro, I am using PSP X, you should be able to use any version.
Tube of choice, I am using the artwork of Ismael Rac which you need a license to use. You can get it at his store here.
Scrap kit of choice. I am using Winter Frost by Stargazer Musings. You can find it here. The stores she sells in are listed on the right side of her blog.
Font of choice, I am using
Plugins: no outside plugins used.
Just remember that my choices of papers and elements is just a suggestion, change it up and make it yours! You don't have to follow mine exactly.
Let's get started!
Open a new canvas 650 x 650 white.
Open snowball frame one, copy and paste as a new layer, resize by 60%.
Open snowflake frame one, copy and paste as a new layer, resize by 60%, arrange it over the snowball frame, add drop shadow.
Open diamond frame 1, copy and paste as a new layer, resize by 60%, arrange it over the snowflake frame, add a drop shadow.
Click inside the snowball frame layer with your magic wand.
Selections, modify, expand by 3.
Open paper 22, copy and paste as a new layer, resize by 60%. Selections, invert, click delete on your keyboard. Leave selected and drag the paper layer down below your snowball frame.
Open your tube, copy and paste as a new layer. Arrange in the frame how you want it then duplicate it. Close the duplicate for now.
Make sure the original tube is below the snowball frame layer, take your eraser tool and erase the parts hanging over the bottom of the frame. Deselect and add a drop shadow to the tube and the snowball frame layer.
Unhide the duplicate tube, drag it above all 3 of the frame layers. Erase the bits that hang over the bottom of the frames. This way you don't have to erase the 3 frame layers where they go over the head area of the tube!
Add whichever elements you'd like to your tag. I used the following elements with a drop shadow added to each one.
Branch 5 element resize by 80% rotate to the left by 90
Cluster element resize by 80%
Curled ribbon 2 resize by 60%
Arrange these along the bottom of the frames.
Poinsettia cluster 1, free rotate to the right by 17 drag it just above the white background layer.
Scatter diamonds layer. Open up and take your selection tool and draw around the diamonds on the top right side. Copy and paste as a new layer into your tag. Arrange on the top left. Duplicate, image mirror. Merge these two down together, duplicate and flip. Merge these two layers down together, then drag that layer down so it is just above the poinsettia layer.
Add your name, copyright and credits as needed.
Crop, resize and save.
Subscribe to:
Posts (Atom)