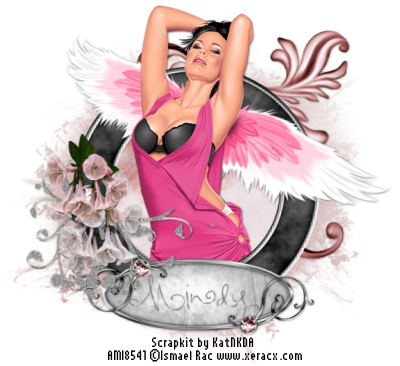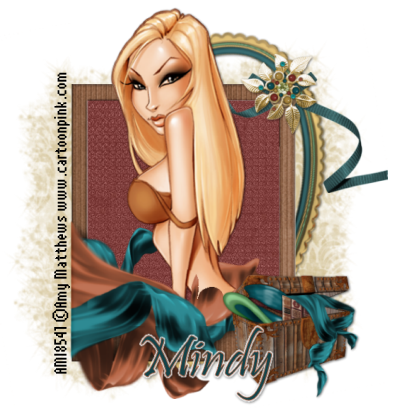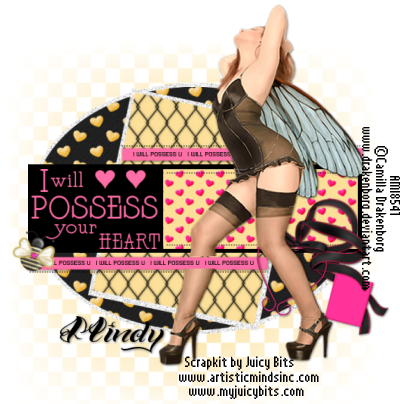
For this tutorial you will need the following:
Paint Shop Pro, any version should work, I am using version PSP X.
Tube of choice. I am using the wonderful artwork of Camilla Drakenborg which you must have a license to use. You can find her work at
AMI.
Template CM06 by Bel Vidotti, which you can find at the
Creative Misfits blog (March 14, 2010 entry). Just click on the template below Bel's name to go to the download.
Scrap kit of your choice. I am using a kit by Juicy Bits called Love Buzz which you can also find at the
AMI store.
Mask of your choice. I am using Becky_Mask042. I don't have a current download site for her anymore.
Font of your choice. I used VTC Bad Tattoo
Let's get started!
Remember, you don't have to use the same tube, elements or papers I do. You can use anything you want, these are just suggestions. Make it yours!
Open your template, delete the credits layer and both star layers, change the canvas size to 600x700 just to give us some extra room to work. If you like having a white background layer to help you see what you're doing, you can add a new layer, drag it to the bottom and flood fill with white. It's not necessary, but some people like that too see a bit more easily.
Make the gradient elipse layer active, selections, select all, float, defloat, invert. Open paper 11, copy and paste as a new layer, resize by 65%, make sure you are on your paper layer and click delete on your keyboard and then deselect. Delete the original layer.
Make the blue frame layer active, selections, select all, float, invert, open paper 2, copy and paste as a new layer, resize by 55%, make sure you have that layer active, and click delete on your keyboard and then deselect. Delete the original layer.
Make the Blue rec layer active, selections,select all, float, invert, open paper 13, copy and paste as a new layer, resize by 40%, make sure you are on that layer and click delete on your keyboard. Delete the original blue rec layer.
Make one of the thin rec layers active, selections, select all, float, add a new raster layer and flood fill with a color from one of the papers you used. I chose pink because I had only used it on one of the papers and didn't want my whole tag to be yellow and black. Add a drop shadow. I used 1, 1, 60, 5.
Do the same for the other thin rec layer, the hearts layer and the top I will posses you layer (the white one).
Add any elements you'd like. I added Heart Tag 1 resized at 40%, and the bee resized at 23% and rotated by 18 to the right.
Add your name, © info and credits as necessary. Crop and resize, save and you're all done!

 For this tutorial you will need the following:
Paint Shop Pro, I am using PSPX, but any version should work.
Two tubes of your choice. I am using the gorgeous artwork of Ismael Rac which you must purchase at AMI to use.
Effects and Plugins:
Sepia Toning, which comes with PSP X
Penta.com Color Dot
Toadies Ommadawn
Font used: Angelic War
Let's get started!
Open a new canvas about 700x700 with a white background. You can crop it down and get rid of the white at the end. This just makes it easier for us to work.
Using your preset shape tool set at rectangle, set your foreground to #c5203e and your background to null, line width about 5. Draw out a smallish rectangle. Convert to raster layer and then duplicate it 3 times. Arrange them so they are overlapping how you'd like them.
For this tutorial you will need the following:
Paint Shop Pro, I am using PSPX, but any version should work.
Two tubes of your choice. I am using the gorgeous artwork of Ismael Rac which you must purchase at AMI to use.
Effects and Plugins:
Sepia Toning, which comes with PSP X
Penta.com Color Dot
Toadies Ommadawn
Font used: Angelic War
Let's get started!
Open a new canvas about 700x700 with a white background. You can crop it down and get rid of the white at the end. This just makes it easier for us to work.
Using your preset shape tool set at rectangle, set your foreground to #c5203e and your background to null, line width about 5. Draw out a smallish rectangle. Convert to raster layer and then duplicate it 3 times. Arrange them so they are overlapping how you'd like them.
 Make the second rectangle down active and click inside it with your magic wand tool. Now, make the top rectangle active, click delete on your keyboard. Do the same for the third rectangle down, then deselect.
Merge the top 3 rectangles together.
Now, make the third rectangle down active, click inside it with your magic wand. Now get on the bottom rectangle layer and make it active, click delete on your keyboard. Merge it with the other layer with the 3 rectangles.
Click inside each of the rectangles with your magic wand while holding the shift key down, selections, modify, expand by 2, add a new raster layer and flood fill with #1381e2.
Open one of your tubes, copy and paste it as a new layer, selections, invert, click delete on your keyboard, deselect and add a drop shadow.
Take your magic wand and on your rectangles layer, click inside 2 of the frames holding down the shift key. Now go to your tube layer and go to Effects>Image Effects> Sepia Toning and use the default setting. Deselect.
Back on the blue background layer inside your rectangles, apply Penta.com Color dot with the following settings top to bottom: 90, 2, 255, 255, 255.
Hide your white background layer again, and merge all layers visible, add a drop shadow, then unhide your white background.
Duplicate your merged layer. On the bottom layer, blur, gaussian blur by 20. Duplicate the blurred layer and mirror it. Drag the two blurred layers around to where they show how you like them and then merge them together. Then apply Toadies Ommadawn with the following settings top to bottom: 12, 8, 234, 17.
Add your full tube and give it a drop shadow.
Add your name.
Add your copyright info, crop and resize as necessary and save!
Make the second rectangle down active and click inside it with your magic wand tool. Now, make the top rectangle active, click delete on your keyboard. Do the same for the third rectangle down, then deselect.
Merge the top 3 rectangles together.
Now, make the third rectangle down active, click inside it with your magic wand. Now get on the bottom rectangle layer and make it active, click delete on your keyboard. Merge it with the other layer with the 3 rectangles.
Click inside each of the rectangles with your magic wand while holding the shift key down, selections, modify, expand by 2, add a new raster layer and flood fill with #1381e2.
Open one of your tubes, copy and paste it as a new layer, selections, invert, click delete on your keyboard, deselect and add a drop shadow.
Take your magic wand and on your rectangles layer, click inside 2 of the frames holding down the shift key. Now go to your tube layer and go to Effects>Image Effects> Sepia Toning and use the default setting. Deselect.
Back on the blue background layer inside your rectangles, apply Penta.com Color dot with the following settings top to bottom: 90, 2, 255, 255, 255.
Hide your white background layer again, and merge all layers visible, add a drop shadow, then unhide your white background.
Duplicate your merged layer. On the bottom layer, blur, gaussian blur by 20. Duplicate the blurred layer and mirror it. Drag the two blurred layers around to where they show how you like them and then merge them together. Then apply Toadies Ommadawn with the following settings top to bottom: 12, 8, 234, 17.
Add your full tube and give it a drop shadow.
Add your name.
Add your copyright info, crop and resize as necessary and save!