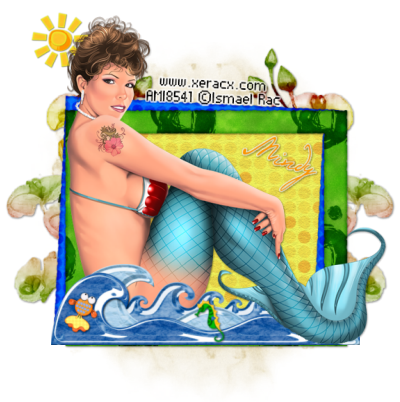
 Anyone else chompin' at the bit waiting for Spring to get here? I decided it was time for a summer themed tag just because I'm sick of looking at all the snow outside my window!
For this tut you will need the following:
Paint Shop Pro, I am using PSP X, but any version should work.
Scrap kit of your choice. I am using a PTU kit by Gina of Scrappin' Bratz, called Something's Fishy. You can get her kit HERE.
A tube of your choice. I am using the wonderful artwork of Ismael Rac which you have to purchase to use. You can find his stuff over at AMI.
Let's get started!
Open the Something's Fishy frame 5. Resize it to 550x480 pixels. Then change the canvas size to 700x700.
Take your magic wand and click inside the frame, modify, expand by 5. Open a paper, copy and paste as a new layer, resize to the size you'd like so the pattern is showing how you want it to in the frame, arrange it, and then selections, invert, make sure you are on the paper layer, and click delete on your keyboard. Leave selected.
Open your tube, copy and paste as a new layer then duplicate it. Drag the original below your frame layer and hide the duplicate for now. Take your eraser tool and erase the parts of your tube that you don't want hanging below your frame. Deselect and add a drop shadow.
Unhide your duplicate tube and erase the parts that hang over your frame. You don't have to be really careful what you erase, because you will have the bottom tube showing through.
Open paper 1, resize by 35%, copy and paste as a new layer, send to the bottom. Apply your mask, then delete the mask and merge the group.
Open one of the wave elements, copy and paste as a new layer. Resize it so it fits across the bottom of your frame. I did it twice by 50% then once by 60%. Then drop the opacity to about 50% and take your eraser tool and erase the bits that cover the mermaid's tail. Bring the opacity back to 100%.
Add any elements you like to your tag.
Anyone else chompin' at the bit waiting for Spring to get here? I decided it was time for a summer themed tag just because I'm sick of looking at all the snow outside my window!
For this tut you will need the following:
Paint Shop Pro, I am using PSP X, but any version should work.
Scrap kit of your choice. I am using a PTU kit by Gina of Scrappin' Bratz, called Something's Fishy. You can get her kit HERE.
A tube of your choice. I am using the wonderful artwork of Ismael Rac which you have to purchase to use. You can find his stuff over at AMI.
Let's get started!
Open the Something's Fishy frame 5. Resize it to 550x480 pixels. Then change the canvas size to 700x700.
Take your magic wand and click inside the frame, modify, expand by 5. Open a paper, copy and paste as a new layer, resize to the size you'd like so the pattern is showing how you want it to in the frame, arrange it, and then selections, invert, make sure you are on the paper layer, and click delete on your keyboard. Leave selected.
Open your tube, copy and paste as a new layer then duplicate it. Drag the original below your frame layer and hide the duplicate for now. Take your eraser tool and erase the parts of your tube that you don't want hanging below your frame. Deselect and add a drop shadow.
Unhide your duplicate tube and erase the parts that hang over your frame. You don't have to be really careful what you erase, because you will have the bottom tube showing through.
Open paper 1, resize by 35%, copy and paste as a new layer, send to the bottom. Apply your mask, then delete the mask and merge the group.
Open one of the wave elements, copy and paste as a new layer. Resize it so it fits across the bottom of your frame. I did it twice by 50% then once by 60%. Then drop the opacity to about 50% and take your eraser tool and erase the bits that cover the mermaid's tail. Bring the opacity back to 100%.
Add any elements you like to your tag.

Saturday, February 27, 2010
Under the Sea
Anyone else chompin' at the bit waiting for Spring to get here? I decided it was time for a summer themed tag just because I'm sick of looking at all the snow outside my window!
For this tut you will need the following:
Paint Shop Pro, I am using PSP X, but any version should work.
Scrap kit of your choice. I am using a PTU kit by Gina of Scrappin' Bratz, called Something's Fishy. You can get her kit HERE.
A tube of your choice. I am using the wonderful artwork of Ismael Rac which you have to purchase to use. You can find his stuff over at AMI.
Let's get started!
Open the Something's Fishy frame 5. Resize it to 550x480 pixels. Then change the canvas size to 700x700.
Take your magic wand and click inside the frame, modify, expand by 5. Open a paper, copy and paste as a new layer, resize to the size you'd like so the pattern is showing how you want it to in the frame, arrange it, and then selections, invert, make sure you are on the paper layer, and click delete on your keyboard. Leave selected.
Open your tube, copy and paste as a new layer then duplicate it. Drag the original below your frame layer and hide the duplicate for now. Take your eraser tool and erase the parts of your tube that you don't want hanging below your frame. Deselect and add a drop shadow.
Unhide your duplicate tube and erase the parts that hang over your frame. You don't have to be really careful what you erase, because you will have the bottom tube showing through.
Open paper 1, resize by 35%, copy and paste as a new layer, send to the bottom. Apply your mask, then delete the mask and merge the group.
Open one of the wave elements, copy and paste as a new layer. Resize it so it fits across the bottom of your frame. I did it twice by 50% then once by 60%. Then drop the opacity to about 50% and take your eraser tool and erase the bits that cover the mermaid's tail. Bring the opacity back to 100%.
Add any elements you like to your tag.
Thursday, February 25, 2010
Swagbucks
I have joined Swagbucks and earn points or "swagbucks" for searching the web. Check out their site and join by clicking the banner below. You can get cool stuff like Amazon.com gift cards, movie posters, books, magazines, trading cards, gift cards from several other companies, clothes, etc.

Sunday, February 21, 2010
Dare to Be Different
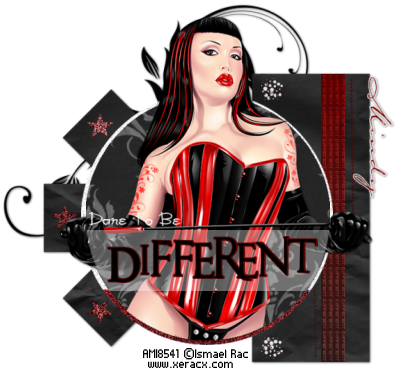 For this tut you will need the following:
Paint Shop Pro, any version should work, I am using 10.
A tube of your choice. I am using the awesome artwork of Ismael Rac which you can purchase at AMI.
Scrap kit of choice. I am using My Bloody Wedding by Addicted2Scraps. It is a PTU kit.
Template 52 by Linda which can be found at the Creative Misfits blog. It's the second one down, just click on the set and you'll be taken to the download.
Font: I used Carlotta.
Plugin: (optional) I used Eye Candy 3.1 Glow to put the glow on my name.
Let's begin!
Open your template and delete the top credits layer.
Make the black circle layer active and click inside it with your magic wand. Open a black paper from the kit, copy and paste as a new layer, resize if necessary. Selections, invert, make sure you are on your paper layer, and hit delete on your keyboard. Leave selected.
Copy and paste your tube as a new layer and arrange it in your circle. Use your eraser tool to erase the bits you don't want hanging over the bottom of your circle. Deselect and add a drop shadow to your tube. Delete the original circle layer.
Hide your tube and circle layer.
Take your selection tool and draw out a rectangle starting at the top edge of the blue part of the glittery frame circle. Open a red paper, copy and paste as a new layer, selections, invert, and hit delete on your keyboard then deselect.
Now back on your glitter circle, selections, select all, float, defloat, invert, on that paper layer you just did above, make that layer active then hit delete on your keyboard. Now the red paper should be a half circle just covering the blue area. Now go to adjust, add/remove noise, and add noise with 100%, uniform and monochrome checked. Merge this red layer down with the glitter circle layer and add a drop shadow. Unhide your tube and circle layers.
Activate the large rectangle layer, click inside it with your magic wand. Open another black paper, copy and paste as a new layer. Selections invert, hit delete on your keyboard. Add a drop shadow.
Do the same for the Rectangles layer.
Do the same for each of the remaining blue layers, but use a red paper to fill them in. On the glittery text and stars layers, Add noise to it just like you did with the half circle layer.
Open element 60, copy and paste as a new layer, arrange to the top left, and then drag it to the bottom and then add a drop shadow.
Add any other elements you might like. I didn't add anything besides that last one. You can also add a mask if you'd like.
Add your copyright info and your name.
Crop it down, resize if necessary, delete the white background layer and save as a .png so it's transparent.
For this tut you will need the following:
Paint Shop Pro, any version should work, I am using 10.
A tube of your choice. I am using the awesome artwork of Ismael Rac which you can purchase at AMI.
Scrap kit of choice. I am using My Bloody Wedding by Addicted2Scraps. It is a PTU kit.
Template 52 by Linda which can be found at the Creative Misfits blog. It's the second one down, just click on the set and you'll be taken to the download.
Font: I used Carlotta.
Plugin: (optional) I used Eye Candy 3.1 Glow to put the glow on my name.
Let's begin!
Open your template and delete the top credits layer.
Make the black circle layer active and click inside it with your magic wand. Open a black paper from the kit, copy and paste as a new layer, resize if necessary. Selections, invert, make sure you are on your paper layer, and hit delete on your keyboard. Leave selected.
Copy and paste your tube as a new layer and arrange it in your circle. Use your eraser tool to erase the bits you don't want hanging over the bottom of your circle. Deselect and add a drop shadow to your tube. Delete the original circle layer.
Hide your tube and circle layer.
Take your selection tool and draw out a rectangle starting at the top edge of the blue part of the glittery frame circle. Open a red paper, copy and paste as a new layer, selections, invert, and hit delete on your keyboard then deselect.
Now back on your glitter circle, selections, select all, float, defloat, invert, on that paper layer you just did above, make that layer active then hit delete on your keyboard. Now the red paper should be a half circle just covering the blue area. Now go to adjust, add/remove noise, and add noise with 100%, uniform and monochrome checked. Merge this red layer down with the glitter circle layer and add a drop shadow. Unhide your tube and circle layers.
Activate the large rectangle layer, click inside it with your magic wand. Open another black paper, copy and paste as a new layer. Selections invert, hit delete on your keyboard. Add a drop shadow.
Do the same for the Rectangles layer.
Do the same for each of the remaining blue layers, but use a red paper to fill them in. On the glittery text and stars layers, Add noise to it just like you did with the half circle layer.
Open element 60, copy and paste as a new layer, arrange to the top left, and then drag it to the bottom and then add a drop shadow.
Add any other elements you might like. I didn't add anything besides that last one. You can also add a mask if you'd like.
Add your copyright info and your name.
Crop it down, resize if necessary, delete the white background layer and save as a .png so it's transparent.
Punked
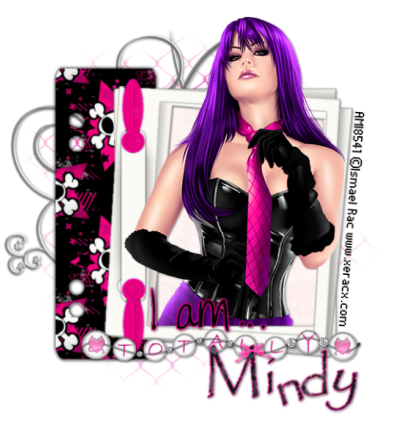 For this tut you will need the following:
Paint Shop Pro, I am using version X.
Tube of choice. I am using the wonderful artwork of Ismael Rac. You have to purchase his work, and you can find it at AMI.
Scrap kit of choice. I am using a PTU kit by Addicted2Scraps called Totally Punk.
Mask: I used BeckyMask23. Her site is closed, and I cannot share it. You can use that one if you have it, or use another.
Plugin: Alien Skin Eye Candy 3.1 Glow (or another one of their versions of glow if you have a higher version)
Font if you want to use another font, that's fine, I just used the Alpha that came with the kit.
Let's get started.
Open a new canvas sized 650x650, flood fill white.
Open TP1 frame, copy and paste as a new layer. Take your magic wand and click inside it, selections, modify, expand by 5, leave selected and open a paper, copy and paste as a new layer, selections, invert, hit delete on your keyboard, leave selected and drag the paper layer below your frame layer. Open a close up of your tube if you have one, or just resize if you don't, copy and paste as a new layer, duplicate. Drag the original below the frame layer and close off the top tube layer. Now, take your eraser tool and erase the parts of the tube you don't want showing around your frame, then add a drop shadow and deselect.
Unhide your top tube layer and erase the parts along the bottom of your frame that you don't want showing. You don't have to be real careful with getting exactly along the frame line because you will have your bottom tube showing through! Add a drop shadow to your frame.
Open the I Am word art, copy and paste as a new layer, resize by about 40%. Add a glow using Eye Candy and change the color to #f3008b, make the width 3, and fat. Add your drop shadow.
Open element TP49, copy and paste as a new layer, add a drop shadow and arrange it along the bottom of the frame. Move the I Am word art so it is above this element.
Open wire element TP50. Arrange it to the top left of your canvas and duplicate. Move the duplicate over so it is to the right of your canvas, and line it up so they line up together and it looks like one piece. Merge down and duplicate this merged layer. Drag the duplicate down to the bottom of your canvas and line up the edges so they overlap and look like one piece again. Merge these two layers together.
Apply your mask. Delete the mask layer, and merge together the group. Resize if necessary.
Open element TP20, copy and paste as a new layer, move it just above the masked layer, and arrange to the left of your tag. Add a drop shadow.
Now for your name. Open each of the Alphas that you need for your name. You will notice it has both the upper and lower case letters on each one. Just take your selection tool and draw around whichever one you need, then copy and paste as a new layer. Then, what I did, was line them up how I wanted, rotated some, brought some down higher or lower so they didn't all line up. Then I resized them by 60% and added a drop shadow. Arrange the name where you'd like it.
Add your copyright info.
Crop it, delete your white background if you want to save it as transparent. To save as transparent, save as a .png.
For this tut you will need the following:
Paint Shop Pro, I am using version X.
Tube of choice. I am using the wonderful artwork of Ismael Rac. You have to purchase his work, and you can find it at AMI.
Scrap kit of choice. I am using a PTU kit by Addicted2Scraps called Totally Punk.
Mask: I used BeckyMask23. Her site is closed, and I cannot share it. You can use that one if you have it, or use another.
Plugin: Alien Skin Eye Candy 3.1 Glow (or another one of their versions of glow if you have a higher version)
Font if you want to use another font, that's fine, I just used the Alpha that came with the kit.
Let's get started.
Open a new canvas sized 650x650, flood fill white.
Open TP1 frame, copy and paste as a new layer. Take your magic wand and click inside it, selections, modify, expand by 5, leave selected and open a paper, copy and paste as a new layer, selections, invert, hit delete on your keyboard, leave selected and drag the paper layer below your frame layer. Open a close up of your tube if you have one, or just resize if you don't, copy and paste as a new layer, duplicate. Drag the original below the frame layer and close off the top tube layer. Now, take your eraser tool and erase the parts of the tube you don't want showing around your frame, then add a drop shadow and deselect.
Unhide your top tube layer and erase the parts along the bottom of your frame that you don't want showing. You don't have to be real careful with getting exactly along the frame line because you will have your bottom tube showing through! Add a drop shadow to your frame.
Open the I Am word art, copy and paste as a new layer, resize by about 40%. Add a glow using Eye Candy and change the color to #f3008b, make the width 3, and fat. Add your drop shadow.
Open element TP49, copy and paste as a new layer, add a drop shadow and arrange it along the bottom of the frame. Move the I Am word art so it is above this element.
Open wire element TP50. Arrange it to the top left of your canvas and duplicate. Move the duplicate over so it is to the right of your canvas, and line it up so they line up together and it looks like one piece. Merge down and duplicate this merged layer. Drag the duplicate down to the bottom of your canvas and line up the edges so they overlap and look like one piece again. Merge these two layers together.
Apply your mask. Delete the mask layer, and merge together the group. Resize if necessary.
Open element TP20, copy and paste as a new layer, move it just above the masked layer, and arrange to the left of your tag. Add a drop shadow.
Now for your name. Open each of the Alphas that you need for your name. You will notice it has both the upper and lower case letters on each one. Just take your selection tool and draw around whichever one you need, then copy and paste as a new layer. Then, what I did, was line them up how I wanted, rotated some, brought some down higher or lower so they didn't all line up. Then I resized them by 60% and added a drop shadow. Arrange the name where you'd like it.
Add your copyright info.
Crop it, delete your white background if you want to save it as transparent. To save as transparent, save as a .png.
Saturday, February 20, 2010
Out of My Face
 For this tut you will need the following:
Paint Shop Pro, I am using version PSP X.
Tube of your choice, I am using the super fab work of Ismael Rac, which you must purchase to use. His stuff can be found at AMI.
A scrap kit of your choice. I am using a PTU kit by Aiya of Juicy Bits called Vinyl Vixen, you can find this kit at AMI also.
Tag template #329 by Missy at Divine Intentions.
Font of your choice. I used VTO Bad Tattoo Hand One
Plugin: Eye Candy 3.1 Glow (or another version of Gradient Glow, etc)
Let's get started!
Open up your template, delete the top credits layer. Resize by about 85%. Change your canvas size to about 700 x 700. You can crop it down at the end, this just gives you some room to work.
Click on the Shape 1 layer, click on it with your magic wand, add a new raster layer and flood fill with #860500. Deselect, add a drop shadow of your choice and delete the original layer.
Do the same with the Thin Rectangle layer above it, but this time fill it with black.
Activate the Rectangle 2 layer, then click on it with your magic wand. Open paper 8, copy and paste as a new layer, resize it by 75%, selections, invert, make sure you are on the paper layer and hit delete key on your keyboard. Deselect, add drop shadow, and delete the original layer.
Do the same for the Shape 2 layer (the rectangle on the far right) but fill with paper 6 resized to 75%.
Activate the glittered rectangle layer, click on it with your magic wand, add a new raster layer and flood fill with black, then add a drop shadow and delete the original layer.
Delete the dotted line 2 layer and the thin rectangle layer below it, also the star layer that is right below the top word art layer.
Activate the small circle 1 layer. Selections, select all, float, defloat, add a new raster layer. Set your foreground at #860500 and your background at black. Right click on the foreground color and choose the gradient tab. Set the style on the 3rd little box (sunburst) and the repeats to 1, click ok. Flood fill the new layer with that gradient. Selections, modify, expand by 5, add a new raster layer below your gradient circle, flood fill with black. Deselect. Adjust, add/remove noise, monochrome, 100%, add a drop shadow.
Repeat for the small circle 2 layer.
Click on the pink Circle layer, with your magic wand, click inside it. Open paper 6, copy and paste as a new layer, resize by 75%, selections, invert, make sure you are on the paper layer, hit delete on your keyboard.
Do the same for the bottom thin rectangle (the black rectangle that runs horizontally below your circles, just above the word art.
Activate the dotted line layer, selections, select all, float, defloat. Add a new raster layer and flood fill all the dots with black, then add a drop shadow. It's easier if you zoom in real close.
Do the same for the stars on each side of the dotted line layer, but fill those in with the gradient you used above, except change the repeats to 6.
Activate the circle 3 layer, click inside it with your magic wand. Take the close up of the tube you are going to use (or just your tube if you don't have a close up) and mirror it, then copy and paste it as a new layer (resize if you need to) and arrange it into the circle. Selections, invert, delete. Change the blend mode to Luminance(L). Apply the Eye Candy Glow white with a width of 3, fat.
Copy and paste your tube as a new layer, add a drop shadow.
You can also add a mask behind it if you like. I chose not to use one.
Add your copyright info and your name. I also added the same glow I used on the tube and a drop shadow.
Crop it down and resize as needed. Save as a .png file if you'd like it to be transparent.
For this tut you will need the following:
Paint Shop Pro, I am using version PSP X.
Tube of your choice, I am using the super fab work of Ismael Rac, which you must purchase to use. His stuff can be found at AMI.
A scrap kit of your choice. I am using a PTU kit by Aiya of Juicy Bits called Vinyl Vixen, you can find this kit at AMI also.
Tag template #329 by Missy at Divine Intentions.
Font of your choice. I used VTO Bad Tattoo Hand One
Plugin: Eye Candy 3.1 Glow (or another version of Gradient Glow, etc)
Let's get started!
Open up your template, delete the top credits layer. Resize by about 85%. Change your canvas size to about 700 x 700. You can crop it down at the end, this just gives you some room to work.
Click on the Shape 1 layer, click on it with your magic wand, add a new raster layer and flood fill with #860500. Deselect, add a drop shadow of your choice and delete the original layer.
Do the same with the Thin Rectangle layer above it, but this time fill it with black.
Activate the Rectangle 2 layer, then click on it with your magic wand. Open paper 8, copy and paste as a new layer, resize it by 75%, selections, invert, make sure you are on the paper layer and hit delete key on your keyboard. Deselect, add drop shadow, and delete the original layer.
Do the same for the Shape 2 layer (the rectangle on the far right) but fill with paper 6 resized to 75%.
Activate the glittered rectangle layer, click on it with your magic wand, add a new raster layer and flood fill with black, then add a drop shadow and delete the original layer.
Delete the dotted line 2 layer and the thin rectangle layer below it, also the star layer that is right below the top word art layer.
Activate the small circle 1 layer. Selections, select all, float, defloat, add a new raster layer. Set your foreground at #860500 and your background at black. Right click on the foreground color and choose the gradient tab. Set the style on the 3rd little box (sunburst) and the repeats to 1, click ok. Flood fill the new layer with that gradient. Selections, modify, expand by 5, add a new raster layer below your gradient circle, flood fill with black. Deselect. Adjust, add/remove noise, monochrome, 100%, add a drop shadow.
Repeat for the small circle 2 layer.
Click on the pink Circle layer, with your magic wand, click inside it. Open paper 6, copy and paste as a new layer, resize by 75%, selections, invert, make sure you are on the paper layer, hit delete on your keyboard.
Do the same for the bottom thin rectangle (the black rectangle that runs horizontally below your circles, just above the word art.
Activate the dotted line layer, selections, select all, float, defloat. Add a new raster layer and flood fill all the dots with black, then add a drop shadow. It's easier if you zoom in real close.
Do the same for the stars on each side of the dotted line layer, but fill those in with the gradient you used above, except change the repeats to 6.
Activate the circle 3 layer, click inside it with your magic wand. Take the close up of the tube you are going to use (or just your tube if you don't have a close up) and mirror it, then copy and paste it as a new layer (resize if you need to) and arrange it into the circle. Selections, invert, delete. Change the blend mode to Luminance(L). Apply the Eye Candy Glow white with a width of 3, fat.
Copy and paste your tube as a new layer, add a drop shadow.
You can also add a mask behind it if you like. I chose not to use one.
Add your copyright info and your name. I also added the same glow I used on the tube and a drop shadow.
Crop it down and resize as needed. Save as a .png file if you'd like it to be transparent.
Friday, February 19, 2010
Please check it out
Toyota and Nascar is having a contest. I made 3 different race car designs and entered them into the contest. Basically the winning design will be made into a Nascar race car and the winner gets to go to one of the races and ride in their car, and watch the race for free, even get spending money for the weekend. The last one is the first car I made, second one is the 2nd car I made and the first one, I was finally getting the hang of using their software, lol. I like the red and black one best, but you can decide for yourself. I'm not sure if it will let you vote for more than one or not.
Oh and you can vote every day for 15 days too, so please come back and vote every day!
http://www.sponsafier.com/share/79649
http://www.sponsafier.com/share/76819
http://www.sponsafier.com/share/71234
I put them in order that I like them, but you might want to check out all 3 before voting.
Monday, February 15, 2010
Gothic Grunge
 For this tutorial you will need the following:
Paint Shop Pro, I am using PSP X, but I think any version should work.
A tube, I am using the artwork of Ismael Rac which you can purchase at AMI. You must purchase his artwork to use it.
Scrap kit of choice. I am using a PTU kit by Addicted2Scraps called Bloody Wedding.
Let's get started.
Open element 3, which is a square frame, resize by about 50%, then change the canvas size to 650x650.
Take your selection tool set on rectangle and draw a big rectangle going around the darker part of your frame. Open a paper, copy and paste as a new layer, selections, invert, and click delete on your keyboard. Drag the paper below the frame. Add a drop shadow to your frame layer.
Open element 1, copy and paste as a new layer, bring it to the bottom and resize by 35%. Add a drop shadow.
Open one of your tubes, copy and paste as a new layer. Resize if necessary, add a drop shadow and then erase the parts that hang over your frame.
Open a paper, copy and paste as a new layer, drag it to the bottom, resize if you'd like and apply a mask. Drop the opacity down to about 65% if it's too dark.
Add any elements you'd like.
Add your ©info and name.
For this tutorial you will need the following:
Paint Shop Pro, I am using PSP X, but I think any version should work.
A tube, I am using the artwork of Ismael Rac which you can purchase at AMI. You must purchase his artwork to use it.
Scrap kit of choice. I am using a PTU kit by Addicted2Scraps called Bloody Wedding.
Let's get started.
Open element 3, which is a square frame, resize by about 50%, then change the canvas size to 650x650.
Take your selection tool set on rectangle and draw a big rectangle going around the darker part of your frame. Open a paper, copy and paste as a new layer, selections, invert, and click delete on your keyboard. Drag the paper below the frame. Add a drop shadow to your frame layer.
Open element 1, copy and paste as a new layer, bring it to the bottom and resize by 35%. Add a drop shadow.
Open one of your tubes, copy and paste as a new layer. Resize if necessary, add a drop shadow and then erase the parts that hang over your frame.
Open a paper, copy and paste as a new layer, drag it to the bottom, resize if you'd like and apply a mask. Drop the opacity down to about 65% if it's too dark.
Add any elements you'd like.
Add your ©info and name.
Bling Bling
 For this tutorial you will need the following:
Any version of Paint Shop Pro. I am using PSP X.
Scrap kit of choice. I am using Angelic Katie by Wicked Princess Scraps.
At least 3 tubes of your choice. I am using the work of Rion Vernon which I have purchased at CILM.
No outside filters used.
I used PT Banana Split for my name.
Let's get started.
Open the element Bling Trio. Change the canvas size to 650x650 so you have some room to work.
Click inside the top and bottom circles with your magic wand. Selections, select all, float, defloat, modify, expand by 5.
Open a paper of your choice. I used PP3. Copy and paste as a new layer, selections invert, click delete on your keyboard and drag that layer below your frame element. Leave selected, and open your first tube. Copy and paste as a new layer and arrange it in the top circle. You may have to resize. If you use the same tube as me, I resized it down to 80%. If you have some showing in the bottom circle, selections, invert and take your eraser tool and erase what's inside it. Then, make sure you invert it again.
Open your second tube, copy and paste as a new layer, arrange it into the bottom circle. If you use the same tube as me, I resized it about 115%. Click delete on your keyboard. Deselect and add a drop shadow to both tubes.
For the middle circle, select it with your magic wand, and do the same as you did for the top and middle circles. Merge visible.
Open the Dolie element, copy and paste as a new layer, drop it down to the bottom, add a drop shadow.
Open the Notepaper element, and colorize. Hue 4 Saturation 194. Copy and paste as a new layer, resize about 85%. Duplicate it twice. Rotate the center one to the right by 30 and the bottom one to the left by 30. Add a drop shadow to all 3.
Open the glitter splatter element, copy and paste as a new layer, move it below the frame element, resize by 85% and add a drop shadow.
Open the bouquet, copy and paste as a new layer. Move it below the frame, but above the splatter element, and arrange it slightly to the left.
Open your tube, copy and paste as a new layer, arrange alongside your frame, add a drop shadow.
Add your name and ©info as needed, save your tag and you're done!
For this tutorial you will need the following:
Any version of Paint Shop Pro. I am using PSP X.
Scrap kit of choice. I am using Angelic Katie by Wicked Princess Scraps.
At least 3 tubes of your choice. I am using the work of Rion Vernon which I have purchased at CILM.
No outside filters used.
I used PT Banana Split for my name.
Let's get started.
Open the element Bling Trio. Change the canvas size to 650x650 so you have some room to work.
Click inside the top and bottom circles with your magic wand. Selections, select all, float, defloat, modify, expand by 5.
Open a paper of your choice. I used PP3. Copy and paste as a new layer, selections invert, click delete on your keyboard and drag that layer below your frame element. Leave selected, and open your first tube. Copy and paste as a new layer and arrange it in the top circle. You may have to resize. If you use the same tube as me, I resized it down to 80%. If you have some showing in the bottom circle, selections, invert and take your eraser tool and erase what's inside it. Then, make sure you invert it again.
Open your second tube, copy and paste as a new layer, arrange it into the bottom circle. If you use the same tube as me, I resized it about 115%. Click delete on your keyboard. Deselect and add a drop shadow to both tubes.
For the middle circle, select it with your magic wand, and do the same as you did for the top and middle circles. Merge visible.
Open the Dolie element, copy and paste as a new layer, drop it down to the bottom, add a drop shadow.
Open the Notepaper element, and colorize. Hue 4 Saturation 194. Copy and paste as a new layer, resize about 85%. Duplicate it twice. Rotate the center one to the right by 30 and the bottom one to the left by 30. Add a drop shadow to all 3.
Open the glitter splatter element, copy and paste as a new layer, move it below the frame element, resize by 85% and add a drop shadow.
Open the bouquet, copy and paste as a new layer. Move it below the frame, but above the splatter element, and arrange it slightly to the left.
Open your tube, copy and paste as a new layer, arrange alongside your frame, add a drop shadow.
Add your name and ©info as needed, save your tag and you're done!
Sunday, February 7, 2010
Love Buzz
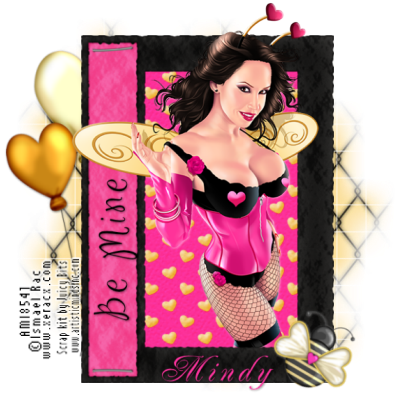 For this tutorial you will need the following:
Any version of PSP. I am using PSPX.
Love Buzz PTU scrap kit by Juicy Bits which you can purchase at AMI.
A tube of your choice. I am using the beautiful artwork of Ismael Rac which you can also purchase at AMI.
WSL_84 Mask at WeeScotsLass Creations
Two fonts, I used MA Sexy and Magestic.
Let's get started.
Open frame 3, rotate all layers to the right by 90. Resize all layers by 405x575 pixels. Resize canvas to 650x650.
On the frame layer, take your magic wand and click inside the frame, selections, modify, expand by 5.
Open a paper of choice (I used 12 and resized by 65%), copy and paste as a new layer, selections invert, on the paper layer, click delete on your keyboard. Drag the paper layer below your frame. Leave selected.
Open your tube, copy and paste as a new layer, duplicate. Drag the original layer below your frame, and leave the duplicate above the frame, but hide it for now. On the bottom tube layer, erase the bits of her legs that go over the black part of the frame. Deselect and then add a drop shadow to the tube. Now, unhide the top tube layer. Take your eraser tool and erase her legs where it's hanging over the black part of the frame layer. You don't have to be careful not to go into the open part of the frame because you have your bottom tube showing.
Open the bee element, copy and paste as a new layer, resize by 40%, free rotate to the right by 30, add a drop shadow and move it to the bottom right of your tag.
Write out the words Be Mine and then rotate them to the left by 90 and arrange over the pink part of your frame. Add any glow or drop shadow if you want.
Open a paper, copy and paste as a new layer, send to the bottom. Open your mask. Layers, new mask layer, from image, scroll to find your mask and click ok. Delete the mask layer and merge the group.
Open the balloons element, copy and paste as a new layer, resize by about 85%, arrange to the left of your tag, drag below the frame layer, but above the mask layer. Add a drop shadow.
Add your copyright/credits info as needed.
Add your name and you're done.
Crop and resize as necessary.
Save as a .png file so that it's transparent.
For this tutorial you will need the following:
Any version of PSP. I am using PSPX.
Love Buzz PTU scrap kit by Juicy Bits which you can purchase at AMI.
A tube of your choice. I am using the beautiful artwork of Ismael Rac which you can also purchase at AMI.
WSL_84 Mask at WeeScotsLass Creations
Two fonts, I used MA Sexy and Magestic.
Let's get started.
Open frame 3, rotate all layers to the right by 90. Resize all layers by 405x575 pixels. Resize canvas to 650x650.
On the frame layer, take your magic wand and click inside the frame, selections, modify, expand by 5.
Open a paper of choice (I used 12 and resized by 65%), copy and paste as a new layer, selections invert, on the paper layer, click delete on your keyboard. Drag the paper layer below your frame. Leave selected.
Open your tube, copy and paste as a new layer, duplicate. Drag the original layer below your frame, and leave the duplicate above the frame, but hide it for now. On the bottom tube layer, erase the bits of her legs that go over the black part of the frame. Deselect and then add a drop shadow to the tube. Now, unhide the top tube layer. Take your eraser tool and erase her legs where it's hanging over the black part of the frame layer. You don't have to be careful not to go into the open part of the frame because you have your bottom tube showing.
Open the bee element, copy and paste as a new layer, resize by 40%, free rotate to the right by 30, add a drop shadow and move it to the bottom right of your tag.
Write out the words Be Mine and then rotate them to the left by 90 and arrange over the pink part of your frame. Add any glow or drop shadow if you want.
Open a paper, copy and paste as a new layer, send to the bottom. Open your mask. Layers, new mask layer, from image, scroll to find your mask and click ok. Delete the mask layer and merge the group.
Open the balloons element, copy and paste as a new layer, resize by about 85%, arrange to the left of your tag, drag below the frame layer, but above the mask layer. Add a drop shadow.
Add your copyright/credits info as needed.
Add your name and you're done.
Crop and resize as necessary.
Save as a .png file so that it's transparent.
Cupid Love Notes
 For this tutorial you will need:
Any version of Paint Shop Pro, I am using PSPX.
Any tube of your choice. I am using the beautiful artwork of Ismael Rac which you must purchase to use. You can find him over at AMI.
Template 1 by KiwiSuz which you can get at the Xeracx Stalker Creations blog or by joining the Official Xeracx Stalkers Forum. These templates are from our monthly challenges that I run. Just click on her name above the templates to go to the download.
Love Notes PTU scrap kit by Juicy Bits.
Font of your choice. I used MA Sexy.
Plugins: Alien Eye Candy 3.1 Glow (or another gradient glow filter)
Let's get started.
Open your template and delete CR layer and words layer. Resize all layers by 575 x 575 pixels. Then, change canvas size to 650 x 650 pixels.
Click on the big circle layer, selections, float, defloat, invert, open paper 5, copy and paste as a new layer, click delete on your keyboard. Delete the original big circle layer.
With your magic wand, click on the circle frame layer. Add a new raster layer and flood fill with #cd7d48. Delete the original circle frame layer. Go to adjust, add/remove noise, add noise with the following settings: Gaussian, 50, monochrome. Add a drop shadow of your choice.
Leave your foreground set at #cd7d48 and change your background to #c67a84. Now click on the color in your foreground and then click gradient. Scroll down in the drop down box to foreground/background and click on that. Set the style to the 3rd box (circles) and click ok.
On one of your butterfly layers, click on it, then selections, select all, float, defloat, add a new raster layer and flood fill with your gradient. Deselect and delete the original butterfly. Apply Eye Candy glow filter with a fat white glow of 3, add a drop shadow. Repeat for the other butterfly layer.
Make the heart background layer active, hold down your shift key and with your magic wand, click inside each section of the heart, selections, modify, invert, open paper 9, copy and paste as a new layer, arrange it how you want, and then click delete on your keyboard. Leave selected.
Open your tube, copy and paste as a new layer. Resize if necessary. Now, take your eraser tool and erase parts of the tube that you don't want hanging out of the edges of the hearts. I did her one leg. Then make the heart frame layer active, and erase the parts that cover her other leg, so it looks like she's stepping out of the bottom of the heart and I also did parts of the top heart where her upper body is popping out of it. Deselect. Add a drop shadow to the tube.
Now making sure the heart frame layer is still active, selections, select all, float, defloat, add a new raster layer and flood fill with #cd7d48. Deselect, add a drop shadow and delete the original layer.
Open tag cluster 2, copy and paste as a new layer, free rotate to the right by 30, add a drop shadow.
Open any other elements you'd like and arrange them where you want them.
Add your name to the tag cluster layer.
Add your credits and copyright as needed.
Crop and resize if needed.
Save your tag and you're done.
(If you want to save as transparent, save as a .png file)
For this tutorial you will need:
Any version of Paint Shop Pro, I am using PSPX.
Any tube of your choice. I am using the beautiful artwork of Ismael Rac which you must purchase to use. You can find him over at AMI.
Template 1 by KiwiSuz which you can get at the Xeracx Stalker Creations blog or by joining the Official Xeracx Stalkers Forum. These templates are from our monthly challenges that I run. Just click on her name above the templates to go to the download.
Love Notes PTU scrap kit by Juicy Bits.
Font of your choice. I used MA Sexy.
Plugins: Alien Eye Candy 3.1 Glow (or another gradient glow filter)
Let's get started.
Open your template and delete CR layer and words layer. Resize all layers by 575 x 575 pixels. Then, change canvas size to 650 x 650 pixels.
Click on the big circle layer, selections, float, defloat, invert, open paper 5, copy and paste as a new layer, click delete on your keyboard. Delete the original big circle layer.
With your magic wand, click on the circle frame layer. Add a new raster layer and flood fill with #cd7d48. Delete the original circle frame layer. Go to adjust, add/remove noise, add noise with the following settings: Gaussian, 50, monochrome. Add a drop shadow of your choice.
Leave your foreground set at #cd7d48 and change your background to #c67a84. Now click on the color in your foreground and then click gradient. Scroll down in the drop down box to foreground/background and click on that. Set the style to the 3rd box (circles) and click ok.
On one of your butterfly layers, click on it, then selections, select all, float, defloat, add a new raster layer and flood fill with your gradient. Deselect and delete the original butterfly. Apply Eye Candy glow filter with a fat white glow of 3, add a drop shadow. Repeat for the other butterfly layer.
Make the heart background layer active, hold down your shift key and with your magic wand, click inside each section of the heart, selections, modify, invert, open paper 9, copy and paste as a new layer, arrange it how you want, and then click delete on your keyboard. Leave selected.
Open your tube, copy and paste as a new layer. Resize if necessary. Now, take your eraser tool and erase parts of the tube that you don't want hanging out of the edges of the hearts. I did her one leg. Then make the heart frame layer active, and erase the parts that cover her other leg, so it looks like she's stepping out of the bottom of the heart and I also did parts of the top heart where her upper body is popping out of it. Deselect. Add a drop shadow to the tube.
Now making sure the heart frame layer is still active, selections, select all, float, defloat, add a new raster layer and flood fill with #cd7d48. Deselect, add a drop shadow and delete the original layer.
Open tag cluster 2, copy and paste as a new layer, free rotate to the right by 30, add a drop shadow.
Open any other elements you'd like and arrange them where you want them.
Add your name to the tag cluster layer.
Add your credits and copyright as needed.
Crop and resize if needed.
Save your tag and you're done.
(If you want to save as transparent, save as a .png file)
Subscribe to:
Posts (Atom)