 For this tutorial you will need the following:
Any version of PSP. I am using PSPX.
Love Buzz PTU scrap kit by Juicy Bits which you can purchase at AMI.
A tube of your choice. I am using the beautiful artwork of Ismael Rac which you can also purchase at AMI.
WSL_84 Mask at WeeScotsLass Creations
Two fonts, I used MA Sexy and Magestic.
Let's get started.
Open frame 3, rotate all layers to the right by 90. Resize all layers by 405x575 pixels. Resize canvas to 650x650.
On the frame layer, take your magic wand and click inside the frame, selections, modify, expand by 5.
Open a paper of choice (I used 12 and resized by 65%), copy and paste as a new layer, selections invert, on the paper layer, click delete on your keyboard. Drag the paper layer below your frame. Leave selected.
Open your tube, copy and paste as a new layer, duplicate. Drag the original layer below your frame, and leave the duplicate above the frame, but hide it for now. On the bottom tube layer, erase the bits of her legs that go over the black part of the frame. Deselect and then add a drop shadow to the tube. Now, unhide the top tube layer. Take your eraser tool and erase her legs where it's hanging over the black part of the frame layer. You don't have to be careful not to go into the open part of the frame because you have your bottom tube showing.
Open the bee element, copy and paste as a new layer, resize by 40%, free rotate to the right by 30, add a drop shadow and move it to the bottom right of your tag.
Write out the words Be Mine and then rotate them to the left by 90 and arrange over the pink part of your frame. Add any glow or drop shadow if you want.
Open a paper, copy and paste as a new layer, send to the bottom. Open your mask. Layers, new mask layer, from image, scroll to find your mask and click ok. Delete the mask layer and merge the group.
Open the balloons element, copy and paste as a new layer, resize by about 85%, arrange to the left of your tag, drag below the frame layer, but above the mask layer. Add a drop shadow.
Add your copyright/credits info as needed.
Add your name and you're done.
Crop and resize as necessary.
Save as a .png file so that it's transparent.
For this tutorial you will need the following:
Any version of PSP. I am using PSPX.
Love Buzz PTU scrap kit by Juicy Bits which you can purchase at AMI.
A tube of your choice. I am using the beautiful artwork of Ismael Rac which you can also purchase at AMI.
WSL_84 Mask at WeeScotsLass Creations
Two fonts, I used MA Sexy and Magestic.
Let's get started.
Open frame 3, rotate all layers to the right by 90. Resize all layers by 405x575 pixels. Resize canvas to 650x650.
On the frame layer, take your magic wand and click inside the frame, selections, modify, expand by 5.
Open a paper of choice (I used 12 and resized by 65%), copy and paste as a new layer, selections invert, on the paper layer, click delete on your keyboard. Drag the paper layer below your frame. Leave selected.
Open your tube, copy and paste as a new layer, duplicate. Drag the original layer below your frame, and leave the duplicate above the frame, but hide it for now. On the bottom tube layer, erase the bits of her legs that go over the black part of the frame. Deselect and then add a drop shadow to the tube. Now, unhide the top tube layer. Take your eraser tool and erase her legs where it's hanging over the black part of the frame layer. You don't have to be careful not to go into the open part of the frame because you have your bottom tube showing.
Open the bee element, copy and paste as a new layer, resize by 40%, free rotate to the right by 30, add a drop shadow and move it to the bottom right of your tag.
Write out the words Be Mine and then rotate them to the left by 90 and arrange over the pink part of your frame. Add any glow or drop shadow if you want.
Open a paper, copy and paste as a new layer, send to the bottom. Open your mask. Layers, new mask layer, from image, scroll to find your mask and click ok. Delete the mask layer and merge the group.
Open the balloons element, copy and paste as a new layer, resize by about 85%, arrange to the left of your tag, drag below the frame layer, but above the mask layer. Add a drop shadow.
Add your copyright/credits info as needed.
Add your name and you're done.
Crop and resize as necessary.
Save as a .png file so that it's transparent.

Sunday, February 7, 2010
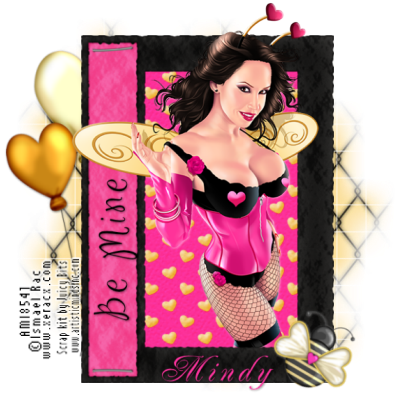
Love Buzz
For this tutorial you will need the following:
Any version of PSP. I am using PSPX.
Love Buzz PTU scrap kit by Juicy Bits which you can purchase at AMI.
A tube of your choice. I am using the beautiful artwork of Ismael Rac which you can also purchase at AMI.
WSL_84 Mask at WeeScotsLass Creations
Two fonts, I used MA Sexy and Magestic.
Let's get started.
Open frame 3, rotate all layers to the right by 90. Resize all layers by 405x575 pixels. Resize canvas to 650x650.
On the frame layer, take your magic wand and click inside the frame, selections, modify, expand by 5.
Open a paper of choice (I used 12 and resized by 65%), copy and paste as a new layer, selections invert, on the paper layer, click delete on your keyboard. Drag the paper layer below your frame. Leave selected.
Open your tube, copy and paste as a new layer, duplicate. Drag the original layer below your frame, and leave the duplicate above the frame, but hide it for now. On the bottom tube layer, erase the bits of her legs that go over the black part of the frame. Deselect and then add a drop shadow to the tube. Now, unhide the top tube layer. Take your eraser tool and erase her legs where it's hanging over the black part of the frame layer. You don't have to be careful not to go into the open part of the frame because you have your bottom tube showing.
Open the bee element, copy and paste as a new layer, resize by 40%, free rotate to the right by 30, add a drop shadow and move it to the bottom right of your tag.
Write out the words Be Mine and then rotate them to the left by 90 and arrange over the pink part of your frame. Add any glow or drop shadow if you want.
Open a paper, copy and paste as a new layer, send to the bottom. Open your mask. Layers, new mask layer, from image, scroll to find your mask and click ok. Delete the mask layer and merge the group.
Open the balloons element, copy and paste as a new layer, resize by about 85%, arrange to the left of your tag, drag below the frame layer, but above the mask layer. Add a drop shadow.
Add your copyright/credits info as needed.
Add your name and you're done.
Crop and resize as necessary.
Save as a .png file so that it's transparent.
Subscribe to:
Post Comments (Atom)
No comments:
Post a Comment