 For this tut you will need the following:
Paint Shop Pro, I am using version X.
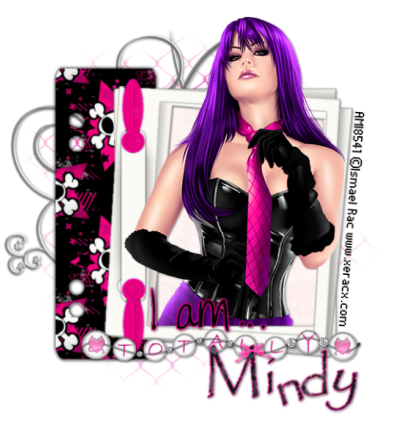
Tube of choice. I am using the wonderful artwork of Ismael Rac. You have to purchase his work, and you can find it at AMI.
Scrap kit of choice. I am using a PTU kit by Addicted2Scraps called Totally Punk.
Mask: I used BeckyMask23. Her site is closed, and I cannot share it. You can use that one if you have it, or use another.
Plugin: Alien Skin Eye Candy 3.1 Glow (or another one of their versions of glow if you have a higher version)
Font if you want to use another font, that's fine, I just used the Alpha that came with the kit.
Let's get started.
Open a new canvas sized 650x650, flood fill white.
Open TP1 frame, copy and paste as a new layer. Take your magic wand and click inside it, selections, modify, expand by 5, leave selected and open a paper, copy and paste as a new layer, selections, invert, hit delete on your keyboard, leave selected and drag the paper layer below your frame layer. Open a close up of your tube if you have one, or just resize if you don't, copy and paste as a new layer, duplicate. Drag the original below the frame layer and close off the top tube layer. Now, take your eraser tool and erase the parts of the tube you don't want showing around your frame, then add a drop shadow and deselect.
Unhide your top tube layer and erase the parts along the bottom of your frame that you don't want showing. You don't have to be real careful with getting exactly along the frame line because you will have your bottom tube showing through! Add a drop shadow to your frame.
Open the I Am word art, copy and paste as a new layer, resize by about 40%. Add a glow using Eye Candy and change the color to #f3008b, make the width 3, and fat. Add your drop shadow.
Open element TP49, copy and paste as a new layer, add a drop shadow and arrange it along the bottom of the frame. Move the I Am word art so it is above this element.
Open wire element TP50. Arrange it to the top left of your canvas and duplicate. Move the duplicate over so it is to the right of your canvas, and line it up so they line up together and it looks like one piece. Merge down and duplicate this merged layer. Drag the duplicate down to the bottom of your canvas and line up the edges so they overlap and look like one piece again. Merge these two layers together.
Apply your mask. Delete the mask layer, and merge together the group. Resize if necessary.
Open element TP20, copy and paste as a new layer, move it just above the masked layer, and arrange to the left of your tag. Add a drop shadow.
Now for your name. Open each of the Alphas that you need for your name. You will notice it has both the upper and lower case letters on each one. Just take your selection tool and draw around whichever one you need, then copy and paste as a new layer. Then, what I did, was line them up how I wanted, rotated some, brought some down higher or lower so they didn't all line up. Then I resized them by 60% and added a drop shadow. Arrange the name where you'd like it.
Add your copyright info.
Crop it, delete your white background if you want to save it as transparent. To save as transparent, save as a .png.
For this tut you will need the following:
Paint Shop Pro, I am using version X.
Tube of choice. I am using the wonderful artwork of Ismael Rac. You have to purchase his work, and you can find it at AMI.
Scrap kit of choice. I am using a PTU kit by Addicted2Scraps called Totally Punk.
Mask: I used BeckyMask23. Her site is closed, and I cannot share it. You can use that one if you have it, or use another.
Plugin: Alien Skin Eye Candy 3.1 Glow (or another one of their versions of glow if you have a higher version)
Font if you want to use another font, that's fine, I just used the Alpha that came with the kit.
Let's get started.
Open a new canvas sized 650x650, flood fill white.
Open TP1 frame, copy and paste as a new layer. Take your magic wand and click inside it, selections, modify, expand by 5, leave selected and open a paper, copy and paste as a new layer, selections, invert, hit delete on your keyboard, leave selected and drag the paper layer below your frame layer. Open a close up of your tube if you have one, or just resize if you don't, copy and paste as a new layer, duplicate. Drag the original below the frame layer and close off the top tube layer. Now, take your eraser tool and erase the parts of the tube you don't want showing around your frame, then add a drop shadow and deselect.
Unhide your top tube layer and erase the parts along the bottom of your frame that you don't want showing. You don't have to be real careful with getting exactly along the frame line because you will have your bottom tube showing through! Add a drop shadow to your frame.
Open the I Am word art, copy and paste as a new layer, resize by about 40%. Add a glow using Eye Candy and change the color to #f3008b, make the width 3, and fat. Add your drop shadow.
Open element TP49, copy and paste as a new layer, add a drop shadow and arrange it along the bottom of the frame. Move the I Am word art so it is above this element.
Open wire element TP50. Arrange it to the top left of your canvas and duplicate. Move the duplicate over so it is to the right of your canvas, and line it up so they line up together and it looks like one piece. Merge down and duplicate this merged layer. Drag the duplicate down to the bottom of your canvas and line up the edges so they overlap and look like one piece again. Merge these two layers together.
Apply your mask. Delete the mask layer, and merge together the group. Resize if necessary.
Open element TP20, copy and paste as a new layer, move it just above the masked layer, and arrange to the left of your tag. Add a drop shadow.
Now for your name. Open each of the Alphas that you need for your name. You will notice it has both the upper and lower case letters on each one. Just take your selection tool and draw around whichever one you need, then copy and paste as a new layer. Then, what I did, was line them up how I wanted, rotated some, brought some down higher or lower so they didn't all line up. Then I resized them by 60% and added a drop shadow. Arrange the name where you'd like it.
Add your copyright info.
Crop it, delete your white background if you want to save it as transparent. To save as transparent, save as a .png.

Sunday, February 21, 2010
Punked
For this tut you will need the following:
Paint Shop Pro, I am using version X.
Tube of choice. I am using the wonderful artwork of Ismael Rac. You have to purchase his work, and you can find it at AMI.
Scrap kit of choice. I am using a PTU kit by Addicted2Scraps called Totally Punk.
Mask: I used BeckyMask23. Her site is closed, and I cannot share it. You can use that one if you have it, or use another.
Plugin: Alien Skin Eye Candy 3.1 Glow (or another one of their versions of glow if you have a higher version)
Font if you want to use another font, that's fine, I just used the Alpha that came with the kit.
Let's get started.
Open a new canvas sized 650x650, flood fill white.
Open TP1 frame, copy and paste as a new layer. Take your magic wand and click inside it, selections, modify, expand by 5, leave selected and open a paper, copy and paste as a new layer, selections, invert, hit delete on your keyboard, leave selected and drag the paper layer below your frame layer. Open a close up of your tube if you have one, or just resize if you don't, copy and paste as a new layer, duplicate. Drag the original below the frame layer and close off the top tube layer. Now, take your eraser tool and erase the parts of the tube you don't want showing around your frame, then add a drop shadow and deselect.
Unhide your top tube layer and erase the parts along the bottom of your frame that you don't want showing. You don't have to be real careful with getting exactly along the frame line because you will have your bottom tube showing through! Add a drop shadow to your frame.
Open the I Am word art, copy and paste as a new layer, resize by about 40%. Add a glow using Eye Candy and change the color to #f3008b, make the width 3, and fat. Add your drop shadow.
Open element TP49, copy and paste as a new layer, add a drop shadow and arrange it along the bottom of the frame. Move the I Am word art so it is above this element.
Open wire element TP50. Arrange it to the top left of your canvas and duplicate. Move the duplicate over so it is to the right of your canvas, and line it up so they line up together and it looks like one piece. Merge down and duplicate this merged layer. Drag the duplicate down to the bottom of your canvas and line up the edges so they overlap and look like one piece again. Merge these two layers together.
Apply your mask. Delete the mask layer, and merge together the group. Resize if necessary.
Open element TP20, copy and paste as a new layer, move it just above the masked layer, and arrange to the left of your tag. Add a drop shadow.
Now for your name. Open each of the Alphas that you need for your name. You will notice it has both the upper and lower case letters on each one. Just take your selection tool and draw around whichever one you need, then copy and paste as a new layer. Then, what I did, was line them up how I wanted, rotated some, brought some down higher or lower so they didn't all line up. Then I resized them by 60% and added a drop shadow. Arrange the name where you'd like it.
Add your copyright info.
Crop it, delete your white background if you want to save it as transparent. To save as transparent, save as a .png.
Subscribe to:
Post Comments (Atom)
No comments:
Post a Comment