 For this tutorial you will need the following:
Tube of choice. I am using the awesome artwork of Angela Newman, which you have to have a license to use, and you can purchase at AMI.
Scrap kit of choice. I am using a freebie called Frosty Days by Sylvie at Fantasy Moments. You can use this one or any other of your choice that matches the tube you are using.
My template HERE.
Font of choice. I am using Nightmare Hero
Plugins: Alien Skin Eye Candy 3.1 Glow (or another version of Alien Skin's gradient glow, etc will work just as well)
Let's start!
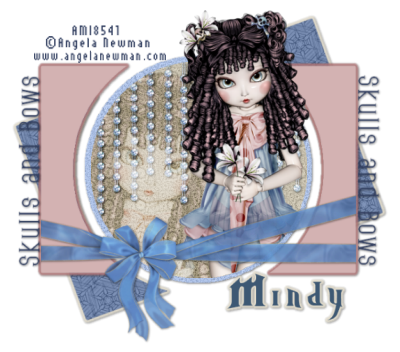
Open your template, delete the Raster 6 layer. Change the canvas size to about 700 x 700 so you have room to work. You can crop it down and resize it at the end if you want.
Open paper 9. On your raster 3 layer, click inside it with your magic wand, copy your paper 9 layer and paste as a new layer. Selections, invert, make sure you are on your paper layer, and hit the delete key on your keyboard. Deselect and using your Eye Candy Glow filter using #ede6d4 as the color, set to width of 5 and fat. Add a drop shadow of your choosing. I use 1, 1, 60, 5. Delete the original raster 3 layer.
Click on your raster 1 layer, click inside it with your magic wand, add a new raster layer, and flood flood fill with #d4b3b3, deselect and delete the original raster 1 layer. Apply the Eye Candy glow filter using the same settings, except change the color to #b87a7b, and add your drop shadow.
Click on your raster 5 layer, click inside it with your magic wand, add a new raster layer and flood fill with #344162. Deselect, add a drop shadow and delete the original layer. Do the same thing for the Copy of Raster 5 layer.
Open paper 17. On your raster 2 layer, click inside it with your magic wand, copy paper 17 and paste as a new layer, selections, invert, make sure you are on the paper layer, and hit delete on your keyboard, add a drop shadow and delete the original raster layer.
Click on raster 4 layer with your magic wand, open paper 18, copy and paste it as a new layer, selections, invert, on your paper layer, hit delete on your keyboard, delete the original raster 4 layer and leave selected.
Open your tube, copy and paste as a new layer, move it to the right side of your circle layer and take your eraser tool and erase the bits that hang over the bottom edge, keep selected.
On the original tube, image, mirror, then copy and paste as a new layer. Resize your tube, I resized about 145%, but the amount you resize will depend on the tube you are using. Make sure you are on the resized tube layer, and hit delete on your keyboard. Drag that layer below your first tube layer, deselect, change the blend mode to Soft Light.
Open a ribbon, I used Element 13 and resized it by 40%, add a drop shadow, arrange it near the bottom of the tag, and erase the bits that hang over the top rectangle.
Take your lighten/darken tool, and with the size set to about 25, hardness at 50, step 5, density 100, thickness 100, rotation 0, opacity 50, right click and hold the button down and drag it across the ends of your ribbon, from the inside edge to the outside edge, making it darken a bit on the edges.
On the smaller circle layer, selections, select all, float, defloat, open Element 17, copy and paste as a new layer, resize by 60%, selections, invert, on your element layer, hit delete on your keyboard and then deselect and add a drop shadow.
With your text tool, background set to #3d5873 write out your name. Using your Glow plugin, add a glow with the width of about 5 fat using color #ede6d4, and then add a drop shadow.
Add your license and ©info.
Delete the white background layer, crop your image, resize as necessary, and save as a transparent .png file and you're done!
For this tutorial you will need the following:
Tube of choice. I am using the awesome artwork of Angela Newman, which you have to have a license to use, and you can purchase at AMI.
Scrap kit of choice. I am using a freebie called Frosty Days by Sylvie at Fantasy Moments. You can use this one or any other of your choice that matches the tube you are using.
My template HERE.
Font of choice. I am using Nightmare Hero
Plugins: Alien Skin Eye Candy 3.1 Glow (or another version of Alien Skin's gradient glow, etc will work just as well)
Let's start!
Open your template, delete the Raster 6 layer. Change the canvas size to about 700 x 700 so you have room to work. You can crop it down and resize it at the end if you want.
Open paper 9. On your raster 3 layer, click inside it with your magic wand, copy your paper 9 layer and paste as a new layer. Selections, invert, make sure you are on your paper layer, and hit the delete key on your keyboard. Deselect and using your Eye Candy Glow filter using #ede6d4 as the color, set to width of 5 and fat. Add a drop shadow of your choosing. I use 1, 1, 60, 5. Delete the original raster 3 layer.
Click on your raster 1 layer, click inside it with your magic wand, add a new raster layer, and flood flood fill with #d4b3b3, deselect and delete the original raster 1 layer. Apply the Eye Candy glow filter using the same settings, except change the color to #b87a7b, and add your drop shadow.
Click on your raster 5 layer, click inside it with your magic wand, add a new raster layer and flood fill with #344162. Deselect, add a drop shadow and delete the original layer. Do the same thing for the Copy of Raster 5 layer.
Open paper 17. On your raster 2 layer, click inside it with your magic wand, copy paper 17 and paste as a new layer, selections, invert, make sure you are on the paper layer, and hit delete on your keyboard, add a drop shadow and delete the original raster layer.
Click on raster 4 layer with your magic wand, open paper 18, copy and paste it as a new layer, selections, invert, on your paper layer, hit delete on your keyboard, delete the original raster 4 layer and leave selected.
Open your tube, copy and paste as a new layer, move it to the right side of your circle layer and take your eraser tool and erase the bits that hang over the bottom edge, keep selected.
On the original tube, image, mirror, then copy and paste as a new layer. Resize your tube, I resized about 145%, but the amount you resize will depend on the tube you are using. Make sure you are on the resized tube layer, and hit delete on your keyboard. Drag that layer below your first tube layer, deselect, change the blend mode to Soft Light.
Open a ribbon, I used Element 13 and resized it by 40%, add a drop shadow, arrange it near the bottom of the tag, and erase the bits that hang over the top rectangle.
Take your lighten/darken tool, and with the size set to about 25, hardness at 50, step 5, density 100, thickness 100, rotation 0, opacity 50, right click and hold the button down and drag it across the ends of your ribbon, from the inside edge to the outside edge, making it darken a bit on the edges.
On the smaller circle layer, selections, select all, float, defloat, open Element 17, copy and paste as a new layer, resize by 60%, selections, invert, on your element layer, hit delete on your keyboard and then deselect and add a drop shadow.
With your text tool, background set to #3d5873 write out your name. Using your Glow plugin, add a glow with the width of about 5 fat using color #ede6d4, and then add a drop shadow.
Add your license and ©info.
Delete the white background layer, crop your image, resize as necessary, and save as a transparent .png file and you're done!

Wednesday, December 23, 2009
Skulls & Bows
For this tutorial you will need the following:
Tube of choice. I am using the awesome artwork of Angela Newman, which you have to have a license to use, and you can purchase at AMI.
Scrap kit of choice. I am using a freebie called Frosty Days by Sylvie at Fantasy Moments. You can use this one or any other of your choice that matches the tube you are using.
My template HERE.
Font of choice. I am using Nightmare Hero
Plugins: Alien Skin Eye Candy 3.1 Glow (or another version of Alien Skin's gradient glow, etc will work just as well)
Let's start!
Open your template, delete the Raster 6 layer. Change the canvas size to about 700 x 700 so you have room to work. You can crop it down and resize it at the end if you want.
Open paper 9. On your raster 3 layer, click inside it with your magic wand, copy your paper 9 layer and paste as a new layer. Selections, invert, make sure you are on your paper layer, and hit the delete key on your keyboard. Deselect and using your Eye Candy Glow filter using #ede6d4 as the color, set to width of 5 and fat. Add a drop shadow of your choosing. I use 1, 1, 60, 5. Delete the original raster 3 layer.
Click on your raster 1 layer, click inside it with your magic wand, add a new raster layer, and flood flood fill with #d4b3b3, deselect and delete the original raster 1 layer. Apply the Eye Candy glow filter using the same settings, except change the color to #b87a7b, and add your drop shadow.
Click on your raster 5 layer, click inside it with your magic wand, add a new raster layer and flood fill with #344162. Deselect, add a drop shadow and delete the original layer. Do the same thing for the Copy of Raster 5 layer.
Open paper 17. On your raster 2 layer, click inside it with your magic wand, copy paper 17 and paste as a new layer, selections, invert, make sure you are on the paper layer, and hit delete on your keyboard, add a drop shadow and delete the original raster layer.
Click on raster 4 layer with your magic wand, open paper 18, copy and paste it as a new layer, selections, invert, on your paper layer, hit delete on your keyboard, delete the original raster 4 layer and leave selected.
Open your tube, copy and paste as a new layer, move it to the right side of your circle layer and take your eraser tool and erase the bits that hang over the bottom edge, keep selected.
On the original tube, image, mirror, then copy and paste as a new layer. Resize your tube, I resized about 145%, but the amount you resize will depend on the tube you are using. Make sure you are on the resized tube layer, and hit delete on your keyboard. Drag that layer below your first tube layer, deselect, change the blend mode to Soft Light.
Open a ribbon, I used Element 13 and resized it by 40%, add a drop shadow, arrange it near the bottom of the tag, and erase the bits that hang over the top rectangle.
Take your lighten/darken tool, and with the size set to about 25, hardness at 50, step 5, density 100, thickness 100, rotation 0, opacity 50, right click and hold the button down and drag it across the ends of your ribbon, from the inside edge to the outside edge, making it darken a bit on the edges.
On the smaller circle layer, selections, select all, float, defloat, open Element 17, copy and paste as a new layer, resize by 60%, selections, invert, on your element layer, hit delete on your keyboard and then deselect and add a drop shadow.
With your text tool, background set to #3d5873 write out your name. Using your Glow plugin, add a glow with the width of about 5 fat using color #ede6d4, and then add a drop shadow.
Add your license and ©info.
Delete the white background layer, crop your image, resize as necessary, and save as a transparent .png file and you're done!
Subscribe to:
Post Comments (Atom)
No comments:
Post a Comment