 For this tut you will need the following:
Tube of choice. I am using the beautiful artwork of Ismael Rac, which you have to purchase at AMI to use.
Scrap kit of choice. I am using a FTU kit from Fantasy moments called Happy New Year.
Font of choice. I used PF Tempesta Seven Extended and Pea Miss Stalker
Plugin: Alien Skin Eye Candy 3.1 glow (optional for name)
Ok, let's get started!
Open a new transparent (or white) canvas of 650 x 650.
Open Happy New Year paper 21 and click on your foreground in the materials palette, go to patterns and browse to find your paper and set it as your foreground, set your background to null.
Click on your preset shape, set it to elipse, and with the width set at 15, draw out a large circle on your canvas. Objects, align, center in canvas and convert to a raster layer. Add a drop shadow of choice. I used 1, 1, 60, 5
With your magic wand, click inside your circle, selections, modify, expand by 5, add a new raster layer below the circle, and open Happy New Year paper 6, and on your foreground in the materials palette, go to patterns and browse to find paper 6 and set it as your foreground. Make sure you are on the new layer and flood fill with the paper 6 pattern. Deselect
Open paper 9 and set it as your background as you did above, and set your foreground to black. With your preset shape tool set on rectangle with the stroke set to 10, draw out a long thinnish rectangle across the circle. (see my tag for reference)Objects, align, center in canvas and convert to raster layer. Add your drop shadow.
Open paper 2 and set it as your background pattern, leaving your foreground set to black and stroke changed to 5. Draw out a long, slightly wide rectangle going from the top to the bottom of your tag, going a bit over the circle layer at both the top and the bottom. Convert to raster layer and rotate to the left by 15. Add drop shadow.
Open paper 12 and set it as your background pattern, leave the foreground set to black, stroke still set at 5 and draw out another long, wide rectangle as you did in the step above. Convert to raster layer and rotate to the right by 15. Add drop shadow.
Open your tube, copy and paste as a new layer. Position it over one of the vertical rectangles you just made, resize as necessary (I resized mine by 120%) add a drop shadow, and erase the bits that hang over the rectangle.
Open element 39, resize by about 80%, copy and paste as a new layer, and move to the left of the tag, add drop shadow.
Open element 28, resize by about 85%, copy and paste as a new layer, and drag down so it's just below your tube layer, and above all the rectangles. Add a very light drop shadow, I used 0, 0, 40, 5
Open element 52, resize by 20% copy and paste as a new layer, and arrange it to the left of the tag, just above the top of the ribbon.
Open element 2, resize by 20%, copy and paste as a new layer, select inside with your magic wand, being sure to hold down the shift key and get inside the hands of the clock and inside the numbers that are closed off (the 0, 8, etc). Selections, modify, expand by 5, add a new layer under the clock layer and flood fill with white. Merge the white layer and the clock layer together.
Open element 16, copy and paste as a new layer, resize by 25% add the light drop shadow that you used for your fireworks and move down to the lower left side.
Open element 36, copy and paste as a new layer, resize by 25%, add the darker drop shadow you used on the rectangles, move to the lower left side, and drag the layer below the champagne glasses.
Open element 20, copy and paste as a new layer, resize by 50%, add the darker drop shadow, make sure that layer is on the top of all your elements, etc, and arrange it so that the bows are on each edge of the vertical rectangle (see my tag for reference).
Add the text 2010 in white, I used PF Tempesta Seven Extended font, add your drop shadow.
Add your name, I used Pea Miss Stalker in white and added Eye Candy Gradient glow size 3 fat in black, then the dark drop shadow.
Add your copyright and license info and you're done!
For this tut you will need the following:
Tube of choice. I am using the beautiful artwork of Ismael Rac, which you have to purchase at AMI to use.
Scrap kit of choice. I am using a FTU kit from Fantasy moments called Happy New Year.
Font of choice. I used PF Tempesta Seven Extended and Pea Miss Stalker
Plugin: Alien Skin Eye Candy 3.1 glow (optional for name)
Ok, let's get started!
Open a new transparent (or white) canvas of 650 x 650.
Open Happy New Year paper 21 and click on your foreground in the materials palette, go to patterns and browse to find your paper and set it as your foreground, set your background to null.
Click on your preset shape, set it to elipse, and with the width set at 15, draw out a large circle on your canvas. Objects, align, center in canvas and convert to a raster layer. Add a drop shadow of choice. I used 1, 1, 60, 5
With your magic wand, click inside your circle, selections, modify, expand by 5, add a new raster layer below the circle, and open Happy New Year paper 6, and on your foreground in the materials palette, go to patterns and browse to find paper 6 and set it as your foreground. Make sure you are on the new layer and flood fill with the paper 6 pattern. Deselect
Open paper 9 and set it as your background as you did above, and set your foreground to black. With your preset shape tool set on rectangle with the stroke set to 10, draw out a long thinnish rectangle across the circle. (see my tag for reference)Objects, align, center in canvas and convert to raster layer. Add your drop shadow.
Open paper 2 and set it as your background pattern, leaving your foreground set to black and stroke changed to 5. Draw out a long, slightly wide rectangle going from the top to the bottom of your tag, going a bit over the circle layer at both the top and the bottom. Convert to raster layer and rotate to the left by 15. Add drop shadow.
Open paper 12 and set it as your background pattern, leave the foreground set to black, stroke still set at 5 and draw out another long, wide rectangle as you did in the step above. Convert to raster layer and rotate to the right by 15. Add drop shadow.
Open your tube, copy and paste as a new layer. Position it over one of the vertical rectangles you just made, resize as necessary (I resized mine by 120%) add a drop shadow, and erase the bits that hang over the rectangle.
Open element 39, resize by about 80%, copy and paste as a new layer, and move to the left of the tag, add drop shadow.
Open element 28, resize by about 85%, copy and paste as a new layer, and drag down so it's just below your tube layer, and above all the rectangles. Add a very light drop shadow, I used 0, 0, 40, 5
Open element 52, resize by 20% copy and paste as a new layer, and arrange it to the left of the tag, just above the top of the ribbon.
Open element 2, resize by 20%, copy and paste as a new layer, select inside with your magic wand, being sure to hold down the shift key and get inside the hands of the clock and inside the numbers that are closed off (the 0, 8, etc). Selections, modify, expand by 5, add a new layer under the clock layer and flood fill with white. Merge the white layer and the clock layer together.
Open element 16, copy and paste as a new layer, resize by 25% add the light drop shadow that you used for your fireworks and move down to the lower left side.
Open element 36, copy and paste as a new layer, resize by 25%, add the darker drop shadow you used on the rectangles, move to the lower left side, and drag the layer below the champagne glasses.
Open element 20, copy and paste as a new layer, resize by 50%, add the darker drop shadow, make sure that layer is on the top of all your elements, etc, and arrange it so that the bows are on each edge of the vertical rectangle (see my tag for reference).
Add the text 2010 in white, I used PF Tempesta Seven Extended font, add your drop shadow.
Add your name, I used Pea Miss Stalker in white and added Eye Candy Gradient glow size 3 fat in black, then the dark drop shadow.
Add your copyright and license info and you're done!

Thursday, December 17, 2009
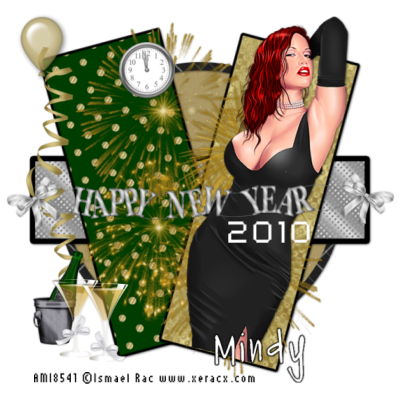
2010 New Year
For this tut you will need the following:
Tube of choice. I am using the beautiful artwork of Ismael Rac, which you have to purchase at AMI to use.
Scrap kit of choice. I am using a FTU kit from Fantasy moments called Happy New Year.
Font of choice. I used PF Tempesta Seven Extended and Pea Miss Stalker
Plugin: Alien Skin Eye Candy 3.1 glow (optional for name)
Ok, let's get started!
Open a new transparent (or white) canvas of 650 x 650.
Open Happy New Year paper 21 and click on your foreground in the materials palette, go to patterns and browse to find your paper and set it as your foreground, set your background to null.
Click on your preset shape, set it to elipse, and with the width set at 15, draw out a large circle on your canvas. Objects, align, center in canvas and convert to a raster layer. Add a drop shadow of choice. I used 1, 1, 60, 5
With your magic wand, click inside your circle, selections, modify, expand by 5, add a new raster layer below the circle, and open Happy New Year paper 6, and on your foreground in the materials palette, go to patterns and browse to find paper 6 and set it as your foreground. Make sure you are on the new layer and flood fill with the paper 6 pattern. Deselect
Open paper 9 and set it as your background as you did above, and set your foreground to black. With your preset shape tool set on rectangle with the stroke set to 10, draw out a long thinnish rectangle across the circle. (see my tag for reference)Objects, align, center in canvas and convert to raster layer. Add your drop shadow.
Open paper 2 and set it as your background pattern, leaving your foreground set to black and stroke changed to 5. Draw out a long, slightly wide rectangle going from the top to the bottom of your tag, going a bit over the circle layer at both the top and the bottom. Convert to raster layer and rotate to the left by 15. Add drop shadow.
Open paper 12 and set it as your background pattern, leave the foreground set to black, stroke still set at 5 and draw out another long, wide rectangle as you did in the step above. Convert to raster layer and rotate to the right by 15. Add drop shadow.
Open your tube, copy and paste as a new layer. Position it over one of the vertical rectangles you just made, resize as necessary (I resized mine by 120%) add a drop shadow, and erase the bits that hang over the rectangle.
Open element 39, resize by about 80%, copy and paste as a new layer, and move to the left of the tag, add drop shadow.
Open element 28, resize by about 85%, copy and paste as a new layer, and drag down so it's just below your tube layer, and above all the rectangles. Add a very light drop shadow, I used 0, 0, 40, 5
Open element 52, resize by 20% copy and paste as a new layer, and arrange it to the left of the tag, just above the top of the ribbon.
Open element 2, resize by 20%, copy and paste as a new layer, select inside with your magic wand, being sure to hold down the shift key and get inside the hands of the clock and inside the numbers that are closed off (the 0, 8, etc). Selections, modify, expand by 5, add a new layer under the clock layer and flood fill with white. Merge the white layer and the clock layer together.
Open element 16, copy and paste as a new layer, resize by 25% add the light drop shadow that you used for your fireworks and move down to the lower left side.
Open element 36, copy and paste as a new layer, resize by 25%, add the darker drop shadow you used on the rectangles, move to the lower left side, and drag the layer below the champagne glasses.
Open element 20, copy and paste as a new layer, resize by 50%, add the darker drop shadow, make sure that layer is on the top of all your elements, etc, and arrange it so that the bows are on each edge of the vertical rectangle (see my tag for reference).
Add the text 2010 in white, I used PF Tempesta Seven Extended font, add your drop shadow.
Add your name, I used Pea Miss Stalker in white and added Eye Candy Gradient glow size 3 fat in black, then the dark drop shadow.
Add your copyright and license info and you're done!
Subscribe to:
Post Comments (Atom)
No comments:
Post a Comment