Pages

Friday, November 12, 2010

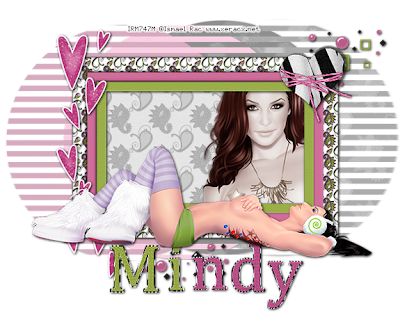
Trendsetter

For this tutorial you will need the following:
Paint Shop Pro, I am using PSP X, you should be able to use any version.
Tube(s) of choice, I am using the beautiful artwork of Ismael Rac, which you need a license to use. You can get at his store HERE. I am using one full length tube, and a close up.
Scrap kit of choice. I am using Trendsetter by Juicy Bits which you can get HERE.
Font of choice, I am using the alpha that came with the kit.
Plugins: VM Extravaganza-Transmission,
Just remember that my choices of papers and elements is just a suggestion, change it up and make it yours! You don't have to follow mine exactly.
Let's get started!
Open a new canvas 600 x 600 white background.
Open Frame 4, copy and paste as a new layer, resize by 65%.
Copy and paste your tube as a new layer, I resized mine by 85%, then hide it for now.
With your magic wand, click inside the frame, then selection, modify, expand by 3.
Open paper 9, copy and paste as a new layer just above your white background layer, resize by 60%, selections, invert, make sure you are still on the paper layer and click delete on your keyboard, leave selected.
Open your close up tube, copy and paste as a new layer, arrange how you want in the frame, click delete on your keyboard, then deselect.
Duplicate the tube, on the top layer, adjust blur, gaussian blur by 3, change the opacity to soft light.
On the original layer adjust, hue and saturation, change both to 0, then add a drop shadow just to the bottom tube.
Now go ahead and unhide the other tube.
Open paper 15, make your elipse tool active, and make your background pattern paper 15, your foreground set to null . Draw out a largish circle that is a little taller than your frame, so you can see it above and below (see my tag for reference), convert to raster layer. Add a drop shadow.
Open paper 8 and do the same as above, just put the circle over to the right side of the frame, drag it below the pink circle layer, add a drop shadow. Merge the two together, apply VM Transmission-Extravaganza with the following settings:
Line Width: 6
Offset: 18
Contrast: 40
Now lower the opacity to about 45.
Open scatter 2, copy and paste just above the layer we just made with the circles, resize by 60% and add your drop shadow.
Open the pink Hearts layer, copy and paste as a new layer just above your frame, resize by 85%, add your drop shadow.
Open heart01, copy and paste as a new layer, resize by 45%, arrange over the top right corner of the frame, add your drop shadow.
Open the alpha, use your lasso tool to go around the letters you need, copy and paste as a new layer, resize them whatever size you want them, I did mine by 45% then sharpened them, after you arrange them all how you want them, merge them together and add a drop shadow.
Add any copyright and credits you need to add.
Crop your tag, and if you want a transparent tag without the white background, delete that layer and save as a .png file.


Friday, November 5, 2010

Masquerade Ball

For this tutorial you will need the following:
Paint Shop Pro, I am using PSP X, you should be able to use any version.
Tube of choice, I am using one of the tubes that came with the scrap kit. It is by Lisa at Sophisticated Imaging.
Scrap kit of choice. I am using Masquerade Ball by Wicked Princess Scraps.
Template 2 by Deb & Mich at Creative Misfits Creations. It's the 4th one down. Just click on the link above the templates where it says Deb & Mich.
Font of choice, I am using
Mask: WSL mask 302, which you can find at Weescotslass Creations.
Plugins: No outside plugins used.
Just remember that my choices of papers and elements is just a suggestion, change it up and make it yours! You don't have to follow mine exactly.
Let's get started!
Open your template. Delete the Copyright, and Raster 1 and 2 layers. I resized mine (all layers) so that it was 575x441 and then changed the canvas size to 650x650. This made the size of the template smaller and then gave me room to work. We'll crop any excess off at the end. I also added a new layer above the background layer and flood filled with white and deleted the background layer that was there. I just find it easier to work with doing it that way.
Make raster3 layer active, selections, select all, float, defloat. Open paper 6, copy and paste as a new layer, arrange how you like it, selections, invert, click delete on your keyboard. Deselect and delete the original layer.
Do the same for the oval frame layer picking a darker paper to use (I used 9), then add a drop shadow.
Repeat for the circle layer. I used paper 16.
Make the white dots layer active, and make the color replacer tool active. Set black as your foreground and white as the background and then go over the dotted layer with the color replacer tool. This will change your dots to black.
Make the diamond dots layer active, use your dropper tool to pick the color of the diamond dots and make it your background color (right click) then left click on a dark color from the paper you used in the circle layer.
Now go over all the dots in the diamond dot layer and diamond dots 2 & 3 layers and change the colors.
Click inside the big diamond layer, selections modify, expand by 3. Open paper 19, copy and paste as a new layer, resize by 65%, selections, invert and click delete on your keyboard. Leave selected.
Open a tube of your choice, copy and paste as a new layer, arrange into the diamond as you like it, click delete and deselect.
Go back to your big diamond layer, selections, select all, float, defloat, add a new layer above the diamond layer and below the paper layer you just put on. Flood fill with the dark color you changed the dotted lines to.
Deselect and delete the original diamond layer. Add a drop shadow.
Duplicate your tube layer. On the top layer blur, gaussian blur of 3, change the blend mode to soft light. On the original layer, change the blend mode to Luminance (L).
Fill the left and right diamond layers as instructed above.
Copy and paste your tube, resize if necessary. If you use the same tube I did, I resized by 64%. Add a drop shadow.
Add any elements you like, resizing as necessary.
Open a paper of your choice, paste it above the white background layer. Open your mask, layers, new mask layer, from image, find your mask in the drop down box, click ok. Delete the mask layer, merge the group. Resize mask if necessary and I changed the opacity of mine to 56%.
Add your name, copyright and other credits as needed.
Crop and save.