Pages

Friday, December 31, 2010

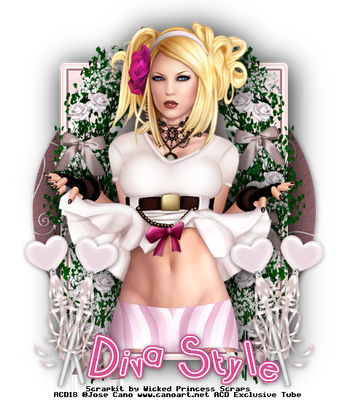
Diva Style

For this tutorial you will need the following:
Paint Shop Pro, I am using PSP X, you should be able to use any version.
Tube of choice, I am using the artwork of Jose Cano. This tube is an ACD group exclusive and is not available for purchase at any stores. Only members of Another Creative Design are eligible. You can go HERE to join and learn about how to earn the tube.
Scrap kit of choice. I am using I Promise You which is a PTU kit and you can find it at Wicked Princess Scraps HERE.
Font of choice, I am using
Plugins: Eye Candy 4000 Shadow Lab (or just a drop shadow will work)
Just remember that my choices of papers and elements is just a suggestion, change it up and make it yours! You don't have to follow mine exactly.
Let's get started!
Open a new 600x600 white canvas.
Open paper 3 and set it as your background pattern and set at 75%. You can do this by right clicking on your background in your color palette and then clicking the pattern tab and scrolling through to find your paper. Then in the percentage box change it to 75%.
Set your foreground to null.
Using your circle preset shape draw out a good sized circle. Objects, align, center in canvas, then change to raster layer and add a drop shadow.
Now open paper 10 and do the same thing, except this time use your rectangle tool and draw out a large rectangle. See my tag for reference. Once you get it drawn, change to raster layer.
Selections, select all, float, defloat, invert.
Copy your tube and paste as a new layer. Arrange how you like it in the center of the rectangle. Selections, invert, on your tube layer, now take your eraser tool and erase any parts you don't want hanging over.
Now selections invert, make sure you are on your rectangle layer, selections, modify, expand by 3. Make a new raster layer below your rectangle and flood fill with #b07e87.
Expand by 3 again, add new raster layer below the one you just did, flood fill with white.
Do the same as above except this time expand by 5 and flood fill with #f9e1de.
I then went ahead and merged all the rectangle sections together, then applied Eye Candy 4000 shadowlab with the following settings to both the rectangle and the tube:
Center Offset Direction: 315
Center Offset Distance: 4.33
Overall Opacity: 100%
Overall blur: 56
Perspective blur: 0
Color black
Draw only outside selection checked
I then went back and erased the part of the shadow that was under the legs of the tube where it cut off her legs in the rectangle.
Now open the arch element and copy and paste it just below your tube. You may or may not need to erase part of the tube or arch if it looks funny. I didn't bother erasing any because I covered it with another element. It's totally up to you depending on what elements you use. If you are copying my tut exactly, you won't need to erase anything.
Open the heart sucker, copy and paste as a new layer, resize by 40%, rotate to the left by 15. duplicate and mirror. Arrange the two on the left lower side. add drop shadow to both then merge together. Duplicate and mirror.
Add your name, copyright and any scrap kit credits needed.
Crop, resize and save!

Wednesday, December 22, 2010

Christmas At Grandma's

For this tutorial you will need the following:
Paint Shop Pro, I am using PSP X, you should be able to use any version.
Tube of choice, I am using the artwork of Ismael Rac, which you need a license to use. You can get at his site HERE.
Scrap kit of choice. I am using Christmas at Grandmas from Juicy Bits, which you can purchase at her store HERE.
Font of choice, I am using Zebra.
Mask: Monti circle mask which you can get at Monti's site HERE. My link should take you to her mask page, if it doesn't click the masks link on the left and the mask is just a little down the page.
Plugins:
Just remember that my choices of papers and elements is just a suggestion, change it up and make it yours! You don't have to follow mine exactly.
Let's get started!
Open a new canvas 650x650 white background.
Open element 19, copy and paste as a new layer, resize by 70%.
Click inside it with your magic wand, selections, expand by 5. Open paper 02, copy and paste as a new layer, below the frame, selections, invert, click delete on your keyboard. Leave selected.
Open your tube, copy and paste as a new layer, take your eraser tool and erase the bits that you don't want hanging over the frame, then go ahead and deselect. Add drop shadow to your tube and frame.
Open element 01, copy and paste as a new layer, rotate to the right by 20. Drag down below the frame and background paper. Add drop shadow.
Open element 29, copy and paste as a new layer, resize by 50% add drop shadow and arrange over the left middle part of the frame.
Open one of the tag elements, copy and paste as a new layer, resize by 50% add a drop shadow and arrange it so that it looks like it's hanging from the bow.
Open element 43, copy and paste as a new layer, resize by 65%, add a drop shadow and arrange on the lower part of the frame.
Open element 26, copy and paste as a new layer, resize by 30%, add a drop shadow and arrange it on the right lower side of tag.
Open both candy canes, copy and paste as new layers resize them both by 20%, then mirror one of them. Rotate one to the left by 20 and the other to the right by 20. Add drop shadow, then merge them together. Arrange on the right side of the little house.
Open one of the mugs, copy and paste as a new layer, resize by 20% then again by 65%. Add a drop shadow and arrange on the bottom by the house.
Open a paper of your choice, copy and paste as a new layer just above your white background layer. Open your mask, go to layers, new mask layer, from image and apply the mask. Then on your layers palette, delete the mask layer and merge the group. Resize the mask if necessary.
Open your alpha. Take your selection tool and draw around the m, copy and paste as a new layer. Go back to your alpha, deselect, draw around the e, copy and paste as a new layer, ect until you get all the letters to spell Merry. Duplicate your r, then arrange the letters out. I rotated a couple of them by 20 to the left or right. Once they're arranged how you like them, merge them all together and then resize by about 50%. Add a drop shadow.
Do the same as above to get the word Christmas.
Add your copyright and credits as necessary.
Add your name or text.
Crop tag and resize as needed.
I always delete the white background layer and then save as a .png so it's transparent and I don't have the white background.