Pages

Sunday, September 28, 2014

Snags using BLT Designs Fall Y'all kit

Snag tags made using BLT Dezignz PTU kit, Fall Y'all available here
artwork by Katherine available here
tutorial for this tag here


Fall Y'all


For this tutorial you will need the following:

Paint Shop Pro, I am using PSP X, you should be able to use any version.

Tube of choice, I am using the artwork of Katharine (Milla tube) which you need a license to use. 

Scrap kit of choice. I am using a PTU kit, Fall Y'all by BLT Dezignz

Font of choice, I am using Les Sensations de Cerise

Mask: DBV Mask 80 by Designs by Vaybs

Plugins: No outside plugins used
I do use Eye Candy 4000 Gradient Glow on all my copyrights/credits layers
I do this because some forums will make a .png tag show up with a black background and then your
copyright doesn't show.


Just remember that my choices of papers and elements is just a suggestion, change it up and make it yours! You don't have to follow mine exactly.

Add a drop shadow of your choosing to tubes & elements throughout. I usually use 1, 1, 50, 5 unless otherwise noted.


Let's get started!

Open a new canvas 850 x 850 pixels with a white background

Open frame 1 copy and paste as a new layer
click inside with your magic wand, selections, modify, expand 2, selections, invert
open paper 3, resize to 850 x 850 pixels copy and paste as a new layer
click delete on your keyboard, leave selected

copy and paste your tube as a new layer, resize by 40%
 erase the bits that hang out of your frame where you don't want them
 deselect

 Now we'll add our elements. I used the following:
cornucopia resize 11% mirror &arrange on bottom right, duplicate & mirror
Take your eraser tool and erase the darker part that curls up, so you just see the front and the veggies

flower 9 resize 13% arrange behind and left of cornucopia, duplicate, arrange above cornucopia, duplicate & mirror

barrel  resize 12% arrange on right, behind cornicopia
owl resize 12% arrange in the center on the bottom
bird cage resize 12% rotate left 12 arrange between barrel and cornicopia on the left
flower 6 resize 5% arrange on the far right side, duplicate & mirror

flower 1 resize 11% arrange on right, between the flowers there and duplicate, mirror
flower 5 resize 11% arrange on left, between the other flowers, duplicate & mirror
rosette resize 15% arrange behind flowers on left, duplicate & mirror
feather resize 15% rotate left 30 arrange over rosette on right, duplicate & mirror

open paper 9, resize 850 x 850 pixels, copy and paste as a new layer
apply your mask & merge group


crop and resize
add your copyright and credits as needed
add your text and save

Friday, September 26, 2014

Alicia Mujica CT Tag Show Off


New CT show off tag for Alicia Mujica using her Amey witch tube available here
scrap kit is Boo Nita by Amy Marie Kits available here

Wednesday, September 24, 2014

Sopfia's Vinyard Snaggables

Snaggables using the artwork of Misticheskaya
scrap kit From the Vine by BLT Dezignz
tutorial available here


Sopfia's Vinyard

Snaggable tags of this tag are available here.

For this tutorial you will need the following:

Paint Shop Pro, I am using PSP X, you should be able to use any version.

Tube of choice, I am using the artwork of Misticheskaya (Sopfia tube) which you need a license to use. 

Scrap kit of choice. I am using a PTU kit by BLT Dezignz called From The Vine

Font of choice, I am using Aligot de Mirabelle

Mask: DVB110 by Designs by Vaybs

Plugins: No outside plugins used
I do use Eye Candy 4000 Gradient Glow on all my copyrights/credits layers
I do this because some forums will make a .png tag show up with a black background and then your
copyright doesn't show.


Just remember that my choices of papers and elements is just a suggestion, change it up and make it yours! You don't have to follow mine exactly.

Add a drop shadow of your choosing to tubes & elements throughout. I usually use 1, 1, 50, 5 unless otherwise noted.


Let's get started!

Open a new canvas 850 x 850 pixels with a white background

Open frame 2 copy and paste as a new layer resize 25%
click inside with your magic wand, selections, modify, expand 2, selections, invert
open paper 8, resize to 600 x 600 pixels,  copy and paste as a new layer
click delete on your keyboard

copy and paste your tube as a new layer, arrange in the frame, click delete on your keyboard
change the blend mode to Luminance(L) drop the opacity to 80

 Copy and paste your tube as a new layer again, resize by 50%

I erased the bigger leaf on each corner of the frame and left the small ones

 add the following elements:
barrels resize 10% arrange in front of tube on bottom right
flower 1 resize 25% arrange behind barrels layer and above them
flower 3 resize 7% arrange just left of flower 1
bird feeder resize 12% arrange above flower layers

grape 2 resize 7% arrange on top left, duplicate & mirror
grape 1 resize 7% arrange below grapes on right, duplicate & mirror
flower 2 resize 7% arrange behind tube on bottom left

flower 4 resize 7% arrange to the left of the green one on bottom left
heart 1 resize 10% arrange behind flowers on bottom left
flower 3 resize 7% arrange between heart and flowers on bottom left,
duplicate & arrange behind heart

flower 1 mirror & resize 26% arrange behind heart
frog resize 7% arrange on top left, just below the grapes
flower 4 resize 7% arrange at top of grapes, duplicate & mirror

beads resize 25% rotate left 90 arrange across top of frame, below grapes, duplicate & mirror
arrange them so they line up with the same size bead in the top middle area, then erase the excess beads on each end that stick out past the frame

butterfly resize 5% arrange on left, duplicate & mirror, arrange on top right

open paper 10, resize 850 x 850 pixels copy and paste above the white backgroun
apply your mask & merge group
rotate left 90, drop opacity to 80

crop and resize
add your copyright and credits as needed
add your text and save

Monday, September 22, 2014

Haunt


For this tutorial you will need the following:

Paint Shop Pro, I am using PSP X, you should be able to use any version.

Tube of choice, I am using the artwork of Alicia Mujica (Drusila tube) which you need a license to use. 

Scrap kit of choice. I am using a PTU kit, Monster's Ball by Scrappin With Lil Ole Me

Font of choice, I am using Another Shabby

Mask of your choice

Plugins: No outside plugins used
I do use Eye Candy 4000 Gradient Glow on all my copyrights/credits layers
I do this because some forums will make a .png tag show up with a black background and then your
copyright doesn't show.


Just remember that my choices of papers and elements is just a suggestion, change it up and make it yours! You don't have to follow mine exactly.

Add a drop shadow of your choosing to tubes & elements throughout. I usually use 1, 1, 50, 5 unless otherwise noted.


Let's get started!

Open a new canvas 850 x 850 pixels with a white background

Copy and paste your tube as a new layer, resize by 45% arrange just below the center

Now add the following elements:
element 35 resize  50% arrange in front of tube on right side
element 98 resize  50% arrange left of tombstone, duplicate, drag to the left
element 13 resize  55% arrange behind tube & other tombstone
element 34 resize  65% arrange behind tube on left side
element 25 resize  55% arrange to the left of the tombstone that is behind your tube
element 108 resize  85% arrange above the white background layer & behind everything
element 31 resize  30% arrange on right
element 54 resize  35% arrange on bottom left
element 20 resize  30% arrange on left, by haunted houses
element 15 resize  35% arrange in front of tube on right

 add paper 8 above the white background
apply your mask, merge group

 crop and resize
add your copyright and credits as needed
add your text and save

Thursday, September 18, 2014

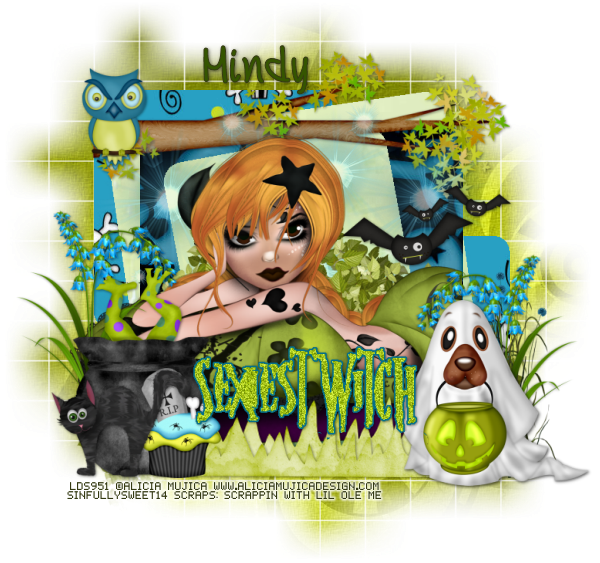
Sexy Witch


For this tutorial you will need the following:

Paint Shop Pro, I am using PSP X, you should be able to use any version.

Tube of choice, I am using the artwork of Alicia Mujica (Drusila tube) which you need a license to use. 

Scrap kit of choice. I am using a PTU kit, Enchantment, by Scrappin With Lil Ole Me 
 

Font of choice, I am using MF Summertime

Mask: WSL84 by Weescotslass Creations list of links to masks is on the right sidebar

Plugins: no outside plugins
I do use Eye Candy 4000 Gradient Glow on all my copyrights/credits layers
I do this because some forums will make a .png tag show up with a black background and then your
copyright doesn't show.


Just remember that my choices of papers and elements is just a suggestion, change it up and make it yours! You don't have to follow mine exactly.

Add a drop shadow of your choosing to tubes & elements throughout. I usually use 1, 1, 50, 5 unless otherwise noted.


Let's get started!

Open your template, shift D to duplicate and close the original
Delete the following layers: CR, 4, 5, 9

Change the canvas size to 900 x 900, unhide the white background and flood fill it with white

Fill the layers with papers, to do this make sure the layer you want to fill has been clicked on in your layer palette.
Click inside the shape with your magic wand, selections, modify, invert, open your paper, copy and paste as a new layer,
click delete on your keyboard.
Delete the original template layer

Some layers, you may just want to flood fill with a color from your kit. To do this, click on the layer in your layer palette, add another raster layer above it,
click inside the shape with your magic wand, and flood fill it with your color
Delete the original template layer

I used the following papers for each layer:
layer 1 use paper 23
layer 2 use paper 23
layer 3 use paper 4
layer 6 use paper 20
layer 7 use paper 4
layer 8 use paper 24


On the word art layer add noise, uniform, monochrome 60
then select the layer and go to selections, select all, float, defloat, modify, expand 2
add a new layer below the word art, flood fill with #056f89 and deselect
merge it with the original word art layer


Copy and paste your tube as a new layer, resize by 50%
make the big center square active, click on that layer with your magic wand, anywhere outside the square
arrange your tube over the template where you want, then take your eraser and 
erase where the tube overhangs the square on the right
deselect
 add the following elements:
 element 92 resize  50% arrange on bottom right
element 27 resize 60% arrange across the top of the template
element 55 resize  25% arrange on top left
element 78 resize  45% arrange on bottom left, erase the handle

 element 85 resize  45% mirror & arrange behind & above the cauldron
duplicate & mirror, drag down behind ghost
element 60 resize 45 arrange behind other flowers on the right

element 83 resize  25% arrange in front of the right side of the cauldron
element 34 resize  25% arrange on right, in the center area
element 29 resize 40% arrange on bottom behind other elements
element 30 resize  30% arrange in front of cauldron
element 4 arrange just behind tube on right, duplicate & mirror
element 3 arrange behind tube

 add paper 15 above your white background
apply your mask and merge group

crop and resize
add your copyright and credits as needed
add your text and save

Wednesday, September 17, 2014

Lazy Autumn Day


For this tutorial you will need the following:

Paint Shop Pro, I am using PSP X, you should be able to use any version.

Tube of choice, I am using the artwork of Alicia Mujica (Drusila tube) which you need a license to use. 

Scrap kit of choice. I am using a PTU kit, Harvest Nights by Scrappin With Lil Ole Me

Font of choice, I am using Anysome

Mask of your choice

Plugins: no outside plugins used
I do use Eye Candy 4000 Gradient Glow on all my copyrights/credits layers
I do this because some forums will make a .png tag show up with a black background and then your
copyright doesn't show.


Just remember that my choices of papers and elements is just a suggestion, change it up and make it yours! You don't have to follow mine exactly.

Add a drop shadow of your choosing to tubes & elements throughout. I usually use 1, 1, 50, 5 unless otherwise noted.


Let's get started!

Open a new canvas 950 x 850 pixels with a white background

open element 61 copy and paste as a new layer rotate left 90 resize 80%
click inside with your magic wand, selections, modify, expand 2, selections, invert
open paper 22 copy and paste as a new layer
click delete on your keyboard, leave selected
open your tube, copy & paste as a new layer, resize 45%
arrange in frame & erase the bits that hang out of your frame where you don't want them

add the following elements

element 6 resize  25% arrange on bottom left, duplicate several times until you have enough to
go across the bottom and arrange how you like

element 4 resize 25% duplicate several times & arrange between acorns

element 11 resize  43% arrange on far right
element 12 resize  25% arrange left of the apple bushel
element 16 arrange on right, just above the frame layer
element 14 resize  25% , duplicate 3 times arrange on the bottom in between the other leaves
element 55 resize  25% rotate left 25 arrange in the leaves

add paper 8 above the white background
apply your mask, merge group

crop and resize
add your copyright and credits as needed
add your text and save

Tuesday, September 16, 2014

Girl's Night


For this tutorial you will need the following:

Paint Shop Pro, I am using PSP X, you should be able to use any version.

Tube of choice, I am using the artwork of Alicia Mujica which you need a license to use. 
This tube (Alicia Mujica Exclusive 7a) is a CDO exclusive tube which you will not find in Alicia's store, it is only at CDO.

Scrap kit of choice. I am using a PTU kit, Girl's Night Out by Scrappin With Lil Ole Me

Font of choice, I am using Caprica Sans

Mask: gemsmasks-173 from Gems Taggin Scraps

Plugins: No outside plugins
I do use Eye Candy 4000 Gradient Glow on all my copyrights/credits layers
I do this because some forums will make a .png tag show up with a black background and then your
copyright doesn't show.


Just remember that my choices of papers and elements is just a suggestion, change it up and make it yours! You don't have to follow mine exactly.

Add a drop shadow of your choosing to tubes & elements throughout. I usually use 1, 1, 50, 5 unless otherwise noted.


Let's get started!

Open a new canvas 850 x 850 pixels with a white background

open 119 copy and paste as a new layer resize 75%
click inside with your magic wand, selections, modify, expand 2
add a new raster layer below the frame
make sure you're on that layer, open paper 29
paste into selection

open your tube, copy and paste as a new layer
arrange in the frame

add the following:
element 53 resize 30% rotate left 12 arrange on bottom left
element 78 resize  45% arrange to the right of the house
element 116 resize  30% arrange behind house & present

element 49 resize 30% arrange between purple flowers & house layer, duplicate, resize 65% drag down so it shows below the present layer

element 101 resize  45% arrange on bottom right
element 84 resize  20% arrange on bottom right, in front of the flowers
element 87 resize  20% arrange in front of house & gift elements on left

element 93 resize  30% arrange to the right of and behind the coffee cup
element 85 resize  15% arrange in front of coffee cup & the other cupcake
element 92 resize  30% arrange on the bottom in the center, duplicate & mirror

duplicate white flowers on the right, mirror, resize 65 arrange them to the left of the food
element 98 resize  20% arrange to the right of the present box
element 40 resize  40% arrange above house

element 75  resize  35% arrange behind white flowers on the right side
element 44 resize 35% arrange on flowers on right side
element 91 resize  21% arrange on top left, duplicate & mirror

add paper 4 above the white background
apply mask & merge group
resize by 85%

crop and resize
add your copyright and credits as needed
add your text and save

Sunday, September 14, 2014

Pirate Cove


For this tutorial you will need the following:

Paint Shop Pro, I am using PSP X, you should be able to use any version.

Tube of choice, I am using the artwork of Derzi from Beehive Studio which you need a license to use. 
This tube is Elfie the Witch Pirate and she comes with different outfits for Elf, witch & pirate
and each outfit also has several choices to change up their clothing

Scrap kit of choice. I am using a PTU kit, Shiver Me Timbers by Hania's Design
This kit was made to match this tube

Font of choice, I am using Pirates Bay

Mask: DVB Mask 111 by Designs by Vaybs

Plugins: No outside plugins
I do use Eye Candy 4000 Gradient Glow on all my copyrights/credits layers
I do this because some forums will make a .png tag show up with a black background and then your
copyright doesn't show.


Just remember that my choices of papers and elements is just a suggestion, change it up and make it yours! You don't have to follow mine exactly.

Add a drop shadow of your choosing to tubes & elements throughout. I usually use 1, 1, 50, 5 unless otherwise noted.


Let's get started!

Open a new canvas 850 x 850 pixels with a white background

copy and paste paper 8
apply your mask and merge group

Copy and paste your tube as a new layer, resize by 45%
arrange  in the center area of the sand

Now add the following elements:

element 1 resize 65% mirror & arrange on bottom right, behind tube layer
element 41 resize 45% arrange to the right of and behind the boat layer
element 61 resize  45% mirror & arrange on rock, duplicate, resize 65% drag below other vine

element 36 resize  45% arrange on rock
element 42 resize  45% arrange to the left of the boat, behind the tube layer
element 45 resize  65% arrange in front of chest and boat

element 77 resize 40%  mirror & arrange on right, erase the bits that show over the tree
element 35 resize 40% arrange to the left of and behind tube
element 19 resize  35% arrange in front of and left of the brown barrel
element 29 resize 35% arrange in front of barrels

crop and resize
add your copyright and credits as needed
add your text and save

Saturday, September 13, 2014

Elfie Fae


For this tutorial you will need the following:

Paint Shop Pro, I am using PSP X, you should be able to use any version.

Tube of choice, I am using the artwork of Derzi at Beehive Studio which you need a license to use. 
This tube is Elfie the Witch Pirate, and she has many choices for outfits, witch, pirate, fairy and you can even change up how each outfit looks as well.

Scrap kit of choice. I am using Elfie 1 by Tiny Turtle Designs, which was made to
match the fairy layer of Derzi's tube

Font of choice, I am using 2 Peas Giggle

Mask: Vix Big Mask 1 by VixPSPPlugins:
I do use Eye Candy 4000 Gradient Glow on all my copyrights/credits layers
I do this because some forums will make a .png tag show up with a black background and then your
copyright doesn't show.


Just remember that my choices of papers and elements is just a suggestion, change it up and make it yours! You don't have to follow mine exactly.

Add a drop shadow of your choosing to tubes & elements throughout. I usually use 1, 1, 50, 5 unless otherwise noted.


Let's get started!

Open a new canvas 850 x 850 pixels with a white background

add the following elements:
element 21 resize  85% arrange in the center
element 84 resize  45% arrange on the left side of element 21
element 93 resize  35% arrange behind and to the right of element 21

element 22 resize  75% arrange behind and left of element 21, duplicate & mirror
element 81 resize  75% arrange behind the other elements in the top center 

copy and paste your tube as a new layer, resize by 35% arrange on the left

element 92 resize  55% arrange beside your tube
element 23 rotate right 72 arrange behind everything on the left, duplicate & mirror
element 97 arrange in the top center between the two flower elements

element 101 resize  35% then 90% mirror & arrange on left
element 29 resize  25% mirror & arrange at top


Add paper 13 above the white background
apply your mask and merge group

crop and resize
add your copyright and credits as needed
add your text and save

Friday, September 12, 2014

Maddy Pumpkin


For this tutorial you will need the following:

Paint Shop Pro, I am using PSP X, you should be able to use any version.

Tube of choice, I am using the artwork of Ninaste at Beehive Studio which you need a license to use. 
This tube is called Maddie Pumpkin and she has several layers with different outfit choices to chose from.

Scrap kit of choice. I am using a PTU kit, Fall Flowers by Tiny Turtle Designs. 
This kit is the matching kit for this layer.

Font of choice, I am using KG Manhattan Script

Mask: WSL84 by Weescotslass Creations mask links on right sidebar, part way down the page

Plugins: No outside plugins
I do use Eye Candy 4000 Gradient Glow on all my copyrights/credits layers
I do this because some forums will make a .png tag show up with a black background and then your
copyright doesn't show.


Just remember that my choices of papers and elements is just a suggestion, change it up and make it yours! You don't have to follow mine exactly.

Add a drop shadow of your choosing to tubes & elements throughout. I usually use 1, 1, 50, 5 unless otherwise noted.


Let's get started!

Open a new canvas 850 x 850 pixels with a white background

open element 101 copy and paste as a new layer resize 130%
click inside with your magic wand, selections, modify, expand 2, 
add a new raster layer above the white background, make sure you are on that layer
edit, paste into selection
copy and paste your tube as a new layer, selections invert,
take your eraser tool and erase the bits that hang out of your frame where you don't want them
deselect

add the following elements:
element 121 arrange on bottom right
element 104 resize  65% arrange to the left of element 121
element 69 mirror & arrange below and left of element 104
element 88 arrange on right, just above frame, duplicate & mirror, merge together

element 29 resize  20% arrange on  right, duplicate 3x and mirror some and resize some, arrange on the
left side of the frame

element 91 resize  25% arrange in the flowers on the bottom

add paper 4 above the white background
apply your mask, merge group

crop and resize
add your copyright and credits as needed
add your text and save

Wednesday, September 10, 2014

Maleficent 3


For this tutorial you will need the following:

Paint Shop Pro, I am using PSP X, you should be able to use any version.

Tube of choice, I am using the artwork of Alicia Mujica (Malefica tube) which you need a license to use. 

Scrap kit of choice. I am using a PTU kit, Maleficent, by Daniela E. 

Font of choice, I am using Darkwood Shadow

Mask of your choice

Plugins: No outside plugins
I do use Eye Candy 4000 Gradient Glow on all my copyrights/credits layers
I do this because some forums will make a .png tag show up with a black background and then your
copyright doesn't show.


Just remember that my choices of papers and elements is just a suggestion, change it up and make it yours! You don't have to follow mine exactly.

Add a drop shadow of your choosing to tubes & elements throughout. I usually use 1, 1, 50, 5 unless otherwise noted.


Let's get started!

Open a new canvas 950 x 950 pixels with a white background

add the following

element 32 resize 85% arrange in center of canvas
Copy and paste your tube as a new layer, resize by 40% arrange on right
element 108 resize 40 % arrange on top right side of door, duplicate & mirror, merge these 2 together

element 59 mirror & arrange on left side of door, below the flower layer
I erased a few of the leaves at the bottom and
some of the top of it where it stuck out beyond the flowers on the left

element 37 resize  60% arrange to the left of the tube
element 45 resize  40% arrange in front of tube
element 43 resize  35% arrange to the left of and below the cat layer


pick two colors from your tag - I used two shades of green
set them as your foreground and background
set your foreground color to foreground background gradient
make a new raster layer above the white background, flood fill with your gradient
apply your mask, merge group

crop and resize
add your copyright and credits as needed
add your text and save

Monday, September 8, 2014

Bimba


For this tutorial you will need the following:

Paint Shop Pro, I am using PSP X, you should be able to use any version.

Tube of choice, I am using the artwork of Alicia Mujica which you need a license to use. 

Scrap kit of choice. I am using a PTU kit, Sorcerers Spell by Scrappin With Lil Ole Me

Font of choice, I am using Disguise Sans (Italic)

Mask: Gemsmask192 from Gems Taggin Scraps

Plugins: No outside plugins
I do use Eye Candy 4000 Gradient Glow on all my copyrights/credits layers
I do this because some forums will make a .png tag show up with a black background and then your
copyright doesn't show.


Just remember that my choices of papers and elements is just a suggestion, change it up and make it yours! You don't have to follow mine exactly.

Add a drop shadow of your choosing to tubes & elements throughout. I usually use 1, 1, 50, 5 unless otherwise noted.


Let's get started!

Open a new canvas 850 x 850 pixels with a white background

Add the following:
element 92 resize 85% arrange on the right
copy and paste your tube as a new layer, arrange to the left of the house resize 35%
element 32 resize 35% arrange to the left of the tube
element 12 resize 35% arrange on the right side of your tube
element 4 resize 35% arrange on the left side of your tube
element 98 resize 65% arrange arrange above the books, behind the tube on the left
element 53 resize 35% rotate left 35 arrange behind the books & pumpkin on the left
element 37 resize  15% arrange on the books
element 60 resize 35% arrange over the house


add paper 8 above the white background
apply your mask & merge group

crop and resize
add your copyright and credits as needed
add your text and save

Sunday, September 7, 2014

Fiona Fae


For this tutorial you will need the following:

Paint Shop Pro, I am using PSP X, you should be able to use any version.

Tube of choice, I am using the artwork of Ishika Chowdhury (Fiona tube)
which you need a license to use. 

Scrap kit of choice. I am using a PTU kit Tareena Norella by Schnegge Scraps

Font of choice, I am using Dear Joe

Mask: DVB80 by Designs by Vaybs

Plugins: No outside plugins
I do use Eye Candy 4000 Gradient Glow on all my copyrights/credits layers
I do this because some forums will make a .png tag show up with a black background and then your
copyright doesn't show.


Just remember that my choices of papers and elements is just a suggestion, change it up and make it yours! You don't have to follow mine exactly.

Add a drop shadow of your choosing to tubes & elements throughout. I usually use 1, 1, 50, 5 unless otherwise noted.


Let's get started!

Open a new canvas 850 x 850 pixels with a white background
open frame 4 copy and paste as a new layer resize 90%
click inside with your magic wand, selections, modify, expand 2, selections, invert
open paper 7 copy and paste as a new layer
click delete on your keyboard, deselect

copy and paste your tube as a new layer, resize by 65% in front of frame
 
 add the following elements
 element 1 arrange in front of tube
element 34 resize  55% arrange on bottom right
element 31 resize  55% arrange on bottom left
element 30 resize  35% arrange in front of rock on bottom left
element 32 resize  55% arrange on bottom left
element 7 resize  55% arrange on top right, duplicate, mirror
arrange on the left, erase the two biggest butterflies

 copy and paste paper 6 above the white background
apply your mask, merge group

crop and resize
add your copyright and credits as needed
add your text and save

Friday, September 5, 2014

Witchy


For this tutorial you will need the following:

Paint Shop Pro, I am using PSP X, you should be able to use any version.

Tube of choice, I am using the artwork of Arthur Crowe, which you need a license to use. 
This tube was part of a calendar bundle for October 2013. You can buy the tube & calendar here
or the tube, calendar and kit here

Scrap kit of choice. I am using a PTU kit, Born a Witch by Scrappin With Lil Ole Me 

Template 676 by Millie's PSP Madness

Font of choice, I am using Caprica Sans

Mask of your choice

Plugins: No outside plugins used
I do use Eye Candy 4000 Gradient Glow on all my copyrights/credits layers
I do this because some forums will make a .png tag show up with a black background and then your
copyright doesn't show.


Just remember that my choices of papers and elements is just a suggestion, change it up and make it yours! You don't have to follow mine exactly.

Add a drop shadow of your choosing to tubes & elements throughout. I usually use 1, 1, 50, 5 unless otherwise noted.


Let's get started!

Open your template, shift D to duplicate and close the original
Delete the following layers: CR, 5, 4, 9, 8


Change the canvas size to 850 x 750

Fill the layers with papers, to do this make sure the layer you want to fill has been clicked on in your layer palette.
Click inside the shape with your magic wand, selections, modify, invert, open your paper, copy and paste as a new layer,
click delete on your keyboard.
Delete the original template layer

Some layers you may just want to flood fill with a color from your kit. To do this, click on the layer in your layer palette, add another raster layer above it,
click inside the shape with your magic wand, and flood fill it with your color


I used the following to fill each template layer:
layer 1 use paper 1
layer 2 use paper 1
layer 3 use paper 4
layer 6 use paper 5
layer 7 use paper 4

Make the top square layer active, click anywhere around the outside of it
open your tube, mirror it, copy and paste as a new layer
arrange in the square, click delete on your keyboard
Change the blend mode to Luminance (L)
drop the opacity to about 70
Paste the tube again as a new layer, mirror it, arrange on the bottom right side, resize 70%

 Add the following elements:
 element 19 resize 55% mirror & arrange on bottom right, below the tube
element 40 resize  75% arrange behind bear
element 50 resize  25% arrange in front of tube
element 31 resize 55% arrange on bottom left (I erased the handle)
element 22 resize 35% arrange on bottom, to the right of the cauldron
element 103 resize  25% arrange on top the tombstone
element 39 resize 25 % arrange on bottom left
element 143 resize 60 % arrange behind the cauldron
element 105 resize  75% arrange at the top

add paper 28 above the white background
apply your mask, merge group

crop and resize
add your copyright and credits as needed
add your text and save

Tuesday, September 2, 2014

Autumn Fairy Tale


For this tutorial you will need the following:

Paint Shop Pro, I am using PSP X, you should be able to use any version.

Tube of choice, I am using the artwork of Misticheskaya (Samantha tube)
which you need a license to use. 

Scrap kit of choice. I am using a PTU kit, Autumn Fairy Tale by Graphics of Fantasy

Font of choice, I am using Caprica Sans It

Mask: Vix Big Mask 1

Plugins: No outside plugins
I do use Eye Candy 4000 Gradient Glow on all my copyrights/credits layers
I do this because some forums will make a .png tag show up with a black background and then your
copyright doesn't show.


Just remember that my choices of papers and elements is just a suggestion, change it up and make it yours! You don't have to follow mine exactly.

Add a drop shadow of your choosing to tubes & elements throughout. I usually use 1, 1, 50, 5 unless otherwise noted.


Let's get started!

Open a new canvas 850 x 850 pixels with a white background
open frame 4 copy and paste as a new layer resize 90%
click inside with your magic wand, selections, modify, expand 2, selections, invert
open paper 7 copy and paste as a new layer
click delete on your keyboard,
leave selected

Copy and paste your tube as a new layer, resize by 75%
arrange in your frame
erase the bits that hang out of your frame where you don't want them
 deselect

 Add the following elements:
 element 14 resize  45% arrange on bottom left corner
element 66 resize  60% rotate left 15 arrange behind & to the right of element 14
element 22 arrange behind the two elements at the bottom

element 84 resize 50% arrange on top left side of frame
element 104 resize  40% arrange to the left of element 84, behind the tube

element 1 mirror & arrange on left, duplicate, resize 50% arrange a little lower than the original, duplicate & mirror, arrange that one to the left and a little lower

element 28 resize  25% arrange in front of basket
element 88 resize 25% arrange behind sunflowers, duplicate, mirror, arrange behind sunflowers
element 86 resize 25% arrange behind sunflowers at the top, duplicate, arrange near the bottom of the sunflowers, above the sunflower layers


copy and paste paper 5 as a new layer above the white background
rotate left 90
resize 110%
crop the tag down to the size of the paper
apply your mask, merge ground


crop and resize
add your copyright and credits as needed
add your text and save