Pages

Showing posts with label Alehandra Vanhek. Show all posts

Saturday, October 18, 2014

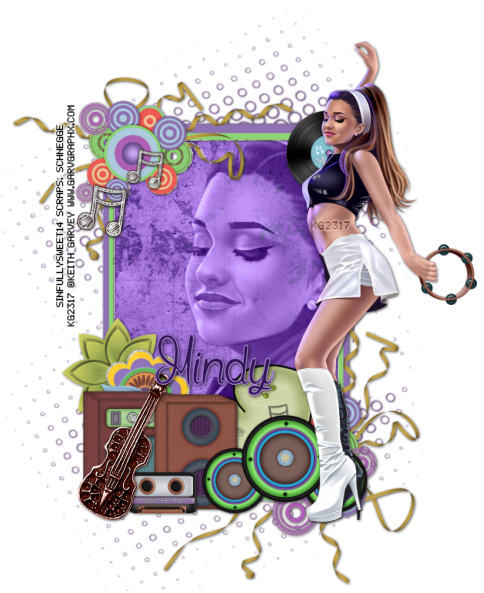
Go Go Music


For this tutorial you will need the following:

Paint Shop Pro, I am using PSP X, you should be able to use any version.

Tube of choice, I am using the artwork of Keith Garvey (Dottie Go Go tube)
which you need a license to use. 

Scrap kit of choice. I am using a PTU scrap kit, Music, by Schnegge

Font of choice, I am using Mandala Home

Plugins: No outside plugins used
I do use Eye Candy 4000 Gradient Glow on all my copyrights/credits layers
I do this because some forums will make a .png tag show up with a black background and then your
copyright doesn't show.


Just remember that my choices of papers and elements is just a suggestion, change it up and make it yours! You don't have to follow mine exactly.

Add a drop shadow of your choosing to tubes & elements throughout. I usually use 1, 1, 50, 5 unless otherwise noted.


Let's get started!

Open a new canvas 850 x 850 pixels with a white background

open frame 3 copy and paste as a new layer rotate left 90, resize 85%
click inside with your magic wand, make sure you get in the little sections of the ribbon that are inside the frame area
selections, modify, expand 2, selections, invert
open paper 7 copy and paste as a new layer
click delete on your keyboard,
leave selected, open your close up tube, copy and paste as a new layer
arrange in the frame, click delete on your keyboard, and deselect
change the blend mode to Luminance(L) and drop the opacity to 70

Open your main tube, copy and paste as a new layer and arrange on the right side
 
 add the following elements:
 element 9 resize 25% arrange on left bottom corner
 element 8 resize 25% arrange to the right of element 9
element 7 resize 30% arrange to the right of element 8

element 6 resize 20% arrange in front of amp and speaker (elements 8 & 9)
element 11 resize 20% arrange on top right
element 3 resize 40% arrange in front of amp and speaker

element 2 resize 17% arrange so it's over her hand, drop the opacity low enough that you can see her
hand through the tambourine and then erase the part that shows over her hand, then bring the opacity back up to 100. It should look like she's holding it.

element 19 resize 45% arrange above the elements on the left
element 29 resize 32% arrange to the right of element 19
element 17 resize 40% arrange on bottom behind the other elements

element 5 resize 40% arrange at the top, duplicate, resize 75% drag up and right
element 15 resize 75% rotate left 30 arrange at top behind the frame & paper, duplicate, drag down

Copy and paste your tube as a new layer, resize by %
arrange in your frame
erase the bits that hang out of your frame where you don't want them


crop and resize
add your copyright and credits as needed
add your text and save

Saturday, November 23, 2013

Christmas Bunny


For this tutorial you will need the following:

Paint Shop Pro, I am using PSP X, you should be able to use any version.

Tube of choice, I am using the artwork of Alehandra Vanheck (Christmas With Rabbit, which is an Exclusive tube at PFD) which you need a license to use.  

Scrap kit of choice. I am using a PTU kit, Christmas Bunny by Amy Marie
she made this kit to match Christmas With Rabbit tube 

Font of choice, I am using Caneletter Script

Mask: WSL84 by Wee Scots Lass Creations, you'll find the link to all the masks
on the right sidebar slightly down the page

Plugins: No outside plugins
I do use Eye Candy 4000 Gradient Glow on all my copyrights/credits layers
I do this because some forums will make a .png tag show up with a black background and then your
copyright doesn't show, and I think it helps set it off against the tag so it's a little more visible. 


Just remember that my choices of papers and elements is just a suggestion, change it up and make it yours! You don't have to follow mine exactly.

Add a drop shadow of your choosing to tubes & elements throughout. I usually use 1, 1, 50, 5 unless otherwise noted.


Let's get started!

Open a new canvas 850 x 850 pixels with a white background

Add the following items, you can check my tag for placement ideas

open 81 copy and paste as a new layer resize 85% rotate 90
click inside with your magic wand, selections, modify, expand 2, selections, invert
open paper 15 copy and paste as a new layer click delete on your keyboard
copy and paste your tube, resize 35% erase the bits of leg that hang over the edge


element 64 resize 60% arrange on bottom in center
element 14 resize 50% arrange on right, dp;licate & mirror
element 56 resize 40%  arrange on bottom left
element 7 resize 40% arrange on bottom right
element 4 resize 40% arrange on left
element 36 resize 40% arrange on left, duplicate& mirror

Open paper 4, copy and paste above the white background
apply your mask

crop and resize
add your copyright and credits as needed
add your text and save

Thursday, November 21, 2013

Sweet Winter


For this tutorial you will need the following:

Paint Shop Pro, I am using PSP X, you should be able to use any version.

Tube of choice, I am using the artwork of  Alehandra Vanheck (Christmas With Rabbit, which is an Exclusive Image at PFD) which you need a license to use.  

Scrap kit of choice. I am using a PTU kit White Winter by Amy Marie  

Font of choice, I am using Scriptina


Plugins: no outside plugins
I do use Eye Candy 4000 Gradient Glow on all my copyrights/credits layers
I do this because some forums will make a .png tag show up with a black background and then your
copyright doesn't show. 


Just remember that my choices of papers and elements is just a suggestion, change it up and make it yours! You don't have to follow mine exactly.

Add a drop shadow of your choosing to tubes & elements throughout. I usually use 1, 1, 50, 5 unless otherwise noted.


Let's get started!

Open a new canvas 1000 x 1000 pixels with a white background

Add the following elements to your tag, you can check my tag for an example
element 2 arrange on right
element 93 arrange on left
copy and paste your tube, resize 25% arrange in the middle
element 25 resize 65% arrange on left, duplicate & mirror
element 26 resize 75% arrange in center duplicate & mirror
element 3 resize 45% arrange on right
element 17 resize 45% arrange below poinsetta duplicate & mirror
element 74 arrange below other branches duplicate & mirror

Copy and paste paper 4 above the white background
apply your mask
I duplicated and merged the mask layer a few times to make it darker

crop and resize
add your copyright and credits as needed
add your text and save

Friday, September 27, 2013

Dia de los Muertos


For this tutorial you will need the following:

Paint Shop Pro, I am using PSP X, you should be able to use any version.

Tube of choice, I am using the artwork of Alehandra Vanhek which you need a license to use,
available at Pics For Design (PFD)

Scrap kit of choice. I am using a PTU kit by Designs by Sarah called Dia de los Muertos 

Font of choice, I am using Sold Out

Plugins: Eye Candy 4000 Gradient Glow for word art (optional)
I do use Eye Candy 4000 Gradient Glow on all my copyrights/credits layers
I do this because some forums will make a .png tag show up with a black background and then your
copyright doesn't show. 


Just remember that my choices of papers and elements is just a suggestion, change it up and make it yours! You don't have to follow mine exactly.

Add a drop shadow of your choosing to tubes & elements throughout. I usually use 1, 1, 50, 5 unless otherwise noted.


Let's get started!

Open a new canvas 850 x 850 pixels with a white background
open frame 1 copy and paste as a new layer 
click inside with your magic wand, selections, modify, expand 5, selections, invert
open paper 2 copy and paste as a new layer 
click delete on your keyboard, leave selected, 
Open your tube, copy and paste as a new layer, resize 45%
take your eraser tool and erase the bits that hang out of the frame where you don't want them.

Now for the elements:
sugar skull 1  resize 45% arrange on bottom in the middle
sugar skull 3 resize 30% arrange on right, a little way up the side of the frame
sugar skull 4 resize 30% mirror arrange on left side of frame partway up
flower 3 resize 45% arrange on one side of the bottom skull, duplicate, mirror
fjower 1  resize 30% arrange above the other flower, duplicate, mirror
leaves resize 30% arrange behind flowers on right, duplicate, mirror
word art 1 resize 60%  arrange above the middle skull add gradient glow
print 3 arrange behind frame & paper
print 2 resize 105% arrange bdhind print 3

crop and resize
add your copyright and credits as needed
add your text and save

Sunday, September 22, 2013

Samaelia


For this tutorial you will need the following:

Paint Shop Pro, I am using PSP X, you should be able to use any version.

Tube of choice, I am using the artwork of Alehandra Vanhek, which you need a license to use, available at Pics For Design (PFD).  

Scrap kit of choice. I am using a PTU kit by Amy Marie called Samaelia 

Font of choice, I am using Pentagram

Plugins: No outside plugins used
I do use Eye Candy 4000 Gradient Glow on all my copyrights/credits layers
I do this because some forums will make a .png tag show up with a black background and then your
copyright doesn't show. 


Just remember that my choices of papers and elements is just a suggestion, change it up and make it yours! You don't have to follow mine exactly.

Add a drop shadow of your choosing to tubes & elements throughout. I usually use 1, 1, 50, 5 unless otherwise noted.


Let's get started!

Tag:
Open a new canvas 850 x 850 pixels with a white background

open element 34 copy and paste as a new layer
click inside with your magic wand, selections, modify, expand 2, selections, invert
open paper 16 copy and paste as a new layer, click delete on your keyboard
Open your tube, copy and paste as a new layer, resize 55%
take your eraser tool and erase the bits that hang over the bottom of the frame.

element 33 arrange at bottom of frame
element 38 resize 55% arrange behind grass & skulls on the right side, duplicate & mirror
element 62 arrange across bottom below all the layers, but so that it's peeking out across the bottom
element 74 resize 65% arrange on left below the skull layers & showing just above it
element 75 resize 80% arrange on right
element 70 resize 55% arrange on the bottom, in the middle of the skulls
element 29 arrange behind frame & paper on the top left, duplicate & mirror
element 8 resize 40%  arrange on bottom left

Banner:
Open a  new canvas 600 x 250 pixels with a white background
Copy & paste paper 17 as a new layer
arrange it so the moon shows on the top left, duplicate & mirror
drage the duplicate layer to the bottom and drag it over to the right until the edges match
Hide the white background layer on your main tag and the grim reaper, copy merged & paste into your banner
arrange it in the banner how you like
Open the reaper element, copy and paste into the banner, arrange on the left, duplicate & mirror
Make the white background layer active
Selections, select all, select selection borders, set it at 3
Add a new raster layer at the top, fill with #589bb6
Add your copyright info & credits as needed
Add your text and save

Go back to your main tag
crop and resize
add your copyright and credits as needed
add your text and save

Avatar:
Open a new canvas 200 x 200 pixels or whatever size avatar your forum allows
Copy and paste the black clouds, arrange on the right, duplicate & mirror
Copy and paste the tube, arrange in the center
Make the white background layer active
Selections, select all, select selection borders, set it at 3
Add a new raster layer at the top, fill with #589bb6
Add your copyright info & credits as needed
Add your text and save