
Thursday, December 3, 2009
Another CT
As of today I am on another CT (creative team) besides Juicy Bits which I joined a few weeks ago. Today I got word that I was accepted to join the AMI CT. I will be posting more tutorials featuring their great artists and scrap kit makers work. Although, come to think of it, mostly I use Rac's work anyway, lol. You can find the AMI site HERE, and the CT site which has lots of great tutorial links HERE.

Tuesday, December 1, 2009
Purple Elegance
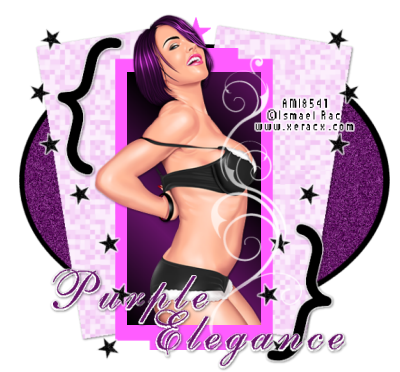 For this tut you will need:
Paint Shop Pro: I used PSP X you should be able to use any version.
Tube of choice. I am using the wonderful artwork, once again, of Ismael Rac which you have to purchase at AMI
Template 19 by Cinda at Elegantly Wasted. Please leave a comment for her!
Family Counts pattern at COLOURlovers. If you don't want to use the pattern, you can always choose another or use Xero Fritillary filter to get the same effect as the pattern I chose.
Font of choice. I used ALS script.
No scrap kits used, but you can always use one if you'd like. I just thought this template was pretty as it was and didn't need any scrap elements added.
Filter Eye Candy 3.1 glow or another Eye Candy glow filter like gradient glow.
Of course, my tutorial is just a starting point, feel free to add to it as you'd like or change it up any way you'd like. I'd love to see your results. Please feel free to send them in.
Let's begin.
Delete the copyright layer and the two text layers.
Click on layer 12. Selections, select all, float, defloat, and add a new raster layer. Flood fill with black or another dark color from your tube. Deselect and delete the original layer. Add a drop shadow of your choice.
Click on layer 11, and do the same, chosing a medium color from your tube. Do not add the drop shadow. Click on adjust, add/remove noise and add noise with the following settings: gaussian, 50% and uniform checked.
On layer 8, select with your magic wand. Add a new raster layer, flood fill with a light color from your tube. Deselect, and delete the original layer. Add a drop shadow.
Do the same with layer 6, which is the star at the top.
Open up your pattern and colorize it to match your tube. Select layer 10 and add a new raster layer, flood fill with your pattern by clicking on your foreground and then clicking on pattern and browsing to the pattern and clicking on it. Add a drop shadow. Repeat for layer 9.
If you want, instead of using the pattern, you can fill those two layers with a color of choice and then apply Xero Fritillary to those layers. That is basically what the pattern I chose was. That way you can play with the settings and get it how you want. But that is up to you. If you don't want to use the plugin or don't have it, you can use the pattern.
Click on layer 7 selections, select all, float, defloat, add a new raster layer. With your foreground set to a light color from your tube and your background set to a darker color from your tube, click on your foreground and chose gradient. Browse down until you find the foreground/background gradient. Make sure the first Style is clicked on in the Styles section, change the angle to 45 and repeats to 2. Flood fill that layer, leave selected, and invert your selection.
I like to add my drop shadow first so that when I erase the bits that hang over where I don't want them, I don't add the drop shadow and have to go back and erase where the shadow hangs over. So add the drop shadow to your tube, then copy and paste it as a new layer. Then take your eraser and erase where it hangs over the bottom. Deselect and delete the original layer 7.
Click on layer 4 selections, select all, float, defloat, add new raster layer and flood fill black or another dark color from your tube. Deselect and delete the original layer. Using Eye Candy, add a glow with a width of about 3 to your stars.
Do the same for layer 5.
Click on layer 1 and selections, select all, float, defloat, add a new raster layer and fill with black or another dark color from your tube that you used for your stars. Deselect and add the same glow you used for your stars.
Do the same for layer 2. Delete the original layers 1 and 2.
Bring the opacity for layer 3 back up to 100%
Add your copyright info and license info.
Add your name. I added it and then selections float, selections defloat, expand by 3 and then added a new layer below it and filled it with white, deselected and then added a drop shadow, because when I used the glow I didn't like the ragged edges it left when I added the drop shadow.
Save your tag and you're done!
For this tut you will need:
Paint Shop Pro: I used PSP X you should be able to use any version.
Tube of choice. I am using the wonderful artwork, once again, of Ismael Rac which you have to purchase at AMI
Template 19 by Cinda at Elegantly Wasted. Please leave a comment for her!
Family Counts pattern at COLOURlovers. If you don't want to use the pattern, you can always choose another or use Xero Fritillary filter to get the same effect as the pattern I chose.
Font of choice. I used ALS script.
No scrap kits used, but you can always use one if you'd like. I just thought this template was pretty as it was and didn't need any scrap elements added.
Filter Eye Candy 3.1 glow or another Eye Candy glow filter like gradient glow.
Of course, my tutorial is just a starting point, feel free to add to it as you'd like or change it up any way you'd like. I'd love to see your results. Please feel free to send them in.
Let's begin.
Delete the copyright layer and the two text layers.
Click on layer 12. Selections, select all, float, defloat, and add a new raster layer. Flood fill with black or another dark color from your tube. Deselect and delete the original layer. Add a drop shadow of your choice.
Click on layer 11, and do the same, chosing a medium color from your tube. Do not add the drop shadow. Click on adjust, add/remove noise and add noise with the following settings: gaussian, 50% and uniform checked.
On layer 8, select with your magic wand. Add a new raster layer, flood fill with a light color from your tube. Deselect, and delete the original layer. Add a drop shadow.
Do the same with layer 6, which is the star at the top.
Open up your pattern and colorize it to match your tube. Select layer 10 and add a new raster layer, flood fill with your pattern by clicking on your foreground and then clicking on pattern and browsing to the pattern and clicking on it. Add a drop shadow. Repeat for layer 9.
If you want, instead of using the pattern, you can fill those two layers with a color of choice and then apply Xero Fritillary to those layers. That is basically what the pattern I chose was. That way you can play with the settings and get it how you want. But that is up to you. If you don't want to use the plugin or don't have it, you can use the pattern.
Click on layer 7 selections, select all, float, defloat, add a new raster layer. With your foreground set to a light color from your tube and your background set to a darker color from your tube, click on your foreground and chose gradient. Browse down until you find the foreground/background gradient. Make sure the first Style is clicked on in the Styles section, change the angle to 45 and repeats to 2. Flood fill that layer, leave selected, and invert your selection.
I like to add my drop shadow first so that when I erase the bits that hang over where I don't want them, I don't add the drop shadow and have to go back and erase where the shadow hangs over. So add the drop shadow to your tube, then copy and paste it as a new layer. Then take your eraser and erase where it hangs over the bottom. Deselect and delete the original layer 7.
Click on layer 4 selections, select all, float, defloat, add new raster layer and flood fill black or another dark color from your tube. Deselect and delete the original layer. Using Eye Candy, add a glow with a width of about 3 to your stars.
Do the same for layer 5.
Click on layer 1 and selections, select all, float, defloat, add a new raster layer and fill with black or another dark color from your tube that you used for your stars. Deselect and add the same glow you used for your stars.
Do the same for layer 2. Delete the original layers 1 and 2.
Bring the opacity for layer 3 back up to 100%
Add your copyright info and license info.
Add your name. I added it and then selections float, selections defloat, expand by 3 and then added a new layer below it and filled it with white, deselected and then added a drop shadow, because when I used the glow I didn't like the ragged edges it left when I added the drop shadow.
Save your tag and you're done!
A new award
Aiya over at Juicy Bits gave me this award. As part of the terms, I have to tell a bit about myself and I have to pass it on to 10 people. I don't really know 10 bloggers to pass it on to, so I'll pass it on to a few that I do know.
 1. My favorite season is summer.
2. My favorite holiday is Thanksgiving. You get a big feast and no one expects presents!
3. My favorite colors are (in order) Green, Blue, Pink
4. Color I hate: Orange
5. I've always wanted to get to wear a wedding dress. The problem is, I don't EVER want to get married.
6. Chicago is my favorite place I've lived, except I hate the cold.
7. My favorite artists are (not necessarily in order) Ismael Rac, Keith Garvey, Elias Chatzoudis, Rion Vernon, Barbara Jenson, Suzanne Woolcott. There are many more I love, but those are my all time favorites.
8. My worst fear is fire.
9. I have panic attacks swimming.
I'm passing this award on to:
Jess, Stu, Leigh, Tracy & Stef,
1. My favorite season is summer.
2. My favorite holiday is Thanksgiving. You get a big feast and no one expects presents!
3. My favorite colors are (in order) Green, Blue, Pink
4. Color I hate: Orange
5. I've always wanted to get to wear a wedding dress. The problem is, I don't EVER want to get married.
6. Chicago is my favorite place I've lived, except I hate the cold.
7. My favorite artists are (not necessarily in order) Ismael Rac, Keith Garvey, Elias Chatzoudis, Rion Vernon, Barbara Jenson, Suzanne Woolcott. There are many more I love, but those are my all time favorites.
8. My worst fear is fire.
9. I have panic attacks swimming.
I'm passing this award on to:
Jess, Stu, Leigh, Tracy & Stef,
Subscribe to:
Posts (Atom)