Pages

Tuesday, September 13, 2011

Announcement & New PTU kit!

I am very happy to announce that I am now making scrap kits and will be selling them at Designer Scraps! A big thank you to Farrah for the tips and for accepting me at her store! Here is a preview of my first kit, Sweet Like Cherry Pie, which you can get at the store. Click on the preview to see it a bit larger.
I am at Tagging Angels so you can also check out my products and shop there. Thank you so much to Kissy for accepting me into the store!
If you use my kits for a tut, please send me a link to my email listed on the left so I can link you up!

Monday, September 12, 2011

I'm No Angel

For this tutorial you will need the following:
Paint Shop Pro, I am using PSP X, you should be able to use any version.
Tube of choice, I am using the artwork of Barbara Jensen, which you need a license to use. You can get it at her site here. This tube, however, is exclusive to Scraps and the City and you can get it here.
Template10 by Mindy Mae, which you can get here. Just look on the right sidebar for download links.
Font of choice, I am using Brushtip Travis, Dagobert
Plugins: no outside plugins, we'll just use ones that are standard with PSP.
Just remember that my choices of papers and elements is just a suggestion, change it up and make it yours! You don't have to follow mine exactly.
Let's get started!
Open the template, change the canvas size to 650 x 650 to give a little space to work.
Delete the following layers: raster 1, stars, hearts, and little circles.
Click inside the circle with your magic wand, make your foreground a gradient, choose the grey accent gradient from your drop down box, angle 45, repeats 1.
Add a new raster layer and flood fill with your gradient. Deselect.
Effects, texture effects, weave with the following settings, 2, 8, 30 weave and gap both white, fill gaps checked.
Click inside the white border on the circle layer we just used, add a new raster layer below the gradient, flood fill with white and deselect. Delete the original circle layer.
On the white border layer, add noise uniform, 80, monochrome checked. Add a drop shadow.
Add a drop shadow to the stitches and the angel circle layer.
Open your tube, copy and paste as a new layer, resize if needed, add a drop shadow.
Now, make your gradient circle layer active, selections, select all, float, defloat. Now make your tube layer active, take your eraser tool and erase the bits that hang over the bottom too far, then deselect.
Bring the big angel word art layer to the top, click inside it with your magic wand. Add a new raster layer, flood fill with white.
Add noise, uniform 80, monochrome unchecked.
Selections, modify, expand by 3, add a new raster layer under the angel word art, flood fill with black. Deselect, merge the white layer and black layer together, delete the original word art layer.
Free rotate to the left by about 15 add a drop shadow.
Use your text tool to add the words "I'm no" I did mine in black, then selections, modify, expand by 2, added a new raster layer, flood filled with white, deselect, and merged the two together, rotate the same as we did the angel layer and add a drop shadow.
Move both of these layers up to the top left of your tag.
Recolor the lines by making that layer active, and using adjust hue and saturation to get it to the color that matches your tube. I did mine by changing hue to 67 and saturation to 154.
Add your copyright and name and you're done!

Thursday, September 8, 2011

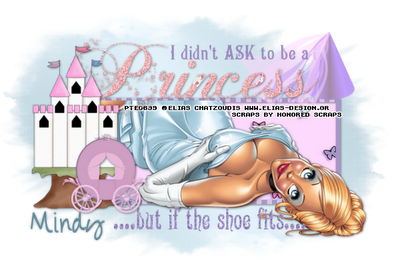
I Didn't Ask to be a Princess

For this tutorial you will need the following:
Paint Shop Pro, I am using PSP X, you should be able to use any version.
Tube of choice, I am using the artwork of Elias Chatzoudis which you need a license to use. You can get it at Psp Tubes Emporium.
Scrap kit of choice. I am using Princess Tales, which is a PTU kit by Honored Scraps which you can purchase here.
MisfitExclusiveTemplate 2 by Melissa @ the Creative Misfits. It's the 9th set down from the top.
Font of choice, I am using Over the Rainbow
Mask: WSLMask302 by Weescotslass
Plugins: no outside plugins required
Just remember that my choices of papers and elements is just a suggestion, change it up and make it yours! You don't have to follow mine exactly.
Let's get started!
Open a new canvas 650 x 650 white.
Open your template, resize the canvas to 700 x 600 to give us some extra working room and flood fill raster 1 with white. Delete the credits layer (raster 8) and raster 2.
Make the raster 4 layer active, open your paper, copy and paste as a new layer, selections, invert and click delete on your keyboard. Leave selected.
Open your tube, copy and paste as a new layer, arrange how you want it in the frame, and erase the parts that hang over where you don't want it. Deselect and add a drop shadow to your tube.
Delete the original raster 4 layer.
Make raster 3 layer active, click on it with your magic wand. Open your paper, copy and paste as a new layer. Selections, invert, click delete on your keyboard. Deselect, add a drop shadow and delete the original layer.
Use the steps above to add papers to your word art layers. On the word art layers, after you add your paper, add noise uniform, noise 40%, monochrome checked.
Add any elements you'd like to the tag.
Either copy and paste a paper into your tag just above the background layer OR flood fill with a color or gradient made from the kit or your tube. Open the mask, layer, new mask layer, from image, find your mask in the drop down box. Click ok, delete the mask, merge group.
Add your copyrights, credits and name.

Monday, September 5, 2011

Let's Get Lost

For this tutorial you will need the following:
Paint Shop Pro, I am using PSP X, you should be able to use any version.
Tube of choice, I am using the artwork of Barbara Jensen, which you need a license to use. You can get it at her site.
Word Art from Blissfully Beth
Font of choice, I am using Wolfgang Amadeus Mozart
Plugins: Mura Meister Copies, Xenofex 1.1 Shower Door
Just remember that my choices of papers and elements is just a suggestion, change it up and make it yours! You don't have to follow mine exactly.
Let's get started!
Tag
Open a new canvas 600 x 250 with a white background.
Open your tube, copy and paste as a new layer.
Apply Mura Meisters copies with the following settings:
Wallpaper Rotate
Random
Wraparound
Settings on right side top to bottom: 20, 50, 50, o, 100, 0, 100, o, 100, 0, 0, 30, o
Adjust blur, motion blur radius 45 strength 100, apply it twice then change radius to 294 and apply that once.
Apply Xenofex Shower Door with the default settings.
Copy and paste your tube, arrange it to the right side, change the blend mode to Luminance(L) and drop the opacity to around 40.
Draw out a white rectangle across the bottom of your tag, lower opacity to about 50.
Copy and paste your tube again, arrange it slightly to the left of the bottom tube, add a drop shadow.
Copy and paste the word art, arrange near the top left, change the color to suit your tube, add a drop shadow.
Make the background layer active, selections, select all, selections, select selection borders, settings are inside, antialias checked, width 3.
Add a new layer at the top, flood fill with a color to complement your tube, add a drop shadow.
Delete the white background.
Add your copyright info & your name & save.
Avatar
Open a new canvas 150 x 150 white background.
Copy and paste the background from the tag that you made out of your tube.
Copy and paste your tube and arrange it how you want it.
Make the white background layer active, use your crop tool and click on the icon at the top "snap crop rectangle to" and click on the center one "layer opaque" then click on your avatar to crop.
Still on the white background layer, go to selections, select all, modify, select selection borders, change the width to 2, add a new raster layer at the top, flood fill with the same color you used on the tag.
Add a drop shadow.
Add your copyright info, and your name/initials and save.