 For this tut you will need:
Any version of Paint Shop Pro. I am using PSP X.
Scrap kit Good Morning at Addicted 2 Scraps.
3 tubes of your choice. I am using the artwork of Caron Vincent which you must have a license to use. You can get yours at CILM.
Mask of choice. I am using a mask from Weescotslass #81 (Wsl_81) which you can find on her site HERE.
Font of choice. I am using Carlotta
Plugins: Eye Candy 3.1 glow (or another version of gradient glow)
Let's begin.
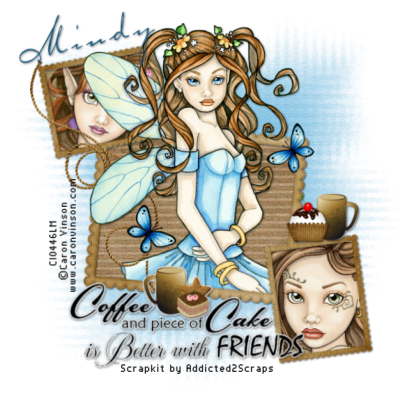
Open a new canvas size 700 x 700 flood fill with white.
Open element el28, copy and paste as a new layer in your canvas.
Open paper pp6. Click inside the large middle square of your frame with your magic wand. Selections, modify, expand by 5, selections, invert. Copy and paste your paper as a new raster layer, on that layer, click delete on your keyboard. Leave selected, drag that layer below your frame layer.
Open one of your tubes, copy and paste as a new layer, resize if needed. Duplicate your tube, bring one above the frame layer and hide it. Make sure the other is below the frame layer. Take your eraser tool and erase the bits that hang below the bottom of the frame. Once you do that, deselect and add a drop shadow.
Unhide the top tube layer. Erase the bits that you don't want hanging below the frame. You don't have to be very careful how you erase because you have the lower one showing.
Now back on your frame layer, take your magic wand, and hold down your shift key, click inside each of the smaller frames. Selections, modify, expand 5, selections, invert.
Open paper pp18, copy and paste as a new layer, resize by 70%, click delete on your keyboard, leave selected, and drag that paper layer below your frame.
Open a tube, arrange so that the part you want showing is showing in the top frame. You may need to resize your tube. Now on that tube layer, click delete on your keyboard. Do the same for the lower frame, then deselect.
Add a new raster layer just above your white background layer. Flood fill with a color from your tube. I used #70b9df. Open your mask. Go to Layers, New Mask Layer, From Image, in the drop down box, look for your mask and then click ok. Delete the mask layer, merge the group. Resize if you'd like. I resized by 85%.
Open ele41, resize by 70%, copy and paste as a new layer. Using Eye Candy 3.1 glow, set to white, 3 width and fat, apply the glow, add a drop shadow.
Open a cupcake or doughnut element, resize (I resized by 15%), copy and paste above the bottom frame, add a drop shadow.
Do the same with one of the mug or cup elements.
Open ele38 resize by 70%, mirror, copy and paste as a new layer, position to the left side of your tag.
Add your © info, scrapkit credits and your name, crop and resize as necessary, and you're done.
Save your file as a transparent file by deleting the white background layer and saving as a .png file.
For this tut you will need:
Any version of Paint Shop Pro. I am using PSP X.
Scrap kit Good Morning at Addicted 2 Scraps.
3 tubes of your choice. I am using the artwork of Caron Vincent which you must have a license to use. You can get yours at CILM.
Mask of choice. I am using a mask from Weescotslass #81 (Wsl_81) which you can find on her site HERE.
Font of choice. I am using Carlotta
Plugins: Eye Candy 3.1 glow (or another version of gradient glow)
Let's begin.
Open a new canvas size 700 x 700 flood fill with white.
Open element el28, copy and paste as a new layer in your canvas.
Open paper pp6. Click inside the large middle square of your frame with your magic wand. Selections, modify, expand by 5, selections, invert. Copy and paste your paper as a new raster layer, on that layer, click delete on your keyboard. Leave selected, drag that layer below your frame layer.
Open one of your tubes, copy and paste as a new layer, resize if needed. Duplicate your tube, bring one above the frame layer and hide it. Make sure the other is below the frame layer. Take your eraser tool and erase the bits that hang below the bottom of the frame. Once you do that, deselect and add a drop shadow.
Unhide the top tube layer. Erase the bits that you don't want hanging below the frame. You don't have to be very careful how you erase because you have the lower one showing.
Now back on your frame layer, take your magic wand, and hold down your shift key, click inside each of the smaller frames. Selections, modify, expand 5, selections, invert.
Open paper pp18, copy and paste as a new layer, resize by 70%, click delete on your keyboard, leave selected, and drag that paper layer below your frame.
Open a tube, arrange so that the part you want showing is showing in the top frame. You may need to resize your tube. Now on that tube layer, click delete on your keyboard. Do the same for the lower frame, then deselect.
Add a new raster layer just above your white background layer. Flood fill with a color from your tube. I used #70b9df. Open your mask. Go to Layers, New Mask Layer, From Image, in the drop down box, look for your mask and then click ok. Delete the mask layer, merge the group. Resize if you'd like. I resized by 85%.
Open ele41, resize by 70%, copy and paste as a new layer. Using Eye Candy 3.1 glow, set to white, 3 width and fat, apply the glow, add a drop shadow.
Open a cupcake or doughnut element, resize (I resized by 15%), copy and paste above the bottom frame, add a drop shadow.
Do the same with one of the mug or cup elements.
Open ele38 resize by 70%, mirror, copy and paste as a new layer, position to the left side of your tag.
Add your © info, scrapkit credits and your name, crop and resize as necessary, and you're done.
Save your file as a transparent file by deleting the white background layer and saving as a .png file.

Friday, January 8, 2010
Coffee & Cake
For this tut you will need:
Any version of Paint Shop Pro. I am using PSP X.
Scrap kit Good Morning at Addicted 2 Scraps.
3 tubes of your choice. I am using the artwork of Caron Vincent which you must have a license to use. You can get yours at CILM.
Mask of choice. I am using a mask from Weescotslass #81 (Wsl_81) which you can find on her site HERE.
Font of choice. I am using Carlotta
Plugins: Eye Candy 3.1 glow (or another version of gradient glow)
Let's begin.
Open a new canvas size 700 x 700 flood fill with white.
Open element el28, copy and paste as a new layer in your canvas.
Open paper pp6. Click inside the large middle square of your frame with your magic wand. Selections, modify, expand by 5, selections, invert. Copy and paste your paper as a new raster layer, on that layer, click delete on your keyboard. Leave selected, drag that layer below your frame layer.
Open one of your tubes, copy and paste as a new layer, resize if needed. Duplicate your tube, bring one above the frame layer and hide it. Make sure the other is below the frame layer. Take your eraser tool and erase the bits that hang below the bottom of the frame. Once you do that, deselect and add a drop shadow.
Unhide the top tube layer. Erase the bits that you don't want hanging below the frame. You don't have to be very careful how you erase because you have the lower one showing.
Now back on your frame layer, take your magic wand, and hold down your shift key, click inside each of the smaller frames. Selections, modify, expand 5, selections, invert.
Open paper pp18, copy and paste as a new layer, resize by 70%, click delete on your keyboard, leave selected, and drag that paper layer below your frame.
Open a tube, arrange so that the part you want showing is showing in the top frame. You may need to resize your tube. Now on that tube layer, click delete on your keyboard. Do the same for the lower frame, then deselect.
Add a new raster layer just above your white background layer. Flood fill with a color from your tube. I used #70b9df. Open your mask. Go to Layers, New Mask Layer, From Image, in the drop down box, look for your mask and then click ok. Delete the mask layer, merge the group. Resize if you'd like. I resized by 85%.
Open ele41, resize by 70%, copy and paste as a new layer. Using Eye Candy 3.1 glow, set to white, 3 width and fat, apply the glow, add a drop shadow.
Open a cupcake or doughnut element, resize (I resized by 15%), copy and paste above the bottom frame, add a drop shadow.
Do the same with one of the mug or cup elements.
Open ele38 resize by 70%, mirror, copy and paste as a new layer, position to the left side of your tag.
Add your © info, scrapkit credits and your name, crop and resize as necessary, and you're done.
Save your file as a transparent file by deleting the white background layer and saving as a .png file.
Subscribe to:
Post Comments (Atom)
No comments:
Post a Comment