 For this tutorial you will need the following:
A tube of your choice. I am using the artwork of Ismael Rac which you have to purchase to use. You can find his work at AMI.
Scrap kit elements of your choice.
Font of choice. I used Lainie Day SH
Plugins: Penta.com Color Dot, Xero Radiance, Eye Candy 3.1 glow
Open a new canvas 700 x 700 flood fill white.
Pick a dark color from your tube, and set it as the background. Use your preset shapes set to rectangle and draw out a good sized rectangle across your canvas and then convert to raster layer.
Selections, select all, float, defloat, selections, modify, expand by 5. Add a new raster layer and flood fill with a contrasting color from your tube. Deselect and drag it below your rectangle layer. Adjust, add/remove noise, add noise with the following settings: Gaussian, 50%, monochrome checked. merge the two layers together, and duplicate. Rotate the top one to the left by about 12 and add a drop shadow of your choice, then rotate the bottom one to the right by the same amount and add a drop shadow. Merge these two togther.
Change the background to the color that you just used for the border of the lower rectangle. Draw out another rectangle over the top of the one you have, about the same size and then convert to a raster layer.
Take your selection tool set on rectangle and draw out a rectangle in the middle of that rectangle about a third of the way up and down and all the way across (see mine for reference). Add a new raster layer, flood fill with the same color as you used for your rectangle (in my case it's the bluish color) then apply Penta.com color dot with the default settings. Deselect and then change the opacity to about 45%, then merge it down into the larger rectangle.
Selections, select all, float, defloat, invert, open your tube and copy and paste as a new layer, arrange it to the right of your rectangle and click delete on your keyboard. Leave selected, change the blend mode to Luminance(L). Lower the opacity to about 40%
Mirror your tube and copy and paste it again, resize it smaller (I did mine by 55%), click delete on your keyboard. Deselect and duplicate your tube. On the top layer apply gaussian blur at 3 change the blend mode to soft light. On the original tube layer that is at the bottom, apply Xero Radiance.
Make the top rectangle layer active again, selections, select all, float, defloat, modify, expand by 5. Add a new raster layer and fill with the color you used for the top rectangle, except make it a few shades darker. Drag this layer below your rectangle, add/remove noise with the same settings as above, merge the two rectangle layers together.
Now take your bottom rectangles that you have merged (the ones that you rotated and merged on the first step) and duplicate it. On the bottom layer, adjust, blur, gaussian blur by 15.
Add whatever elements you'd like to your tag.
Set your foreground and background each to a color from your rectangles, set the stroke at 1 and write out your name with your text tool, grab the little line in the center for rotating your text and pull it so that it rotates somewhat to the left (or you can use the rotate feature and rotate however many degrees you want). Convert to raster layer and add Eye Candy 3.1 glow, fat, width 2 color white, and then add your drop shadow.
Add your copyright info/credits.
Crop down any extra space you have around your tag and resize if necessary. If you'd like it to be transparent, delete the white background layer and save as a .png file.
For this tutorial you will need the following:
A tube of your choice. I am using the artwork of Ismael Rac which you have to purchase to use. You can find his work at AMI.
Scrap kit elements of your choice.
Font of choice. I used Lainie Day SH
Plugins: Penta.com Color Dot, Xero Radiance, Eye Candy 3.1 glow
Open a new canvas 700 x 700 flood fill white.
Pick a dark color from your tube, and set it as the background. Use your preset shapes set to rectangle and draw out a good sized rectangle across your canvas and then convert to raster layer.
Selections, select all, float, defloat, selections, modify, expand by 5. Add a new raster layer and flood fill with a contrasting color from your tube. Deselect and drag it below your rectangle layer. Adjust, add/remove noise, add noise with the following settings: Gaussian, 50%, monochrome checked. merge the two layers together, and duplicate. Rotate the top one to the left by about 12 and add a drop shadow of your choice, then rotate the bottom one to the right by the same amount and add a drop shadow. Merge these two togther.
Change the background to the color that you just used for the border of the lower rectangle. Draw out another rectangle over the top of the one you have, about the same size and then convert to a raster layer.
Take your selection tool set on rectangle and draw out a rectangle in the middle of that rectangle about a third of the way up and down and all the way across (see mine for reference). Add a new raster layer, flood fill with the same color as you used for your rectangle (in my case it's the bluish color) then apply Penta.com color dot with the default settings. Deselect and then change the opacity to about 45%, then merge it down into the larger rectangle.
Selections, select all, float, defloat, invert, open your tube and copy and paste as a new layer, arrange it to the right of your rectangle and click delete on your keyboard. Leave selected, change the blend mode to Luminance(L). Lower the opacity to about 40%
Mirror your tube and copy and paste it again, resize it smaller (I did mine by 55%), click delete on your keyboard. Deselect and duplicate your tube. On the top layer apply gaussian blur at 3 change the blend mode to soft light. On the original tube layer that is at the bottom, apply Xero Radiance.
Make the top rectangle layer active again, selections, select all, float, defloat, modify, expand by 5. Add a new raster layer and fill with the color you used for the top rectangle, except make it a few shades darker. Drag this layer below your rectangle, add/remove noise with the same settings as above, merge the two rectangle layers together.
Now take your bottom rectangles that you have merged (the ones that you rotated and merged on the first step) and duplicate it. On the bottom layer, adjust, blur, gaussian blur by 15.
Add whatever elements you'd like to your tag.
Set your foreground and background each to a color from your rectangles, set the stroke at 1 and write out your name with your text tool, grab the little line in the center for rotating your text and pull it so that it rotates somewhat to the left (or you can use the rotate feature and rotate however many degrees you want). Convert to raster layer and add Eye Candy 3.1 glow, fat, width 2 color white, and then add your drop shadow.
Add your copyright info/credits.
Crop down any extra space you have around your tag and resize if necessary. If you'd like it to be transparent, delete the white background layer and save as a .png file.

Thursday, January 28, 2010
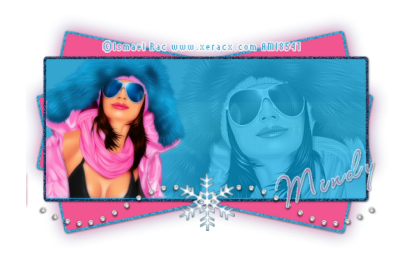
Winter Hottie
For this tutorial you will need the following:
A tube of your choice. I am using the artwork of Ismael Rac which you have to purchase to use. You can find his work at AMI.
Scrap kit elements of your choice.
Font of choice. I used Lainie Day SH
Plugins: Penta.com Color Dot, Xero Radiance, Eye Candy 3.1 glow
Open a new canvas 700 x 700 flood fill white.
Pick a dark color from your tube, and set it as the background. Use your preset shapes set to rectangle and draw out a good sized rectangle across your canvas and then convert to raster layer.
Selections, select all, float, defloat, selections, modify, expand by 5. Add a new raster layer and flood fill with a contrasting color from your tube. Deselect and drag it below your rectangle layer. Adjust, add/remove noise, add noise with the following settings: Gaussian, 50%, monochrome checked. merge the two layers together, and duplicate. Rotate the top one to the left by about 12 and add a drop shadow of your choice, then rotate the bottom one to the right by the same amount and add a drop shadow. Merge these two togther.
Change the background to the color that you just used for the border of the lower rectangle. Draw out another rectangle over the top of the one you have, about the same size and then convert to a raster layer.
Take your selection tool set on rectangle and draw out a rectangle in the middle of that rectangle about a third of the way up and down and all the way across (see mine for reference). Add a new raster layer, flood fill with the same color as you used for your rectangle (in my case it's the bluish color) then apply Penta.com color dot with the default settings. Deselect and then change the opacity to about 45%, then merge it down into the larger rectangle.
Selections, select all, float, defloat, invert, open your tube and copy and paste as a new layer, arrange it to the right of your rectangle and click delete on your keyboard. Leave selected, change the blend mode to Luminance(L). Lower the opacity to about 40%
Mirror your tube and copy and paste it again, resize it smaller (I did mine by 55%), click delete on your keyboard. Deselect and duplicate your tube. On the top layer apply gaussian blur at 3 change the blend mode to soft light. On the original tube layer that is at the bottom, apply Xero Radiance.
Make the top rectangle layer active again, selections, select all, float, defloat, modify, expand by 5. Add a new raster layer and fill with the color you used for the top rectangle, except make it a few shades darker. Drag this layer below your rectangle, add/remove noise with the same settings as above, merge the two rectangle layers together.
Now take your bottom rectangles that you have merged (the ones that you rotated and merged on the first step) and duplicate it. On the bottom layer, adjust, blur, gaussian blur by 15.
Add whatever elements you'd like to your tag.
Set your foreground and background each to a color from your rectangles, set the stroke at 1 and write out your name with your text tool, grab the little line in the center for rotating your text and pull it so that it rotates somewhat to the left (or you can use the rotate feature and rotate however many degrees you want). Convert to raster layer and add Eye Candy 3.1 glow, fat, width 2 color white, and then add your drop shadow.
Add your copyright info/credits.
Crop down any extra space you have around your tag and resize if necessary. If you'd like it to be transparent, delete the white background layer and save as a .png file.
Subscribe to:
Post Comments (Atom)
No comments:
Post a Comment