
For this tutorial you will need the following:
Paint Shop Pro. I am using PSP X but any version should work fine.
Jasc Animation Shop 3.
Tube(s) of choice. I am using the artwork of Ismael Rac which you must have a license to use. I got this tube when he was with AMI, but you can also get it at his new store. Be sure to use the proper copyright info/license number depending on whether you bought it at AMI or at his new store. If you bought it at AMI, use your AMI license number and if you bought at his new store, use the license you got there. Also, remember you cannot mix tubes that you bought at different stores!
No scrap kits used in this tut.
Filters: MuRa Meister copies, VM Natural Sparkle
Font of choice. I am using Vivaldi & Verdana
Let's get started!
Open a new raster layer 600 x 250
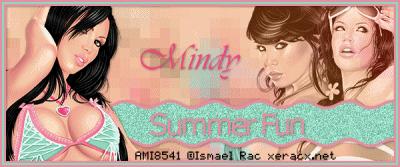
1. Copy and paste your close up tube as a new layer. Apply MuRa Miesters Copies with the wallpaper rotate setting, don't change any of the settings, just use the default settings for the wallpaper rotate.
2. Adjust blur, motion blur, angle at 135, strength at 100%.
3. Copy and paste a tube above this background layer, add a drop shadow. I used 1, 1, 40, 5. Arrange it to the left side of your tag.
4. Copy and paste two other tubes arranging them to the right side of your tag. Merge those two tubes together then change the blend mode to Luminance (L) and drop the opacity to about 75.
5. Choose a color from your tube for your background and another for the foreground.
6. Set your cursor over the left side of your canvas until you get a little arrow that points left and right. Click on it and drag your canvas out and you'll see grey showing on both sides of your canvas.
7. Now, taking your preset shape tool set to rectangle, width set at 5, draw out a thin rectangle that goes all the way across your canvas into the grey on both sides of your canvas. This is so that it's a bit longer than the canvas and when we apply the effect to it, it doesn't shrink up and leave blank spaces on the sides. Convert it to a raster layer.
8. Go to effects, distortion effects, wave with the following settings:
Horizontal displacement -Amplitude and Wavelength =1
Vertical displacement - Amplitude =2 and Wavelength =10
Edge mode = transparent
9. Click inside it with your magic wand. Duplicate 2 times for a total of 3 layers. Hide the top 2 layers.
10. On the bottom layer adjust, add/remove noise, add noise, uniform, monochrome checked, percent at 40.
11. Unhide the middle layer and do the same, but change the percent to 50.
12. Do the same for the top layer, change the percent to 60. Deselect and add a drop shadow to each of these layers.
13. Write out the words Summer Fun or a similar phrase and arrange it in the middle of the wave.
14. Add a new raster layer, selections, select all, modify, contract 3, invert flood fill with the color you picked for the outside edge of your wave layer.
15. Selections, invert, modify, contract 3 and add a new raster layer under the first one, invert, and flood fill with the color you chose for the inside of your wave layer.
16. Do the same as above, but this time, fill it again with the first color you used.
17. Merge those 3 layers together and add your drop shadow.
18. Add your name and copyright information.
To Animate:
1. Close off the top 2 wave layers. Copy merged and paste into animation shop as a new animation.
2. Close off the bottom layer and unhide the middle layer. Copy merged and paste into animation shop after current frame.
3. Close off the middle layer and unhide the top layer. Copy merged and paste into animation shop after current frame.
4. Click on "view animation" see if you like how the animation looks. If not, you can click on "animation" and then "frame properties" and change the numbers around til you get something you like. This speeds up or slows down the speed.
For the Avatar
1. Open a new 150 x 150 canvas (you may make it smaller if the forum you are going to use it at requires smaller.)
2. Copy your background layer from your tag and paste it as a new layer into your avatar canvas.
3. Copy each of your wave layers and paste as a new layer into your avatar canvas.
4. Copy and paste your tube into your avatar canvas, resize if necessary and move it around so that her face is showing on the left side.
5. Follow the instructions above #14 - 17 to make a frame on your avatar.
6. Put your initial over the wave layer.
7. Add your copyright info.
8. Follow the instructions for animating your tag to animate your avatar!
Cute tut
ReplyDeleteI think you forgot to add that you used Effects/Distortion Effects/Pixelate on the background ;o)