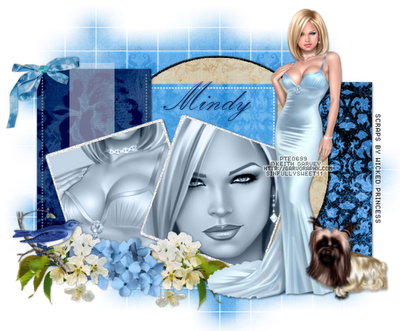
For this tutorial you will need the following:
Paint Shop Pro, I am using PSP X, you should be able to use any version.
Tube of choice, I am using the artwork of Keith Garvey, which you need a license to use. You can get it at PTE.
Scrap kit of choice. I am using Everyday Lady by Wicked Princess and you can find it here.
Collab template 3 by Deb and Tamie , you can find it on the Creative Misfits blog. It's the last one in the group.
Font of choice, I am using
Mask: wsl84 by weescotslass creations, here.
Plugins: no outside plugins needed
Just remember that my choices of papers and elements is just a suggestion, change it up and make it yours! You don't have to follow mine exactly.
Let's get started!
Open your template, resize by setting the width to about 650, it should then auto size the height. Change your canvas size to about 700 x 600.
Delete raster 7 layer.
Make raster 5 active, click on it with your magic wand, open a paper, copy and paste as a new layer, selections invert, click delete on your keyboard. Deselect, add drop shadow, delete the original layer.
Do the same for each shape in the template (except raster 8, 9, & 11), changing papers to whichever paper you like.
On raster 11, adjust, add/remove noise, add noise, uniform, 70, monochrome checked. Add drop shadow.
Do the same for raster 8 & 9.
On raster 12 and copy of vector 1, adjust, hue and saturation, colorize, change them both to 0.
On each of the top square layers, make sure it's active, selections, select all, float, defloat, invert, open your close up tube, copy and paste as a new layer, arrange it how you want, click delete on your keyboard. Change the blend mode to luminance (L)
Copy and paste your full tube, arrange to the right, add a drop shadow.
Add any elements you like, resizing as needed (make sure to go to adjust sharpen, and sharpen after resizing) and adding drop shadow. I used the following:
Dog, resized 25%
Flower branches, resized 30%
Flowerbunch, resized at 20%
Bird, resized at 20%
Satin bow, resized at 25%
Open a paper of choice, copy and paste as a new layer, just above the white background layer. Open your mask, go to layers, new mask layer, from image, find your mask in the drop down box, click on it. Then in your layer palette, delete the mask, merge group. Resize your mask by about 116%.
Add your copyrights and credits as needed. Add your name or other text.
Crop, resize and save.

No comments:
Post a Comment