
For this tutorial you will need the following:
Paint Shop Pro, I am using PSP X, you should be able to use any version.
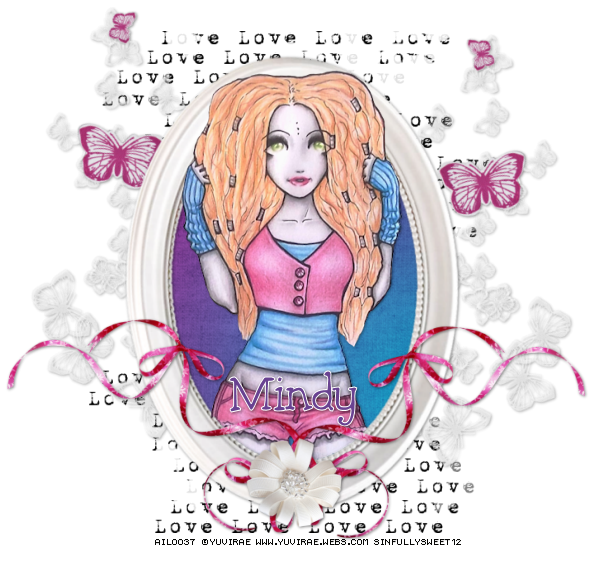
Tube of choice, I am using the artwork of Yuvirae which you need a license to use. You can get it at Aristically Inclinded Licensing.
Scrap kit of choice. I am using Love Me, a PTU kit by Farrah's Designer Scraps.
Font of choice, I am using 5th Grader
Plugins: No outside plugins needed.
Just remember that my choices of papers and elements is just a suggestion, change it up and make it yours! You don't have to follow mine exactly.
Add a drop shadow of your choosing to tubes & elements throughout. I usually use 1, 1, 50, 5 unless otherwise noted.
Let's get started!
Open new canvas 750 x 750 white background.
Open frame 1, copy and paste as a new layer, resize by 28%, rotate to the right by 80.
Click inside it with your magic wand, selections, modify, expand by 3.
Open paper 10, copy and paste as a new layer, resize by 20%, drag below the frame and arrange it how you want. Selections, invert, click delete on your keyboard and leave selected.
Open your tube, copy and paste as a new layer, arrange where you want it within the frame, duplicate. Make sure the original is below the frame, and the copy is above the frame, hide the copy.
Take your eraser tool and erase the parts of the tube you don't want hanging below the frame, then deselect.
Unhide the top tube layer, erase the parts hanging over the frame.
Open Love Me Words, copy and paste as a new layer, resize by 23%, drag down so that it is just above the white background layer.
Open ribbon 2, copy and paste as a new layer, resize by 13%, duplicate and mirror, arrange them each on the bottom (see tag for reference).
Open flower 6, resize by 17%, arrange along the bottom center.
Open Scatter, copy and paste as a new layer, rotate to the right by 20, duplicate and mirror. Add drop shadow so that you can see the white ones. Arrange along the left and right sides, make sure to drag these two layers just above the words layer.
Add your copyright/credits as needed & your name.
Crop, resize and save.
No comments:
Post a Comment