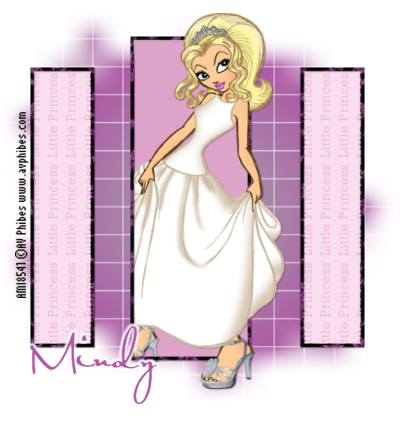
 For this tutorial you will need the following:
Paint Shop Pro, any version 7 and above should work. I am using PSP X.
Artist tube of your choice. I am using the cool artwork of AV Phibes, who is one of the March featured artists at AMI. Get her work HERE.
WSL_mask84 from WeeScotsLass.
Eye Candy 4000 Marble, MuRa Meister Copies, Eye Candy 3.1 glow (optional, for the glow around name text)
Let's get started!
Open a new canvas, size at about 700x700 with a white background. You can crop it at the end if it's too big.
Open your tube. Take two colors from your tube, I used #a5a9ad (foreground) from her shoes and #ae59a5 (background)from her lips. Now, click on your foreground color and choose "other" then choose gradient. Choose the rectangular Style one, then click on the arrow by the color box and scroll down until you see foreground/background fading and choose that. Angle set to 0 repeat set to 1, click ok, then flood fill a new raster layer on your canvas.
Now, open your mask, and apply it by going to Layer, New Mask Layer, From Image. Once applied, on your layers palette, delete the mask layer, click ok to the pop up box, and then merge the group.
Make black your foreground and close off your background color. Take your preset shapes tool set at rectangle, width as 6 and draw out a tall, thinnish rectangle (see mine for reference). Convert to raster layer.
Apply eye candy 4000 marble to the rectangle. Change the bedrock color to black and the vein color to #ae59a5. Click on the random seed a few times til you find something you like, or just leave it, completely up to you. It all looks about the same, you're just changing the placement of the purplish veins by clicking random seed.
Take your magic wand and click inside the rectangular layer, add a new raster layer below it and flood fill with #dda3c9. Leave selected.
Now take your tube, copy and paste as a new layer, resize if necessary. Erase the bits that hang over your rectangle frame.
Draw out another, smaller, rectangle to the right of your larger one, as above. Follow the same steps to apply the filters and fill the inside. I used a lighter shade of pink on my smaller rectangles. Once done, merge the layers together and duplicate, then mirror the duplicate so it goes to the right side.
Take your text tool and with a nice pixel font or something that looks good in tiny print, write out "Little Princess" or some other text. Rotate it to the left by 90, objects, align, center in canvas, and convert to raster layer.
Apply MuRa Meister copies, down at the bottom where it says "preset menu" click on that, scroll down and change to tiling. Now change the tile gap to 2 and click ok. Hide that layer for a moment.
Merge the two small outside rectangles, and then take your magic wand and click inside one, hold down the shift key and click inside the other. Selections, modify, expand by 2. Now unhide your text layer, selections, invert, and on the text layer, hit delete on your keyboard. Change the blend mode to burn and lower to opacity to around 60.
Now just add your ©info, your name, delete the white background layer, crop and resize if necessary. Save as a .png file so that it's transparent. (I used a glow of 5, fat, white around my name text on mine).
For this tutorial you will need the following:
Paint Shop Pro, any version 7 and above should work. I am using PSP X.
Artist tube of your choice. I am using the cool artwork of AV Phibes, who is one of the March featured artists at AMI. Get her work HERE.
WSL_mask84 from WeeScotsLass.
Eye Candy 4000 Marble, MuRa Meister Copies, Eye Candy 3.1 glow (optional, for the glow around name text)
Let's get started!
Open a new canvas, size at about 700x700 with a white background. You can crop it at the end if it's too big.
Open your tube. Take two colors from your tube, I used #a5a9ad (foreground) from her shoes and #ae59a5 (background)from her lips. Now, click on your foreground color and choose "other" then choose gradient. Choose the rectangular Style one, then click on the arrow by the color box and scroll down until you see foreground/background fading and choose that. Angle set to 0 repeat set to 1, click ok, then flood fill a new raster layer on your canvas.
Now, open your mask, and apply it by going to Layer, New Mask Layer, From Image. Once applied, on your layers palette, delete the mask layer, click ok to the pop up box, and then merge the group.
Make black your foreground and close off your background color. Take your preset shapes tool set at rectangle, width as 6 and draw out a tall, thinnish rectangle (see mine for reference). Convert to raster layer.
Apply eye candy 4000 marble to the rectangle. Change the bedrock color to black and the vein color to #ae59a5. Click on the random seed a few times til you find something you like, or just leave it, completely up to you. It all looks about the same, you're just changing the placement of the purplish veins by clicking random seed.
Take your magic wand and click inside the rectangular layer, add a new raster layer below it and flood fill with #dda3c9. Leave selected.
Now take your tube, copy and paste as a new layer, resize if necessary. Erase the bits that hang over your rectangle frame.
Draw out another, smaller, rectangle to the right of your larger one, as above. Follow the same steps to apply the filters and fill the inside. I used a lighter shade of pink on my smaller rectangles. Once done, merge the layers together and duplicate, then mirror the duplicate so it goes to the right side.
Take your text tool and with a nice pixel font or something that looks good in tiny print, write out "Little Princess" or some other text. Rotate it to the left by 90, objects, align, center in canvas, and convert to raster layer.
Apply MuRa Meister copies, down at the bottom where it says "preset menu" click on that, scroll down and change to tiling. Now change the tile gap to 2 and click ok. Hide that layer for a moment.
Merge the two small outside rectangles, and then take your magic wand and click inside one, hold down the shift key and click inside the other. Selections, modify, expand by 2. Now unhide your text layer, selections, invert, and on the text layer, hit delete on your keyboard. Change the blend mode to burn and lower to opacity to around 60.
Now just add your ©info, your name, delete the white background layer, crop and resize if necessary. Save as a .png file so that it's transparent. (I used a glow of 5, fat, white around my name text on mine).

Monday, March 29, 2010
Little Princess
For this tutorial you will need the following:
Paint Shop Pro, any version 7 and above should work. I am using PSP X.
Artist tube of your choice. I am using the cool artwork of AV Phibes, who is one of the March featured artists at AMI. Get her work HERE.
WSL_mask84 from WeeScotsLass.
Eye Candy 4000 Marble, MuRa Meister Copies, Eye Candy 3.1 glow (optional, for the glow around name text)
Let's get started!
Open a new canvas, size at about 700x700 with a white background. You can crop it at the end if it's too big.
Open your tube. Take two colors from your tube, I used #a5a9ad (foreground) from her shoes and #ae59a5 (background)from her lips. Now, click on your foreground color and choose "other" then choose gradient. Choose the rectangular Style one, then click on the arrow by the color box and scroll down until you see foreground/background fading and choose that. Angle set to 0 repeat set to 1, click ok, then flood fill a new raster layer on your canvas.
Now, open your mask, and apply it by going to Layer, New Mask Layer, From Image. Once applied, on your layers palette, delete the mask layer, click ok to the pop up box, and then merge the group.
Make black your foreground and close off your background color. Take your preset shapes tool set at rectangle, width as 6 and draw out a tall, thinnish rectangle (see mine for reference). Convert to raster layer.
Apply eye candy 4000 marble to the rectangle. Change the bedrock color to black and the vein color to #ae59a5. Click on the random seed a few times til you find something you like, or just leave it, completely up to you. It all looks about the same, you're just changing the placement of the purplish veins by clicking random seed.
Take your magic wand and click inside the rectangular layer, add a new raster layer below it and flood fill with #dda3c9. Leave selected.
Now take your tube, copy and paste as a new layer, resize if necessary. Erase the bits that hang over your rectangle frame.
Draw out another, smaller, rectangle to the right of your larger one, as above. Follow the same steps to apply the filters and fill the inside. I used a lighter shade of pink on my smaller rectangles. Once done, merge the layers together and duplicate, then mirror the duplicate so it goes to the right side.
Take your text tool and with a nice pixel font or something that looks good in tiny print, write out "Little Princess" or some other text. Rotate it to the left by 90, objects, align, center in canvas, and convert to raster layer.
Apply MuRa Meister copies, down at the bottom where it says "preset menu" click on that, scroll down and change to tiling. Now change the tile gap to 2 and click ok. Hide that layer for a moment.
Merge the two small outside rectangles, and then take your magic wand and click inside one, hold down the shift key and click inside the other. Selections, modify, expand by 2. Now unhide your text layer, selections, invert, and on the text layer, hit delete on your keyboard. Change the blend mode to burn and lower to opacity to around 60.
Now just add your ©info, your name, delete the white background layer, crop and resize if necessary. Save as a .png file so that it's transparent. (I used a glow of 5, fat, white around my name text on mine).

Saturday, March 20, 2010
Home Sweet Home
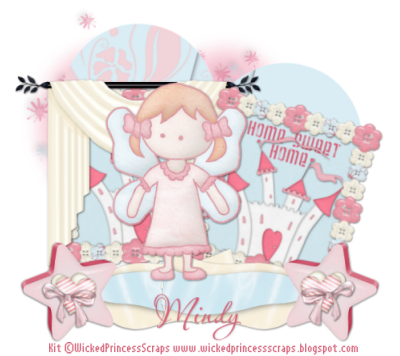 For this tutorial you will need the following:
Paint Shop Pro, I am using PSP X, but any version 7 and above should work fine.
Scrap kit Sweet Pea by Wicked Princess Scraps. You can find it HERE.
Fonts used: Weltron Urban, Aquarelle
Let's get started!
Open a new 700x700 white canvas.
Open the button frame element, copy and paste as a new layer and resize by 70%. Click inside it with your magic wand, selections, modify, expand by 5.
Open paper 11, copy and paste as a new layer, selections, invert and on the paper layer, click delete on your keyboard and deselect. Drag the paper layer below the frame layer add a drop shadow to the frame layer.
Open the castle element, copy and paste as a new layer, resize by 50%, drag it between the paper and frame layers, add a drop shadow.
Using #d7647a take your text tool and make the paper background layer active. Write the words Home Sweet Home as a vector layer and then convert to raster.
Hide the white background layer and merge visible. Unhide the white background layer.
Resize the merged layer by 80% and duplicate. Drag the top layer down a little and to the right.
Open the curtain element, copy and paste as a new layer, drag it so that the layer is just above the bottom merged layer. Resize by 75% and add a drop shadow.
Rotate the other merged layer to the right by 15.
Open the Sweet Pea tube element. Copy and paste as a new layer, resize by 60% and add a drop shadow. Arrange her in the middle of the two frames.
Open the laced journal note element, copy and paste as a new layer, drag it to the bottom.
Open the star comet, copy and paste as a new layer, resize by 50% and drag it below the tube layer, duplicate and on the duplicate copy mirror it and arrange it to the them as shown, add a drop shadow. If you don't like how the little pieces hang over each other at the bottom, you can take your eraser tool and erase some of the bits.
Open the faded heart element, copy and paste as a new layer, arrange it to the left so it's showing around the bottom blue heart how you like it, then drag it below the bottom blue heart journal layer.
Open the double heart bow layer, copy and paste as a new layer, resize by 20% and arrange it on the bottom right side of in the star, add a drop shadow. Duplicate and mirror.
Add your credits and/or copyrights as needed.
Add your name.
Delete the white background, crop and resize as needed. Save as a .png so it's transparent.
For this tutorial you will need the following:
Paint Shop Pro, I am using PSP X, but any version 7 and above should work fine.
Scrap kit Sweet Pea by Wicked Princess Scraps. You can find it HERE.
Fonts used: Weltron Urban, Aquarelle
Let's get started!
Open a new 700x700 white canvas.
Open the button frame element, copy and paste as a new layer and resize by 70%. Click inside it with your magic wand, selections, modify, expand by 5.
Open paper 11, copy and paste as a new layer, selections, invert and on the paper layer, click delete on your keyboard and deselect. Drag the paper layer below the frame layer add a drop shadow to the frame layer.
Open the castle element, copy and paste as a new layer, resize by 50%, drag it between the paper and frame layers, add a drop shadow.
Using #d7647a take your text tool and make the paper background layer active. Write the words Home Sweet Home as a vector layer and then convert to raster.
Hide the white background layer and merge visible. Unhide the white background layer.
Resize the merged layer by 80% and duplicate. Drag the top layer down a little and to the right.
Open the curtain element, copy and paste as a new layer, drag it so that the layer is just above the bottom merged layer. Resize by 75% and add a drop shadow.
Rotate the other merged layer to the right by 15.
Open the Sweet Pea tube element. Copy and paste as a new layer, resize by 60% and add a drop shadow. Arrange her in the middle of the two frames.
Open the laced journal note element, copy and paste as a new layer, drag it to the bottom.
Open the star comet, copy and paste as a new layer, resize by 50% and drag it below the tube layer, duplicate and on the duplicate copy mirror it and arrange it to the them as shown, add a drop shadow. If you don't like how the little pieces hang over each other at the bottom, you can take your eraser tool and erase some of the bits.
Open the faded heart element, copy and paste as a new layer, arrange it to the left so it's showing around the bottom blue heart how you like it, then drag it below the bottom blue heart journal layer.
Open the double heart bow layer, copy and paste as a new layer, resize by 20% and arrange it on the bottom right side of in the star, add a drop shadow. Duplicate and mirror.
Add your credits and/or copyrights as needed.
Add your name.
Delete the white background, crop and resize as needed. Save as a .png so it's transparent.
Friday, March 19, 2010
Happy Easter
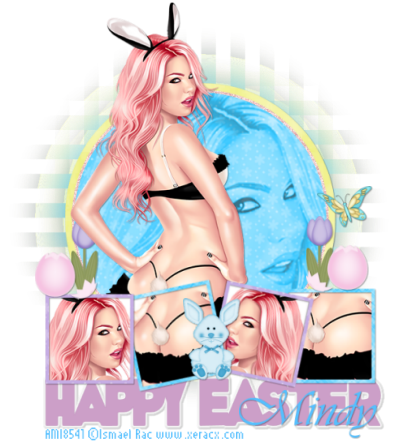 For this tut you will need the following:
Paint Shop Pro. I am using PSP X but any version PSP & and higher should work for you.
A scrap kit of your choice. I am using Easterlicious by Stargazers Musings. You can purchase it at AMI.
A tube of your choice. I am using the wonderful artwork of Ismael Rac which you can also purchase at AMI.
Plugins DSB Flux Linear Transmission
Fonts used: WhoopAss & Vivaldi
Let's get started.
Open a new 700x700 canvas with a white background in psp.
Open paper 9, right click on background, click other, then click pattern, search for that paper and set that as your background. Take your preset shape tool set on elipse and then at the top in your toolbar click on draw circle and draw out a decent sized circle on your canvas. Objects, align, center in canvas and then convert to raster layer. Selections, select all, float, defloat, modify, expand by 4, add a new raster layer below your blue layer, flood fill with #ffcece, selections, modify expand by 10. Open paper 8, set that as your foreground pattern, add a new raster layer below that pink layer, and flood fill with the yellow paper pattern. Deselect.
Go back to your pink layer, adjust, add/remove noise, and check, uniform, monochrome and have the amount set at 40%.
Add a drop shadow of your choosing to the yellow layer. I used 1, 1, 40, 2.
Make the blue center circle layer active again, selections, select all, float, defloat, open your closeup of your tube (if you have one, if not, just resize your tube to fit the circle and be sure to sharpen it after you resize)copy and paste as a new layer. You may have to resize even if you have a closeup. Selections, invert, click the delete key on your keyboard and deselect. Change the blend mode of your tube to luminance and the opacity to around 45%.
Hide your white background layer and merge visable all layers and unhide your white background layer. Duplicate your merged layer. On the bottom layer, adjust blur, gaussian blur set at 20. Now on that same layer, apply DSB Flux Linear Transmission with the settings as follows: Slice Size 7, Offset 6, Blend 50, Direction Vertical. After you apply that, duplicate that layer and rotate to the left by 90.
Open paper 1 and set that as your foreground pattern, set your background to null. Take your preset rectangle shape with the width set to 6 and draw out a smallish square then convert to raster layer.
Take your magic wand and click inside the left square, selections, modify, expand by 3 add a new raster layer below it and flood fill with white. Open your tube, copy and paste it as a new layer, arrange it so whatever part you want showing is in the square, selections, invert, click delete on your keyboard. Deselect, add a drop shadow to your frame and merge the frame and tube layer together. Merge the frame, tube and white background layer together and then duplicate that merged layer and mirror it. Drag it over to the right a little.
Open paper 4 and do the same as the above 2 steps to make 2 frames with tubes in them. Rotate one of your frames to the right by 12 and one to the left by 12. Arrange them how you like across the bottom of the circle. I then merged the 4 together as one layer.
Copy and paste your tube as a new layer. Drag it below the square frames layer, add a drop shadow. If you have some of your tube showing below the frames, take your eraser tool and erase those bits.
Put any elements you'd like on your tag. I used the tulips, cracked egg, butterfly and the bunny, all resized at 35% and added a drop shadow.
Add your copyright information.
Add your text and name.
Crop down, hide the white background layer and save as a .png if you want it transparent. My blog, for some reason keeps showing the white background even after I save as a .png, but it should be transparent on forums, etc.
For this tut you will need the following:
Paint Shop Pro. I am using PSP X but any version PSP & and higher should work for you.
A scrap kit of your choice. I am using Easterlicious by Stargazers Musings. You can purchase it at AMI.
A tube of your choice. I am using the wonderful artwork of Ismael Rac which you can also purchase at AMI.
Plugins DSB Flux Linear Transmission
Fonts used: WhoopAss & Vivaldi
Let's get started.
Open a new 700x700 canvas with a white background in psp.
Open paper 9, right click on background, click other, then click pattern, search for that paper and set that as your background. Take your preset shape tool set on elipse and then at the top in your toolbar click on draw circle and draw out a decent sized circle on your canvas. Objects, align, center in canvas and then convert to raster layer. Selections, select all, float, defloat, modify, expand by 4, add a new raster layer below your blue layer, flood fill with #ffcece, selections, modify expand by 10. Open paper 8, set that as your foreground pattern, add a new raster layer below that pink layer, and flood fill with the yellow paper pattern. Deselect.
Go back to your pink layer, adjust, add/remove noise, and check, uniform, monochrome and have the amount set at 40%.
Add a drop shadow of your choosing to the yellow layer. I used 1, 1, 40, 2.
Make the blue center circle layer active again, selections, select all, float, defloat, open your closeup of your tube (if you have one, if not, just resize your tube to fit the circle and be sure to sharpen it after you resize)copy and paste as a new layer. You may have to resize even if you have a closeup. Selections, invert, click the delete key on your keyboard and deselect. Change the blend mode of your tube to luminance and the opacity to around 45%.
Hide your white background layer and merge visable all layers and unhide your white background layer. Duplicate your merged layer. On the bottom layer, adjust blur, gaussian blur set at 20. Now on that same layer, apply DSB Flux Linear Transmission with the settings as follows: Slice Size 7, Offset 6, Blend 50, Direction Vertical. After you apply that, duplicate that layer and rotate to the left by 90.
Open paper 1 and set that as your foreground pattern, set your background to null. Take your preset rectangle shape with the width set to 6 and draw out a smallish square then convert to raster layer.
Take your magic wand and click inside the left square, selections, modify, expand by 3 add a new raster layer below it and flood fill with white. Open your tube, copy and paste it as a new layer, arrange it so whatever part you want showing is in the square, selections, invert, click delete on your keyboard. Deselect, add a drop shadow to your frame and merge the frame and tube layer together. Merge the frame, tube and white background layer together and then duplicate that merged layer and mirror it. Drag it over to the right a little.
Open paper 4 and do the same as the above 2 steps to make 2 frames with tubes in them. Rotate one of your frames to the right by 12 and one to the left by 12. Arrange them how you like across the bottom of the circle. I then merged the 4 together as one layer.
Copy and paste your tube as a new layer. Drag it below the square frames layer, add a drop shadow. If you have some of your tube showing below the frames, take your eraser tool and erase those bits.
Put any elements you'd like on your tag. I used the tulips, cracked egg, butterfly and the bunny, all resized at 35% and added a drop shadow.
Add your copyright information.
Add your text and name.
Crop down, hide the white background layer and save as a .png if you want it transparent. My blog, for some reason keeps showing the white background even after I save as a .png, but it should be transparent on forums, etc.
Monday, March 8, 2010
Geisha
 For this tutorial you will need the following:
Paint Shop Pro, I am using PSP X, but any version should work.
Tube of choice. I am using the artwork of Camilla Drakenborg, which you can purchase at AMI.
Scrap kit of your choice. I am using a PTU kit called Geisha by Juicy Bits which you can also purchase at AMI.
A mask of your choice. I am using Beckymask23, her site is closed, so I can't link to a download. Use it if you have it or just find another mask you like!
Font of your choice. I am using Bonzai
Let's get started!
Open frame 3, resize by about 90%, then change the canvas size to 700x700 so that you have room to work. Add a new raster layer, drag it to the bottom and flood fill with white.
Back on your frame layer, click inside it with your magic wand, selections, modify, expand by 5. Open a paper 19, copy and paste as a new layer, resize by 75%, selections, invert, click delete on your keyboard, leave selected, drag the paper below your frame layer.
Copy and paste your tube as a new layer and duplicate it. Drag the original below your frame layer, and hide the duplicate layer. Take your eraser tool and erase the bits that hang below your frame. Deselect and add a drop shadow to your tube.
Unhide the top tube layer and take your eraser tool and erase the parts you don't want showing over your frame. Your bottom tube will show through so you don't have to be real careful where you erase.
Add a drop shadow to your frame.
Open paper 1, copy and paste as a new layer, drag it down so it's just above the white background layer. Open your mask, go to layers, new mask layer, from image, then in the drop down box, scroll down and click on the mask. Delete the mask, then merge the group together. Resize if you find it's too big or too small for your tag.
Add any elements you'd like to your tag.
Add your name and copyright info.
For my name, I used the Bonsai font, background at #790000, foreground at #336e6a with the stroke set to 2, and then I added a glow with the width of 3 and then added a drop shadow.
Crop down and resize as necessary. Hide the white background layer and save as a .png file for it to be transparent.
For this tutorial you will need the following:
Paint Shop Pro, I am using PSP X, but any version should work.
Tube of choice. I am using the artwork of Camilla Drakenborg, which you can purchase at AMI.
Scrap kit of your choice. I am using a PTU kit called Geisha by Juicy Bits which you can also purchase at AMI.
A mask of your choice. I am using Beckymask23, her site is closed, so I can't link to a download. Use it if you have it or just find another mask you like!
Font of your choice. I am using Bonzai
Let's get started!
Open frame 3, resize by about 90%, then change the canvas size to 700x700 so that you have room to work. Add a new raster layer, drag it to the bottom and flood fill with white.
Back on your frame layer, click inside it with your magic wand, selections, modify, expand by 5. Open a paper 19, copy and paste as a new layer, resize by 75%, selections, invert, click delete on your keyboard, leave selected, drag the paper below your frame layer.
Copy and paste your tube as a new layer and duplicate it. Drag the original below your frame layer, and hide the duplicate layer. Take your eraser tool and erase the bits that hang below your frame. Deselect and add a drop shadow to your tube.
Unhide the top tube layer and take your eraser tool and erase the parts you don't want showing over your frame. Your bottom tube will show through so you don't have to be real careful where you erase.
Add a drop shadow to your frame.
Open paper 1, copy and paste as a new layer, drag it down so it's just above the white background layer. Open your mask, go to layers, new mask layer, from image, then in the drop down box, scroll down and click on the mask. Delete the mask, then merge the group together. Resize if you find it's too big or too small for your tag.
Add any elements you'd like to your tag.
Add your name and copyright info.
For my name, I used the Bonsai font, background at #790000, foreground at #336e6a with the stroke set to 2, and then I added a glow with the width of 3 and then added a drop shadow.
Crop down and resize as necessary. Hide the white background layer and save as a .png file for it to be transparent.
Subscribe to:
Posts (Atom)