 For this tut you will need the following:
Paint Shop Pro. I am using PSP X but any version PSP & and higher should work for you.
A scrap kit of your choice. I am using Easterlicious by Stargazers Musings. You can purchase it at AMI.
A tube of your choice. I am using the wonderful artwork of Ismael Rac which you can also purchase at AMI.
Plugins DSB Flux Linear Transmission
Fonts used: WhoopAss & Vivaldi
Let's get started.
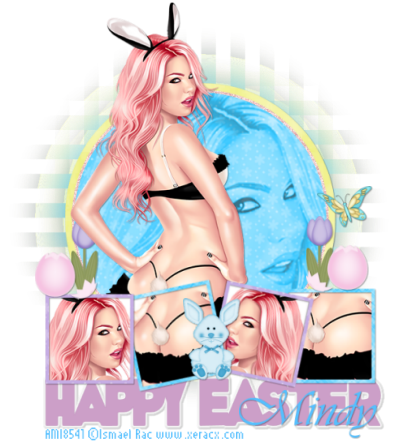
Open a new 700x700 canvas with a white background in psp.
Open paper 9, right click on background, click other, then click pattern, search for that paper and set that as your background. Take your preset shape tool set on elipse and then at the top in your toolbar click on draw circle and draw out a decent sized circle on your canvas. Objects, align, center in canvas and then convert to raster layer. Selections, select all, float, defloat, modify, expand by 4, add a new raster layer below your blue layer, flood fill with #ffcece, selections, modify expand by 10. Open paper 8, set that as your foreground pattern, add a new raster layer below that pink layer, and flood fill with the yellow paper pattern. Deselect.
Go back to your pink layer, adjust, add/remove noise, and check, uniform, monochrome and have the amount set at 40%.
Add a drop shadow of your choosing to the yellow layer. I used 1, 1, 40, 2.
Make the blue center circle layer active again, selections, select all, float, defloat, open your closeup of your tube (if you have one, if not, just resize your tube to fit the circle and be sure to sharpen it after you resize)copy and paste as a new layer. You may have to resize even if you have a closeup. Selections, invert, click the delete key on your keyboard and deselect. Change the blend mode of your tube to luminance and the opacity to around 45%.
Hide your white background layer and merge visable all layers and unhide your white background layer. Duplicate your merged layer. On the bottom layer, adjust blur, gaussian blur set at 20. Now on that same layer, apply DSB Flux Linear Transmission with the settings as follows: Slice Size 7, Offset 6, Blend 50, Direction Vertical. After you apply that, duplicate that layer and rotate to the left by 90.
Open paper 1 and set that as your foreground pattern, set your background to null. Take your preset rectangle shape with the width set to 6 and draw out a smallish square then convert to raster layer.
Take your magic wand and click inside the left square, selections, modify, expand by 3 add a new raster layer below it and flood fill with white. Open your tube, copy and paste it as a new layer, arrange it so whatever part you want showing is in the square, selections, invert, click delete on your keyboard. Deselect, add a drop shadow to your frame and merge the frame and tube layer together. Merge the frame, tube and white background layer together and then duplicate that merged layer and mirror it. Drag it over to the right a little.
Open paper 4 and do the same as the above 2 steps to make 2 frames with tubes in them. Rotate one of your frames to the right by 12 and one to the left by 12. Arrange them how you like across the bottom of the circle. I then merged the 4 together as one layer.
Copy and paste your tube as a new layer. Drag it below the square frames layer, add a drop shadow. If you have some of your tube showing below the frames, take your eraser tool and erase those bits.
Put any elements you'd like on your tag. I used the tulips, cracked egg, butterfly and the bunny, all resized at 35% and added a drop shadow.
Add your copyright information.
Add your text and name.
Crop down, hide the white background layer and save as a .png if you want it transparent. My blog, for some reason keeps showing the white background even after I save as a .png, but it should be transparent on forums, etc.
For this tut you will need the following:
Paint Shop Pro. I am using PSP X but any version PSP & and higher should work for you.
A scrap kit of your choice. I am using Easterlicious by Stargazers Musings. You can purchase it at AMI.
A tube of your choice. I am using the wonderful artwork of Ismael Rac which you can also purchase at AMI.
Plugins DSB Flux Linear Transmission
Fonts used: WhoopAss & Vivaldi
Let's get started.
Open a new 700x700 canvas with a white background in psp.
Open paper 9, right click on background, click other, then click pattern, search for that paper and set that as your background. Take your preset shape tool set on elipse and then at the top in your toolbar click on draw circle and draw out a decent sized circle on your canvas. Objects, align, center in canvas and then convert to raster layer. Selections, select all, float, defloat, modify, expand by 4, add a new raster layer below your blue layer, flood fill with #ffcece, selections, modify expand by 10. Open paper 8, set that as your foreground pattern, add a new raster layer below that pink layer, and flood fill with the yellow paper pattern. Deselect.
Go back to your pink layer, adjust, add/remove noise, and check, uniform, monochrome and have the amount set at 40%.
Add a drop shadow of your choosing to the yellow layer. I used 1, 1, 40, 2.
Make the blue center circle layer active again, selections, select all, float, defloat, open your closeup of your tube (if you have one, if not, just resize your tube to fit the circle and be sure to sharpen it after you resize)copy and paste as a new layer. You may have to resize even if you have a closeup. Selections, invert, click the delete key on your keyboard and deselect. Change the blend mode of your tube to luminance and the opacity to around 45%.
Hide your white background layer and merge visable all layers and unhide your white background layer. Duplicate your merged layer. On the bottom layer, adjust blur, gaussian blur set at 20. Now on that same layer, apply DSB Flux Linear Transmission with the settings as follows: Slice Size 7, Offset 6, Blend 50, Direction Vertical. After you apply that, duplicate that layer and rotate to the left by 90.
Open paper 1 and set that as your foreground pattern, set your background to null. Take your preset rectangle shape with the width set to 6 and draw out a smallish square then convert to raster layer.
Take your magic wand and click inside the left square, selections, modify, expand by 3 add a new raster layer below it and flood fill with white. Open your tube, copy and paste it as a new layer, arrange it so whatever part you want showing is in the square, selections, invert, click delete on your keyboard. Deselect, add a drop shadow to your frame and merge the frame and tube layer together. Merge the frame, tube and white background layer together and then duplicate that merged layer and mirror it. Drag it over to the right a little.
Open paper 4 and do the same as the above 2 steps to make 2 frames with tubes in them. Rotate one of your frames to the right by 12 and one to the left by 12. Arrange them how you like across the bottom of the circle. I then merged the 4 together as one layer.
Copy and paste your tube as a new layer. Drag it below the square frames layer, add a drop shadow. If you have some of your tube showing below the frames, take your eraser tool and erase those bits.
Put any elements you'd like on your tag. I used the tulips, cracked egg, butterfly and the bunny, all resized at 35% and added a drop shadow.
Add your copyright information.
Add your text and name.
Crop down, hide the white background layer and save as a .png if you want it transparent. My blog, for some reason keeps showing the white background even after I save as a .png, but it should be transparent on forums, etc.

Friday, March 19, 2010
Happy Easter
For this tut you will need the following:
Paint Shop Pro. I am using PSP X but any version PSP & and higher should work for you.
A scrap kit of your choice. I am using Easterlicious by Stargazers Musings. You can purchase it at AMI.
A tube of your choice. I am using the wonderful artwork of Ismael Rac which you can also purchase at AMI.
Plugins DSB Flux Linear Transmission
Fonts used: WhoopAss & Vivaldi
Let's get started.
Open a new 700x700 canvas with a white background in psp.
Open paper 9, right click on background, click other, then click pattern, search for that paper and set that as your background. Take your preset shape tool set on elipse and then at the top in your toolbar click on draw circle and draw out a decent sized circle on your canvas. Objects, align, center in canvas and then convert to raster layer. Selections, select all, float, defloat, modify, expand by 4, add a new raster layer below your blue layer, flood fill with #ffcece, selections, modify expand by 10. Open paper 8, set that as your foreground pattern, add a new raster layer below that pink layer, and flood fill with the yellow paper pattern. Deselect.
Go back to your pink layer, adjust, add/remove noise, and check, uniform, monochrome and have the amount set at 40%.
Add a drop shadow of your choosing to the yellow layer. I used 1, 1, 40, 2.
Make the blue center circle layer active again, selections, select all, float, defloat, open your closeup of your tube (if you have one, if not, just resize your tube to fit the circle and be sure to sharpen it after you resize)copy and paste as a new layer. You may have to resize even if you have a closeup. Selections, invert, click the delete key on your keyboard and deselect. Change the blend mode of your tube to luminance and the opacity to around 45%.
Hide your white background layer and merge visable all layers and unhide your white background layer. Duplicate your merged layer. On the bottom layer, adjust blur, gaussian blur set at 20. Now on that same layer, apply DSB Flux Linear Transmission with the settings as follows: Slice Size 7, Offset 6, Blend 50, Direction Vertical. After you apply that, duplicate that layer and rotate to the left by 90.
Open paper 1 and set that as your foreground pattern, set your background to null. Take your preset rectangle shape with the width set to 6 and draw out a smallish square then convert to raster layer.
Take your magic wand and click inside the left square, selections, modify, expand by 3 add a new raster layer below it and flood fill with white. Open your tube, copy and paste it as a new layer, arrange it so whatever part you want showing is in the square, selections, invert, click delete on your keyboard. Deselect, add a drop shadow to your frame and merge the frame and tube layer together. Merge the frame, tube and white background layer together and then duplicate that merged layer and mirror it. Drag it over to the right a little.
Open paper 4 and do the same as the above 2 steps to make 2 frames with tubes in them. Rotate one of your frames to the right by 12 and one to the left by 12. Arrange them how you like across the bottom of the circle. I then merged the 4 together as one layer.
Copy and paste your tube as a new layer. Drag it below the square frames layer, add a drop shadow. If you have some of your tube showing below the frames, take your eraser tool and erase those bits.
Put any elements you'd like on your tag. I used the tulips, cracked egg, butterfly and the bunny, all resized at 35% and added a drop shadow.
Add your copyright information.
Add your text and name.
Crop down, hide the white background layer and save as a .png if you want it transparent. My blog, for some reason keeps showing the white background even after I save as a .png, but it should be transparent on forums, etc.
Subscribe to:
Post Comments (Atom)
No comments:
Post a Comment