 For some reason, blogspot is taking my transparent .png tags and showing a white background!!! grrrrr
For this tutorial you will need the following:
Paint Shop Pro, any version should work, I am using PSP X.
St Patricks Template 01 by Artmama. We had a template challenge over at the Ismael Rac Stalkers forum and she made the templates for that. You can join the forum and get it, or you can head on over to our blog, Xeracx Stalker Creations, and pick it up there. Her's is the first set, just click on her name to go to her download.
Scrap kit. I am using a PTU kit by Kat NKDA called Clover and Gold, which you can purchase at AMI.
Tube(s) of your choice. I am using the artwork of Ismael Rac which you can also purchase at AMI.
Plugin: Xero Radience
Mask of choice. I am using Gemsmask21, but I don't have any info anymore about where to download it. You can use any rounded mask.
Let's begin!
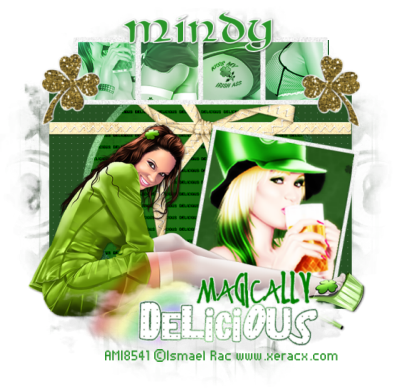
Open the template, delete the top layer, resize to 575x575 pixels, then change the canvas size to 650x650 so you have some room to work. Add a new raster layer and flood fill with white and send it to the bottom to help you see what you're working with (we'll delete it in the end).
Make the square layer active, selections, select all, float, defloat, invert. Open a paper, copy and paste as a new layer, make sure the paper layer is active, and hit delete on your keyboard.
Open a tube, copy and paste as a new layer, arrange in the square how you want it, and on the tube layer, hit delete on your keyboard. Duplicate the tube. On the top layer, adjust, blur, gaussian blur set at 3, change the opacity to soft light. On the bottom tube layer, apply Xero Radience with the factory settings.
Delete the original square layer.
Make the circle layer active, selections, float, defloat, invert, open another paper, copy and paste as a new layer, click delete on your keyboard. Delete the original circle layer.
Make the rectangle layer active, selections, select all, float, defloat, invert. Copy and paste your tube as a new layer, arrange it over the far left frame and click delete on your keyboard. Do the same for the next 3 areas. If any of your tube falls over into the next section, when you get done, deselect and take your eraser tool and erase what goes outside the rectangle space your tube is in. Change the blend mode on each of these tubes to Luminance.
Open your full sized tube, copy and paste it so that it's just above the square frame but below the clouds layer. Add a drop shadow.
Copy a paper and paste as a new layer, drag to the bottom. I used paper 8 because it was white with a gray design on it, and that way just the design shows. Open your mask in psp. Go to layers, New mask layer, from image. In the scoll down box, look for your mask. Click ok. Delete the mask and merge the group. Mine wasn't showing very well, so I duplicated it twice to make it darker then merged all the mask layers together. You can duplicate yours as many times as you need to make it dark as you'd like it.
Add any other elements to the tag you'd like.
Add your name. I used Cry Unical and made the background #2a952a, the foreground white, and the stroke set to 3. Then convert to raster layer and add a drop shadow.
Add your copyright info. Crop your image, delete the white background layer if you added one to work with it, save as a .png file so it's transparent.
You're all done!
For some reason, blogspot is taking my transparent .png tags and showing a white background!!! grrrrr
For this tutorial you will need the following:
Paint Shop Pro, any version should work, I am using PSP X.
St Patricks Template 01 by Artmama. We had a template challenge over at the Ismael Rac Stalkers forum and she made the templates for that. You can join the forum and get it, or you can head on over to our blog, Xeracx Stalker Creations, and pick it up there. Her's is the first set, just click on her name to go to her download.
Scrap kit. I am using a PTU kit by Kat NKDA called Clover and Gold, which you can purchase at AMI.
Tube(s) of your choice. I am using the artwork of Ismael Rac which you can also purchase at AMI.
Plugin: Xero Radience
Mask of choice. I am using Gemsmask21, but I don't have any info anymore about where to download it. You can use any rounded mask.
Let's begin!
Open the template, delete the top layer, resize to 575x575 pixels, then change the canvas size to 650x650 so you have some room to work. Add a new raster layer and flood fill with white and send it to the bottom to help you see what you're working with (we'll delete it in the end).
Make the square layer active, selections, select all, float, defloat, invert. Open a paper, copy and paste as a new layer, make sure the paper layer is active, and hit delete on your keyboard.
Open a tube, copy and paste as a new layer, arrange in the square how you want it, and on the tube layer, hit delete on your keyboard. Duplicate the tube. On the top layer, adjust, blur, gaussian blur set at 3, change the opacity to soft light. On the bottom tube layer, apply Xero Radience with the factory settings.
Delete the original square layer.
Make the circle layer active, selections, float, defloat, invert, open another paper, copy and paste as a new layer, click delete on your keyboard. Delete the original circle layer.
Make the rectangle layer active, selections, select all, float, defloat, invert. Copy and paste your tube as a new layer, arrange it over the far left frame and click delete on your keyboard. Do the same for the next 3 areas. If any of your tube falls over into the next section, when you get done, deselect and take your eraser tool and erase what goes outside the rectangle space your tube is in. Change the blend mode on each of these tubes to Luminance.
Open your full sized tube, copy and paste it so that it's just above the square frame but below the clouds layer. Add a drop shadow.
Copy a paper and paste as a new layer, drag to the bottom. I used paper 8 because it was white with a gray design on it, and that way just the design shows. Open your mask in psp. Go to layers, New mask layer, from image. In the scoll down box, look for your mask. Click ok. Delete the mask and merge the group. Mine wasn't showing very well, so I duplicated it twice to make it darker then merged all the mask layers together. You can duplicate yours as many times as you need to make it dark as you'd like it.
Add any other elements to the tag you'd like.
Add your name. I used Cry Unical and made the background #2a952a, the foreground white, and the stroke set to 3. Then convert to raster layer and add a drop shadow.
Add your copyright info. Crop your image, delete the white background layer if you added one to work with it, save as a .png file so it's transparent.
You're all done!

Monday, March 1, 2010
Magically Delicious
For some reason, blogspot is taking my transparent .png tags and showing a white background!!! grrrrr
For this tutorial you will need the following:
Paint Shop Pro, any version should work, I am using PSP X.
St Patricks Template 01 by Artmama. We had a template challenge over at the Ismael Rac Stalkers forum and she made the templates for that. You can join the forum and get it, or you can head on over to our blog, Xeracx Stalker Creations, and pick it up there. Her's is the first set, just click on her name to go to her download.
Scrap kit. I am using a PTU kit by Kat NKDA called Clover and Gold, which you can purchase at AMI.
Tube(s) of your choice. I am using the artwork of Ismael Rac which you can also purchase at AMI.
Plugin: Xero Radience
Mask of choice. I am using Gemsmask21, but I don't have any info anymore about where to download it. You can use any rounded mask.
Let's begin!
Open the template, delete the top layer, resize to 575x575 pixels, then change the canvas size to 650x650 so you have some room to work. Add a new raster layer and flood fill with white and send it to the bottom to help you see what you're working with (we'll delete it in the end).
Make the square layer active, selections, select all, float, defloat, invert. Open a paper, copy and paste as a new layer, make sure the paper layer is active, and hit delete on your keyboard.
Open a tube, copy and paste as a new layer, arrange in the square how you want it, and on the tube layer, hit delete on your keyboard. Duplicate the tube. On the top layer, adjust, blur, gaussian blur set at 3, change the opacity to soft light. On the bottom tube layer, apply Xero Radience with the factory settings.
Delete the original square layer.
Make the circle layer active, selections, float, defloat, invert, open another paper, copy and paste as a new layer, click delete on your keyboard. Delete the original circle layer.
Make the rectangle layer active, selections, select all, float, defloat, invert. Copy and paste your tube as a new layer, arrange it over the far left frame and click delete on your keyboard. Do the same for the next 3 areas. If any of your tube falls over into the next section, when you get done, deselect and take your eraser tool and erase what goes outside the rectangle space your tube is in. Change the blend mode on each of these tubes to Luminance.
Open your full sized tube, copy and paste it so that it's just above the square frame but below the clouds layer. Add a drop shadow.
Copy a paper and paste as a new layer, drag to the bottom. I used paper 8 because it was white with a gray design on it, and that way just the design shows. Open your mask in psp. Go to layers, New mask layer, from image. In the scoll down box, look for your mask. Click ok. Delete the mask and merge the group. Mine wasn't showing very well, so I duplicated it twice to make it darker then merged all the mask layers together. You can duplicate yours as many times as you need to make it dark as you'd like it.
Add any other elements to the tag you'd like.
Add your name. I used Cry Unical and made the background #2a952a, the foreground white, and the stroke set to 3. Then convert to raster layer and add a drop shadow.
Add your copyright info. Crop your image, delete the white background layer if you added one to work with it, save as a .png file so it's transparent.
You're all done!
Subscribe to:
Post Comments (Atom)
No comments:
Post a Comment