 For this tutorial you will need the following:
Paint Shop Pro, I am using PSP X, but any version should work.
Template 333 by Missy at Divine Intentionz.
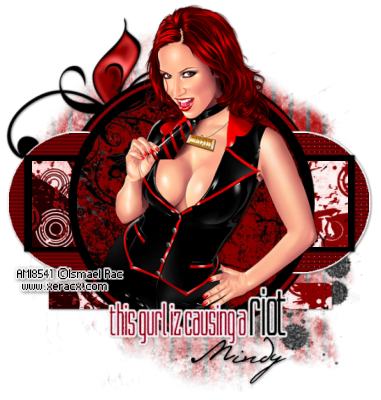
Tube of choice. I am using the awesome artwork of Ismael Rac which you can purchase at AMI.
Scrap kit of your choice. I am using Vinyl Vixen by Juicy bits which you can purchase at AMI.
A mask of your choice. I am using one by Boundless Bliss (grunge mask 1)and I can no longer find her site. I'm not sure if her TOU allow sharing. You can use that one if you have it, or find one that you would like to use instead.
Font of your choice. I used Pushkin.
Let's get started!
Open your template, delete the top "by Missy" layer. Resize by 85% and then change the canvas size to 650x650.
Open paper 8. Make the circle 4 layer active and click inside it with your magic wand. Copy and paste the paper as a new layer, arrange it how you want in the circle, selections, invert, hit delete on your keyboard, leave selected. Copy and paste your tube as a new layer and arrange it how you want it in the circle. Take your eraser tool and erase the parts that hang over the bottom of the circle. Deselect, add a drop shadow to your tube and delete the original circle 4 layer.
Make circle 2 active, click inside it with your magic wand, add a new raster layer, flood fill with #880306, deselect and delete the original circle 2 layer.
Make the thin rectangle layer active and click inside it with your magic wand. Open paper 9, copy and paste as a new layer, arrange it in the rectangle, selections, invert, click delete on your keyboard. Deselect and add a drop shadow. Delete the original rectangle layer.
Do the same for rectangle 2 layer, except don't do the drop shadow. Add a drop shadow to the rectangle 1 layer.
Make small circle 1 layer active, click inside it with your magic wand. Add a new raster layer, and flood fill with #880306. Deselect. Apply the blinds effect (found in texture effects) with the following settings:
width 6
opacity:50
light from top and horizontal both checked
color black.
Delete the original circle layer.
Do the same for small circle 2.
Add a drop shadow to both small white circles.
Make the word art layer active. Set the background to #de4497 and the foreground to #880306. Now take the color replacer tool and drag it over the word art. The pink will change to red.
Open paper 4, copy and paste as a new layer, bring it to the bottom. Open the mask, go to layers, new mask layer, from image, and in the drop down box, search for your mask. If you are using the same one I am, make sure you have invert mask transparency checked. Delete the maks, and merge the group. Resize the mask if you'd like. I resized mine by 90%.
Add any other elements you'd like to it. I added a doodle and a glitter.
Add your copyright and credits as needed, and your name.
Crop and resize and then save. If you want it to be transparent, then save as a .png.
For this tutorial you will need the following:
Paint Shop Pro, I am using PSP X, but any version should work.
Template 333 by Missy at Divine Intentionz.
Tube of choice. I am using the awesome artwork of Ismael Rac which you can purchase at AMI.
Scrap kit of your choice. I am using Vinyl Vixen by Juicy bits which you can purchase at AMI.
A mask of your choice. I am using one by Boundless Bliss (grunge mask 1)and I can no longer find her site. I'm not sure if her TOU allow sharing. You can use that one if you have it, or find one that you would like to use instead.
Font of your choice. I used Pushkin.
Let's get started!
Open your template, delete the top "by Missy" layer. Resize by 85% and then change the canvas size to 650x650.
Open paper 8. Make the circle 4 layer active and click inside it with your magic wand. Copy and paste the paper as a new layer, arrange it how you want in the circle, selections, invert, hit delete on your keyboard, leave selected. Copy and paste your tube as a new layer and arrange it how you want it in the circle. Take your eraser tool and erase the parts that hang over the bottom of the circle. Deselect, add a drop shadow to your tube and delete the original circle 4 layer.
Make circle 2 active, click inside it with your magic wand, add a new raster layer, flood fill with #880306, deselect and delete the original circle 2 layer.
Make the thin rectangle layer active and click inside it with your magic wand. Open paper 9, copy and paste as a new layer, arrange it in the rectangle, selections, invert, click delete on your keyboard. Deselect and add a drop shadow. Delete the original rectangle layer.
Do the same for rectangle 2 layer, except don't do the drop shadow. Add a drop shadow to the rectangle 1 layer.
Make small circle 1 layer active, click inside it with your magic wand. Add a new raster layer, and flood fill with #880306. Deselect. Apply the blinds effect (found in texture effects) with the following settings:
width 6
opacity:50
light from top and horizontal both checked
color black.
Delete the original circle layer.
Do the same for small circle 2.
Add a drop shadow to both small white circles.
Make the word art layer active. Set the background to #de4497 and the foreground to #880306. Now take the color replacer tool and drag it over the word art. The pink will change to red.
Open paper 4, copy and paste as a new layer, bring it to the bottom. Open the mask, go to layers, new mask layer, from image, and in the drop down box, search for your mask. If you are using the same one I am, make sure you have invert mask transparency checked. Delete the maks, and merge the group. Resize the mask if you'd like. I resized mine by 90%.
Add any other elements you'd like to it. I added a doodle and a glitter.
Add your copyright and credits as needed, and your name.
Crop and resize and then save. If you want it to be transparent, then save as a .png.

Monday, March 1, 2010
Riot Vixen
For this tutorial you will need the following:
Paint Shop Pro, I am using PSP X, but any version should work.
Template 333 by Missy at Divine Intentionz.
Tube of choice. I am using the awesome artwork of Ismael Rac which you can purchase at AMI.
Scrap kit of your choice. I am using Vinyl Vixen by Juicy bits which you can purchase at AMI.
A mask of your choice. I am using one by Boundless Bliss (grunge mask 1)and I can no longer find her site. I'm not sure if her TOU allow sharing. You can use that one if you have it, or find one that you would like to use instead.
Font of your choice. I used Pushkin.
Let's get started!
Open your template, delete the top "by Missy" layer. Resize by 85% and then change the canvas size to 650x650.
Open paper 8. Make the circle 4 layer active and click inside it with your magic wand. Copy and paste the paper as a new layer, arrange it how you want in the circle, selections, invert, hit delete on your keyboard, leave selected. Copy and paste your tube as a new layer and arrange it how you want it in the circle. Take your eraser tool and erase the parts that hang over the bottom of the circle. Deselect, add a drop shadow to your tube and delete the original circle 4 layer.
Make circle 2 active, click inside it with your magic wand, add a new raster layer, flood fill with #880306, deselect and delete the original circle 2 layer.
Make the thin rectangle layer active and click inside it with your magic wand. Open paper 9, copy and paste as a new layer, arrange it in the rectangle, selections, invert, click delete on your keyboard. Deselect and add a drop shadow. Delete the original rectangle layer.
Do the same for rectangle 2 layer, except don't do the drop shadow. Add a drop shadow to the rectangle 1 layer.
Make small circle 1 layer active, click inside it with your magic wand. Add a new raster layer, and flood fill with #880306. Deselect. Apply the blinds effect (found in texture effects) with the following settings:
width 6
opacity:50
light from top and horizontal both checked
color black.
Delete the original circle layer.
Do the same for small circle 2.
Add a drop shadow to both small white circles.
Make the word art layer active. Set the background to #de4497 and the foreground to #880306. Now take the color replacer tool and drag it over the word art. The pink will change to red.
Open paper 4, copy and paste as a new layer, bring it to the bottom. Open the mask, go to layers, new mask layer, from image, and in the drop down box, search for your mask. If you are using the same one I am, make sure you have invert mask transparency checked. Delete the maks, and merge the group. Resize the mask if you'd like. I resized mine by 90%.
Add any other elements you'd like to it. I added a doodle and a glitter.
Add your copyright and credits as needed, and your name.
Crop and resize and then save. If you want it to be transparent, then save as a .png.
Subscribe to:
Post Comments (Atom)
No comments:
Post a Comment