 For this tutorial you will need the following:
Tube of choice: I am using the wonderful artwork of Ismael Rac which you must purchase at AMI to use.
Scrap kit of choice. I am using Monti's PTU kit called It's Snow Time which you can also find at AMI.
Mask WSL Mask 81 which you can get at Weescotslass Creations. You can find the links to all her masks just a little way down on the right side.
Fonts of choice. I used FFF Urban, LD Warm Heart
Plugins: Penta.com Color Dot, Eye Candy 3.1 Glow (or another version of Eye Candy graident glow if you have that instead)
Keep in mind, tube selection, scrap kit element choices, etc are all subject to your likes and dislikes. You don't have to use the same ones I use, mix it up and make it how you want, be creative!
Open a new canvas sized 700 x 700 so you have plenty of room to work, and you can crop it at the end to get rid of any excess edges. Flood fill it with white so you can see what you're doing as you're working.
With your foreground set to #8c9ca9 and your background set to blocked off (click the last circle under the colored square) draw out a large elipse with your preset shape tool. Objects, align, center in canvas, convert to raster layer.
Take your selection tool set to rectangle and draw out a rectangle on the left side of the oval you just drew out. Apply Penta.com Color dot with the following settings going from top to bottom, 90, 2, 255, 255, 255. Deselect.
Do the same thing as above in two or three more spots on your oval shape until you get the dottted areas how you like them on your oval.
Make sure you are still on your oval layer, selections, select all, float, defloat, modify, expand by 5. add a new raster layer and flood fill with #e5d7aa. Deselect.
Adjust, add/remove noise, and add noice with the following settings: Gaussian, monochrome checked, amount set to 50. Add drop shadow of 1, 1, 60, 5 or a drop shadow of your choice.
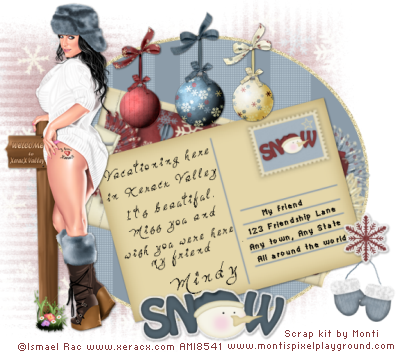
Open one of the post cards elements. I'm using postcard #2. Copy and paste it as a new layer on your canvas. Resize it by 85% and rotate it to the left by 15. Add drop shadow. Move it to the bottom right area of your oval.
With your text too, use a nice pixel font, with the anti-alias set to off, (which helps keep pixel fonts from looking raggedy) type in the address area a name, or just my friend, or something like that, and a fake address. I used on the top line, on the next line: 123 Friendship Lane, on the next line: Any Town, Any State, on the last line: All Around the world. Rotate each line by 15 to the left as you place it on your card and align it how you'd like. When you get done, merge all the address lines together.
Take a nice hand writing font and write a little note on the left side of the postcard, make sure you put your anti-alias back to sharp. I chose to write "Vacationing here in Xeracx Valley. It's beautiful. Miss you and wish you were here my friend," because my tube had "Welcome to Xeracx Valley" on the sign post, so I thought it was a good place to say she was vacationing. And below that, your name. Rotate all the lines to the left 15 and merge the text lines all together, except your name if you want to make the tag for others, so leave that on a separate layer.
Open paper 1, copy and paste it as a new layer, and move it down so it is just above your white background layer. Open your mask in PSP and then click layers, new mask layer, from image, scroll down in the box and find the mask, click on it, click ok. Delete the mask layer and merge the groups together. Lower the opacity to around 70.
Open three of the Baubble elements and a bow element. Copy and paste the first baubble as a new layer. Resize it about 30% and move it to the top so that the little eyelet is touching on the cream colored band around the blue oval, add a drop shadow. Do the same for the next two baubbles but resize them at about 25%.
Copy and paste your bow and resize it by 25%. I used a different color bow for each baubble, depending on the color ribbon it was hanging by. Add a drop shadow to each ribbon as you go.
Open a mitten element (I used Mittens9) copy and paste as a new layer, and resize by about 25% add a drop shadow and move them down near the bottom right corner of the postcard.
Open a snowflake element, resize by 25% and then add a white glow, with the width set at 5. Add your drop shadow. Bring it down to the bottom right corner, and place it over the top of the little string on the mittens.
Open the Snow word art 3, resize by 40%, add the same glow and drop shadow you used on the snowflake. Move to the bottom of your tag.
Open your journal 1 element. Copy and paste it as a new layer and then move it below your postcard layer. Rotate it to the right by 15.
Add your copyright and license info, delete your white background layer, crop and resize as necessary. Save as a .png file so it will be transparent and you're done!
For this tutorial you will need the following:
Tube of choice: I am using the wonderful artwork of Ismael Rac which you must purchase at AMI to use.
Scrap kit of choice. I am using Monti's PTU kit called It's Snow Time which you can also find at AMI.
Mask WSL Mask 81 which you can get at Weescotslass Creations. You can find the links to all her masks just a little way down on the right side.
Fonts of choice. I used FFF Urban, LD Warm Heart
Plugins: Penta.com Color Dot, Eye Candy 3.1 Glow (or another version of Eye Candy graident glow if you have that instead)
Keep in mind, tube selection, scrap kit element choices, etc are all subject to your likes and dislikes. You don't have to use the same ones I use, mix it up and make it how you want, be creative!
Open a new canvas sized 700 x 700 so you have plenty of room to work, and you can crop it at the end to get rid of any excess edges. Flood fill it with white so you can see what you're doing as you're working.
With your foreground set to #8c9ca9 and your background set to blocked off (click the last circle under the colored square) draw out a large elipse with your preset shape tool. Objects, align, center in canvas, convert to raster layer.
Take your selection tool set to rectangle and draw out a rectangle on the left side of the oval you just drew out. Apply Penta.com Color dot with the following settings going from top to bottom, 90, 2, 255, 255, 255. Deselect.
Do the same thing as above in two or three more spots on your oval shape until you get the dottted areas how you like them on your oval.
Make sure you are still on your oval layer, selections, select all, float, defloat, modify, expand by 5. add a new raster layer and flood fill with #e5d7aa. Deselect.
Adjust, add/remove noise, and add noice with the following settings: Gaussian, monochrome checked, amount set to 50. Add drop shadow of 1, 1, 60, 5 or a drop shadow of your choice.
Open one of the post cards elements. I'm using postcard #2. Copy and paste it as a new layer on your canvas. Resize it by 85% and rotate it to the left by 15. Add drop shadow. Move it to the bottom right area of your oval.
With your text too, use a nice pixel font, with the anti-alias set to off, (which helps keep pixel fonts from looking raggedy) type in the address area a name, or just my friend, or something like that, and a fake address. I used on the top line, on the next line: 123 Friendship Lane, on the next line: Any Town, Any State, on the last line: All Around the world. Rotate each line by 15 to the left as you place it on your card and align it how you'd like. When you get done, merge all the address lines together.
Take a nice hand writing font and write a little note on the left side of the postcard, make sure you put your anti-alias back to sharp. I chose to write "Vacationing here in Xeracx Valley. It's beautiful. Miss you and wish you were here my friend," because my tube had "Welcome to Xeracx Valley" on the sign post, so I thought it was a good place to say she was vacationing. And below that, your name. Rotate all the lines to the left 15 and merge the text lines all together, except your name if you want to make the tag for others, so leave that on a separate layer.
Open paper 1, copy and paste it as a new layer, and move it down so it is just above your white background layer. Open your mask in PSP and then click layers, new mask layer, from image, scroll down in the box and find the mask, click on it, click ok. Delete the mask layer and merge the groups together. Lower the opacity to around 70.
Open three of the Baubble elements and a bow element. Copy and paste the first baubble as a new layer. Resize it about 30% and move it to the top so that the little eyelet is touching on the cream colored band around the blue oval, add a drop shadow. Do the same for the next two baubbles but resize them at about 25%.
Copy and paste your bow and resize it by 25%. I used a different color bow for each baubble, depending on the color ribbon it was hanging by. Add a drop shadow to each ribbon as you go.
Open a mitten element (I used Mittens9) copy and paste as a new layer, and resize by about 25% add a drop shadow and move them down near the bottom right corner of the postcard.
Open a snowflake element, resize by 25% and then add a white glow, with the width set at 5. Add your drop shadow. Bring it down to the bottom right corner, and place it over the top of the little string on the mittens.
Open the Snow word art 3, resize by 40%, add the same glow and drop shadow you used on the snowflake. Move to the bottom of your tag.
Open your journal 1 element. Copy and paste it as a new layer and then move it below your postcard layer. Rotate it to the right by 15.
Add your copyright and license info, delete your white background layer, crop and resize as necessary. Save as a .png file so it will be transparent and you're done!

Saturday, December 5, 2009
Vacation in Xeracx Valley
For this tutorial you will need the following:
Tube of choice: I am using the wonderful artwork of Ismael Rac which you must purchase at AMI to use.
Scrap kit of choice. I am using Monti's PTU kit called It's Snow Time which you can also find at AMI.
Mask WSL Mask 81 which you can get at Weescotslass Creations. You can find the links to all her masks just a little way down on the right side.
Fonts of choice. I used FFF Urban, LD Warm Heart
Plugins: Penta.com Color Dot, Eye Candy 3.1 Glow (or another version of Eye Candy graident glow if you have that instead)
Keep in mind, tube selection, scrap kit element choices, etc are all subject to your likes and dislikes. You don't have to use the same ones I use, mix it up and make it how you want, be creative!
Open a new canvas sized 700 x 700 so you have plenty of room to work, and you can crop it at the end to get rid of any excess edges. Flood fill it with white so you can see what you're doing as you're working.
With your foreground set to #8c9ca9 and your background set to blocked off (click the last circle under the colored square) draw out a large elipse with your preset shape tool. Objects, align, center in canvas, convert to raster layer.
Take your selection tool set to rectangle and draw out a rectangle on the left side of the oval you just drew out. Apply Penta.com Color dot with the following settings going from top to bottom, 90, 2, 255, 255, 255. Deselect.
Do the same thing as above in two or three more spots on your oval shape until you get the dottted areas how you like them on your oval.
Make sure you are still on your oval layer, selections, select all, float, defloat, modify, expand by 5. add a new raster layer and flood fill with #e5d7aa. Deselect.
Adjust, add/remove noise, and add noice with the following settings: Gaussian, monochrome checked, amount set to 50. Add drop shadow of 1, 1, 60, 5 or a drop shadow of your choice.
Open one of the post cards elements. I'm using postcard #2. Copy and paste it as a new layer on your canvas. Resize it by 85% and rotate it to the left by 15. Add drop shadow. Move it to the bottom right area of your oval.
With your text too, use a nice pixel font, with the anti-alias set to off, (which helps keep pixel fonts from looking raggedy) type in the address area a name, or just my friend, or something like that, and a fake address. I used on the top line, on the next line: 123 Friendship Lane, on the next line: Any Town, Any State, on the last line: All Around the world. Rotate each line by 15 to the left as you place it on your card and align it how you'd like. When you get done, merge all the address lines together.
Take a nice hand writing font and write a little note on the left side of the postcard, make sure you put your anti-alias back to sharp. I chose to write "Vacationing here in Xeracx Valley. It's beautiful. Miss you and wish you were here my friend," because my tube had "Welcome to Xeracx Valley" on the sign post, so I thought it was a good place to say she was vacationing. And below that, your name. Rotate all the lines to the left 15 and merge the text lines all together, except your name if you want to make the tag for others, so leave that on a separate layer.
Open paper 1, copy and paste it as a new layer, and move it down so it is just above your white background layer. Open your mask in PSP and then click layers, new mask layer, from image, scroll down in the box and find the mask, click on it, click ok. Delete the mask layer and merge the groups together. Lower the opacity to around 70.
Open three of the Baubble elements and a bow element. Copy and paste the first baubble as a new layer. Resize it about 30% and move it to the top so that the little eyelet is touching on the cream colored band around the blue oval, add a drop shadow. Do the same for the next two baubbles but resize them at about 25%.
Copy and paste your bow and resize it by 25%. I used a different color bow for each baubble, depending on the color ribbon it was hanging by. Add a drop shadow to each ribbon as you go.
Open a mitten element (I used Mittens9) copy and paste as a new layer, and resize by about 25% add a drop shadow and move them down near the bottom right corner of the postcard.
Open a snowflake element, resize by 25% and then add a white glow, with the width set at 5. Add your drop shadow. Bring it down to the bottom right corner, and place it over the top of the little string on the mittens.
Open the Snow word art 3, resize by 40%, add the same glow and drop shadow you used on the snowflake. Move to the bottom of your tag.
Open your journal 1 element. Copy and paste it as a new layer and then move it below your postcard layer. Rotate it to the right by 15.
Add your copyright and license info, delete your white background layer, crop and resize as necessary. Save as a .png file so it will be transparent and you're done!
Subscribe to:
Post Comments (Atom)
Love what you did with my kit x
ReplyDelete